How To Prepare a Body for Primming & Painting


Author: 
Warren (Primera Man)
Description: 
A "How-To" on preparing a model before painting it. 
Contact:  [email protected]
*NOTE* PLEASE READ and UNDERSTAND TUTORIAL BEFORE YOU BEGIN! :)


Make sure you sand the car well...removing molding lines etc.  Finish off with 1200 grit paper.  Before painting, heat the can up in hot water for 10 minutes so it flows better from the can.  Two Coats of white primer:  First coat very light, the second coat so that it covers the model. Don't be to fussy if it still looks a bit "see-though."  Leave for a week to harden the primmer.

Three - Four Coats of final paint about 5-10 minutes apart....that's it...nice and simple (keep the can warm).  The first coat is a very light mist coat...the paint should only just be landing on the car.  Do the same for the second coat.  The third coat you can spray a bit more heavy.  The last coat is the one you want to get perfect.  I always spray the front and rear bumpers first...then both sides along the whole length of the car body.  Then the last bit I do is the bonnet/boot and roof.

Don't bother sanding between coats as I don't really see the point...all you are doing is making more dust and removing half the paint you have just stuck on.  After you have finished the last coat...leave for 10-12 days.......rub with some compound then finish with a wax.

NOW THE NEW PARTS !!
Once you have finished removing the molding lines and sanding the body, give it a good wash in hot soapy water, then finally wash the whole car with hot water straight from the tap....using a good soft brush to get into all parts of the body.  This gets rid of all the small sanding particles left on the body.
Once you have done this, shake off as much water as you can, then using your soft brush, brush all the water off the car so it don't dry in "spots" on the body.  Once you have done this, you want to keep the car as clean as possible from dust.  Place the body straight into a plastic container with a lid to stop any crap getting into the box and onto the car. This is AS CLEAN as you will get it and you want to keep it like it !! See pic....


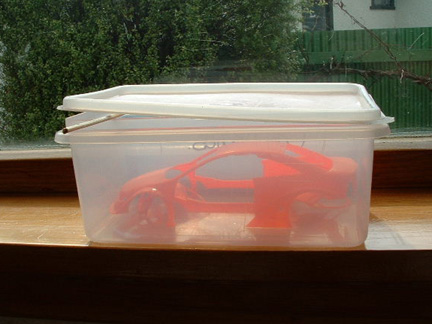
I put a tooth pick under the lid just so that it can "breath" a little as it dries.  Leave the car to dry for awhile.  A good day is how long I leave mine.  IMO this is so important as there is so much crap floating around in the air, and it lands on your model....SO KEEP IT CLEAN !!  After a day or two, take the body out ready for painting.  Attach it to your painting frame and give it a final brush and a good blow.
Now your ready to paint !!!
Spray the primmer on.
In between coats I put it straight into the microwave as this is a great DUST FREE place....this is were I think a lot of people muck up as they leave it in the room to dry....but as its drying its also attracting the very small dust particles which stuff up a good paint job......this is what is giving you a lot of paint finishes that are "rough" looking....because the dust is being trapped under the paint.

Well...that's all. Most have your own ways of doing it, but this is what I have found to work the best for me.

JDMF © 2003

Hosted by www.Geocities.ws

1