|
|
||||
 |
If you have a 95+ Talon or Eclipse, odds are you too have a "flakey fuel guage. If your car's guage reads "E" and you fill up with about 10 gallons of fuel, you have this problem. The 2G tank holds about 13 gallons including the filler neck. The FWD and RWD have different tanks, but the same basic problem (and the same solution). Also, if it seems that your "low fuel" light never comes on, or only flashes occasionally when the guage clearly reads "E", then this is for you. The fuel light is right, you DO
still have gas left, about 2-3 gallons (Which is why it flashes, since it comes on at about 2-2.5 gallons) Project Overview/Theory: To best understand the theory, we will start with the FWD, since it works the same
but has fewer parts. The gas guage in the 2G FWD works as follows: Power from the battery flows through the guage in the dash, throguh a yellow wire to the "sender" unit, and through the sender to ground. Now, the
sender is a variable resistor, who's value is controlled by the float. When the float is all the way "up" and the tank is full, the Now, on the AWD, the gas tank has a "hump" down the middle for the driveshaft to go through, so below 1/2 tank you really have 2 tanks. (Because the one is divided by the hump). Becuase of this, the DSM engineers used 2 senders, one in each half. Each sender is identical to, but have 1/2 the resistance of, the FWD sender. They are connected in series. So, the net result is exactly the same as the FWD, and the same guage and wiring are used in both cars. In the AWD at full, both senders read 2 Ohms, and 2+2=4, same as the FWD. The "Idiot Light" is a SEPERATE circuit, and has NOTHING to do with the guage at all. You could completely remove it and the guage would still function. And vice-cersa. The "Light" works similar to the guage. Electricity flows from the battery (+12V) through the light, to the sender, and then to ground. In this case, the sender is a Thermistor. A thermistor is a lot like a switch - when it is submerged in fuel its resistance is very high, when its in air it is very low. So, since the termistor hangs about 1/2" off the bottom of the tank, when you have 1/2" of fuel left (2.5 gallons) and the thermistor is not being sloshed under fuel constantly, its resistance falls to near zero, current flows, and the light lights up. The idiot light is exactly the same on both FWD and AWD cars, and is located in the drivers side sender on the AWD cars. Now, I came upon the realization that my car should be holding more fuel, and I did a ballsy thing. I drove it past E. Waaaaay past E. Think Seinfeld when Kramer test
drove the Saab. I went almost 75 miles before I gave up. Now, in this process the idiot light lit solid about 20 miles after E was indicated. It stayed solid all the way to 75 miles, when I filled up and began thinking
about what was going on. The next weekend, on less than 1/4 tank of gas showing, I removed the senders from my car and measured the resistance per the manual. They were within spec. Exactly in spec in fact. So I
figured that it has to be a manufacturing defect in the GUAGE cluster. Now, several people have advocated moving the needle on the guage. Well, that works sort of. All you have really done though is move the problem
from one end of the scale to the other. Now your guage will read F for ever when you fill up, and then drop quickly to E. I wanted a better solution. Bending the control rods on the senders would simply amplify the problem, so I thought that an electrical solution would be best. What is needed is a solution that does not
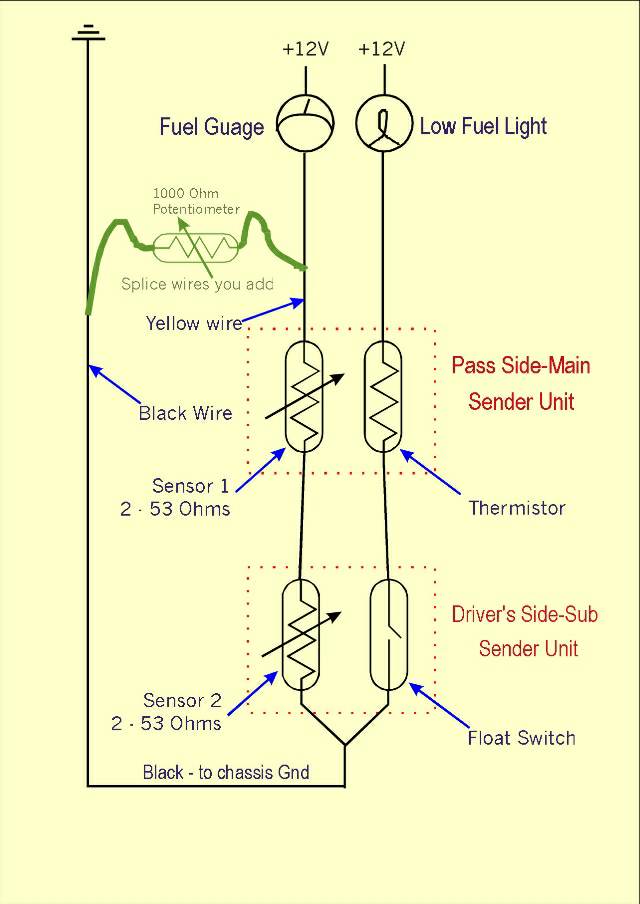
affect the F end of the scale at all, while allowing an adjustment to the E end of things. Well, it turns out that this is VERY easy and cheap to do. Please refer to Figure 1, You will notice that we have the AWD circuit diagramed here. If you follow the path of electricity from the
battery, through the guage, through both senders, and to ground, you will notice that the more electricity flows through the senders, the higher the neele in the guage reads. The less that flows the lower it reads. For
those of you non-electronics people out there, think of the wires as a pipe, and the two senders as valves. The "water" flows in through the top, through our "Water meter" and through both valves before exiting. If we
shut off the valves a bit, the "water meter" will show less water flow (current). Now, when both valves are open (low resistance - full gas tank) the water flow meter reads high. When both are nearly closed (high
resistance - empth gas tank) the water flow meter reads low. Our problem is that when both valves (senders) are in their highest resistance state (tank empty) the water meter is In reality what we do is to wire a small "variable resistor" between the power wire from the guage to the sender, and connect the other end to ground. This allows MORE current to flow through the guage, and gives it a place to go (to ground). Figure 1: Here's the schematics I created for the Fuel system on the 2G AWD DSM cars. Project details are at the bottom. Sorry these are so big, but that's so you can see what I'm talking about.
Now, on to the project. Here's the 'Project' Part, if you can even call it that. Materials required: Soldering iron, solder,
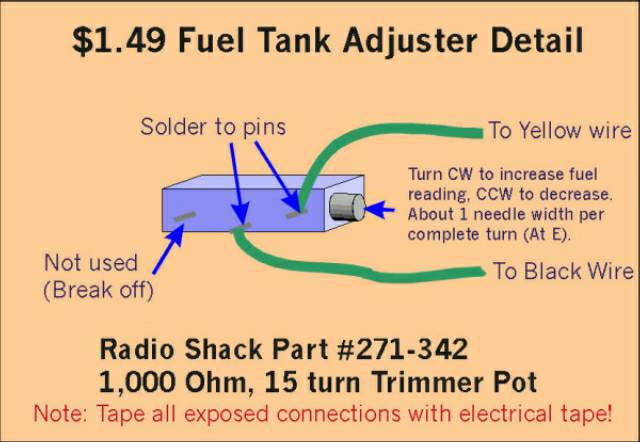
1000 Ohm (1K Ohm) trimmer pot, 2' of wire, 2 "Scotch lock" wire tap connectors (RS #64-3052, $1.69 for 10). Remove the back bottom seat from the car. (Pull tabs and lift) Under the passenger side you will find a small metal "door" and a white wire loom going to it. Unscrew the white wire loom cover and untape it from the wires. Locate the YELLOW (no stripes, just little silver tick marks) wire, and the thick black wire. Now, go inside and assemble your fuel tank adjuster as shown below.
Cut or break off the last terminal, solder one foot wires to the other two. Cover everything with electrical tape, and leave the screw sticking out. Connect one end to the yellow wire in the
car, and the other to the thick black one. DON'T cut the wires in the car, simply splice into them with the scotch locks. (wire taps)
Reassemble the wire loom guard, but leave your adjuster hanging out into the rear seat footwell. (You will need to adjust it). Now, to adjust it you MUST run the car out of gas. People have asked a zillion times for a
"magic number". Well, there isn't one. The guage is finicky and each car I have done is somewhat different. I suggest doing this mod when you are already close to running out (light
has been on for at least 20 miles or more). Now, put a 1gallon gas can in your trunk ($4 at K-Mart) with a gallon of gas in it. And drive
until you feel the car running out (you'll know). Once it starts to stumble (usually around a right
Once you think you have got it where you want it (I put mine 1 needle below E) WAIT another couple minutes to be sure the guage is settled. Then get out and dump in your gallon of gas and go to a gas station. You are finished! Once you have drived all the way to E and are happy with the results, tuck the adjuster up into the wire loom, tape it up, and you are done. |
| [Turboland] [Aircraft Home] [DSM Home] [Snowboarding] |
Unless otherwise noted, all pages and images copyright (c) 1998-1999 Jeff Brinkerhoff, all rights reserved. Email Jeff Brinkerhoff |