Shaping the Tool
Shaping is done with power equipment.
You can do some things with a file
or stone, but making blades from scratch requires power, especially when you are
using hardened materials. The Dremel, with all its attachments is a good start.
There are the abrasive wheels, stones, and sandpaper cylinders in various
grits. An 8" two wheel grinder will make
the work easier, also. But, even more so than with the Dremel, you must go slow and keep the blade
cool. I use a wet rag and keep water handy to cool between each
short grind. Feel the blade between your fingers after each grind and if it is too hot to hold,
it's too hot. Slow down and use shorter grinds.
I also use a belt sander, various sanding cylinders and disks mounted on old motors, and
a slow speed sharpener made with an old dryer motor that had a double ended
shaft. As you see, I like old motors. You can pick
them up at flea markets and garage sales. I am also not above asking a
neighbor if I can scavenge the motor out of the washing machine or dryer he has
put out on the curb for the trash. A keen eye is worth real money when it
comes to getting treasures out of trash. I just have to be careful that my
wife isn't looking.
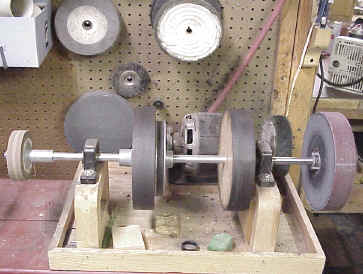 |
My original sharpener was made similar to one sold by John
Burke for $300. If you don't want to build your own, you can buy his.
He has a smaller RV version (only 2 wheels) available for about $250.
They run at about 300 rpm. The motor has dual shafts and the
buffing wheel is mounted directly on the motor shaft so that it runs at the full 1750
rpm. The small 4" diameter grinding wheel on the left running
at the 300 rpm speed produces less heat than larger faster wheels. It is slow
enough to use with water so I used it as a wet grinder. This allowed
me to shape tools with even less chance of burning. The 4"
diameter produces a #5 sweep. A 6" stone will produce a #3
sweep. (For deeper sweeps, I use smaller sanding cylinders
on a Dremel.) The end wheels are easily changed so that other wheels
and grits of sand paper can be used when needed. |
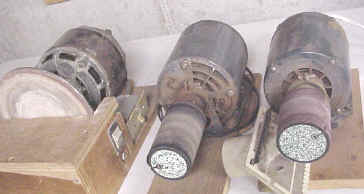
| An old motor, a little scrap wood, and a sanding cylinder or
disk makes a great tool. I use several to finish shaping, smooth, and even sharpen blades and
gouges. These devices can be made with little cost, time or effort. The
sanding cylinders are the most expensive part and cost about $25
each. The disk is available for under $10. These three motors
came from
a dryer, an old furnace and a garage door
opener. I use the older motors. New washing
machines today have motors that are hard to re-use. They have been cheapened
and seldom have a full case. They can be used, but require a little
more work building an enclosure and mount. |
 |
|
What I didn't know was just how much more efficient it would be.
A simpler version of this belt sander was shown in the November-December
1992 Chip Chats. But, I didn't realize the benefits until I was able
to use one during a Gerald Sears Seminar. After that, I had to have
one. |
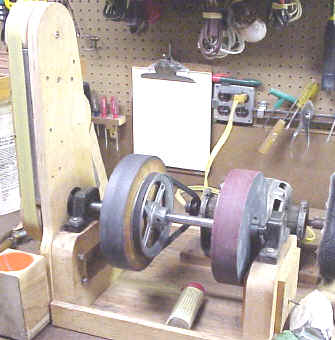
After happily using the original sharpener for a year or
two, I ran across a version of a belt sander specifically designed for
sharpening knives. I am a member of the Gateway Area Knife Club and
am familiar with all the belt sanders that real knife makers use, so it
shouldn't have been a surprise that the belt sander is faster and more
efficient than the sandpaper wheels I previously used.
|
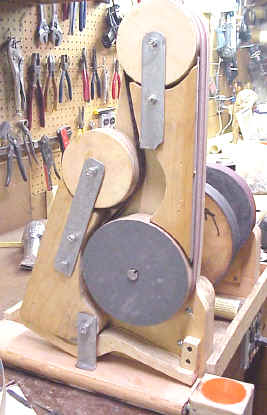
| So, I proceeded to remove both the left and right wheels of
my original sharpener. The left wheel was modified and used to drive
the belt. The right wheel was removed and the shaft shortened to
provide better access to the buffing wheel. The center two wheels were
kept as-is to be used for knives. Flat surfaces are better for
knives while the sanding belt works for "V" tools, gouges and
most other tools. |
After a month of problem solving, I came up with the
arrangement shown. I use 80 (or less) grit for rough shaping new
blades, and work my way up to 220 (or greater) for final sharpening.
A used 220 belt works fine for retouching a slightly dull tool and the
final buffing finishes the process quickly and efficiently. Buffing
alone will keep a knife or gouge in tip top shape without using the
sanding belt or wheel. |
Blade Shapes:
Hollow
For a hollow grind, the edge is made by grinding two concave sides. If done right, this leaves the edge
thinner than most blades. It is very sharp and easy to push through the
wood. It produces the exceptionally good, clean slicing required for woodcarving. It is less suitable for
rapid removal tasks. The same thinness that gives the edge such great slicing performance also makes this
blade more prone to chipping during high stress carving. This edge
should be used for chores that emphasize clean cutting over impact and rough-out
use. To make this blade, the face must be ground on a wheel with the
desired radius. A 6" or 8" wheel usually provides enough curve
for our purposes, but a 4" wheel will really give a concave surface.
It is harder to grind because you need a steady hand and/or a tool rest.
Making this blade out of a straight razor blade makes it easier, since they are
already hollow ground. See Make your First
Knife section.
Convex
This grind has the sides of the blade arcing down in a convex curve to the edge. The edge on this
blade is often very sharp because the convex curves run all the way to the edge without a secondary bevel. It is also a strong edge, because the thin edge thickens quickly enough to have plenty of metal behind it.
It is useful for rough out chores. It is also better for carving a small
radius turn because it doesn't dig in as readily as the hollow ground blade and will
turn back easier without splintering. The main drawback of this blade is that it is
more difficult to shape and to sharpen. Also, it doesn't slice through the
wood as easily as the other two grinds, even though it is correctly sharpened. You can sharpen the edge in a normal manner, but then
you will end up with just a regular
flat edge. Knife makers that have slack belt sanders can do it fairly
easily with practice. Using flat stones and wheels makes it more
difficult.
Flat
The flat grind is a shape that combines most of the cutting ability of the hollow grind, with most of the strength of a
convex grind. Flat bevels run all the way from the spine to the edge. This can leave the edge thin for high-performance. However, the edge thickens
so it ends up stronger than a hollow ground blade. The combination of cutting ability and strength makes this a
good all-around grind.
This is also the grind that chip carvers use almost exclusively. It
is the easiest to grind on the flat stones and sanding disks. It is also
the easiest to maintain.
A Good Point
The point of any blade (as well as the corners of gouges) are the most
difficult part of the tool to grind and keep sharpened. The fragile point
is easily broken or damaged. Any knife will land on its point when dropped
because the blade cuts through the air easier. Well, that may be a little
stretch, but it sure seems like it happens that way. Anyway, the thin
point or corner has less metal to conduct the heat away and is the first to get
hot and the easiest to over heat. When you see the point turn blue, its
over. You have to reshape the tool and get back to new metal.
Therefore, take your time, especially on power tools. Use a minimum of
pressure and short grinds. Feel the tool after each grind. If it is
hot, give it time to cool. Use water or a wet rag. Shorten your
grind time even more. If possible, use your thumb to apply pressure to the
blade. You will know if it is getting too hot. Dip the tool in water
so that it is wet and stop the grind when the wetness disappears. Practice
- practice - practice.
Gouges
Shaping gouges out of spade bits or chisels is relatively easy. This is
done with any grinding medium that has the curve you want. A 6" stone will produce a #3
sweep. A 4"
diameter stone will produce a #5 sweep. For deeper sweeps, I use smaller sanding cylinders
on a Dremel. They come in many sizes and grits and you can pick the
size you need. Start with the roughest grit and work your way down
to the finest. Complete the tool by hand with finer and finer sandpaper
and finally by buffing with a cloth wheel. Get all the sanding marks out
for the best results. Any sanding mark in the cutting area will make the
tool drag. If it is on the edge, it will leave marks on the cut
surface. A definite no-no.