 Perce Rock, Quebec,
Canada
Perce Rock, Quebec,
Canada
by John Boretos
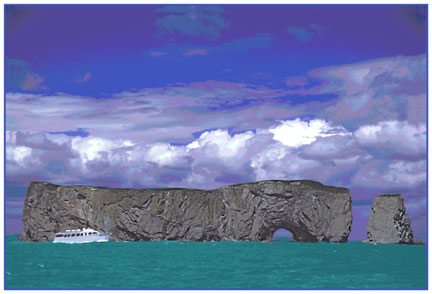
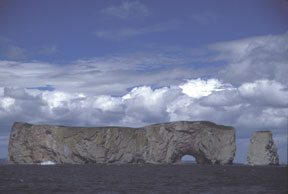 Original Image
Transformation and
Realistic Posterization Combine with
Original Image
Transformation and
Realistic Posterization Combine with
Hue/Saturation and Replace Color for a pleasing result
Here is how it was
done.
Step1 - Posterization
Select the sky only. For this posterization style use a minimum
amount i.e.,
Image > Adjustments > Posterize > Level =10.
(The higher the posterization setting that is selected, the less
it will be posterized.)
In this case I just wanted to emphasize the color in the sky.
With the sky still selected, go to Hue and Saturation.
Move the Saturation slider to +15 and the Hue slider to +10.
Click OK and Deselect
This will produce a striking sky that is unlike any other.
Step2 - Transformation
The boat is too small for the picture and since boats come in
all sizes,
there is no other reference to suggest that the rock is any smaller
that it is in real life.
Increase the size of your viewing image to 100% for ease of capture.
Use the Magnetic Lasso Tool and select the outline of the small
boat.
Go to Edit > Transform > Scale.
A new selection pattern appears over the boat with drag points
indicated.
Grab the upper right corner and drag in an upward and diagonal
direction
until the boat is the size you want it to be.
Click on the move tool and a choice of accepting or rejecting
the
transformation will be shown. Choose > Apply (transformation).
Dress up the boat with the Clone tool to correct for any
minor imperfections in the now larger boat which now balances
the photo.
Step 3 Use Hue &
Saturation
Hue and Saturation was opened to add a green color to the overly
dark blue water.
Check the Colorize box to add color to the water.
The color and amount is determined by the following Settings:
Hue= 185, Saturation = 54, Lightness = +70.
Click OK
Step 4 Use of Replace
Color
Replace Color was used to bring out the dark detail of the ripples
in the water.
Open Replace Color and select the dark area of the water.
Set the Fuzziness slider for Selection.
Adjust the Fuzziness slider until only the water and the ripples
show in the Preview window.
Adjust the Lightness slider to -10 (minus makes it darker).
Click OK.
Do the same Replace Color procedure for the highlighted area of
the rock.
Sample the rock with the + eye dropper in Replace Color.
Set the Fuzziness slider (to approx 36) so that only the highlighted
rock
shows in the Preview window.
Adjust the Lightness for +11 and the Saturation to +22.
Click OK
Dress up any imperfections in the water and the rock with the
clone tool.
All of this was done on a single layer so there is no need to
flatten.
Filter > Sharpen > Unsharp Mask
Step 5 Border
Place a white border around the photo.
Go to Image > Canvas Size. Add 0.2 to the length and width.
Click OK. If the overall size is critical, then use the Stroke
method
or simply go to Image > Image Size and reduce the
overall dimensions by 0.2 in length and width.
Done
Music Box