 Leaf Explosion
by John Boretos
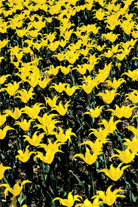 Original Image - Bed of Yellow
Tulips
Use of Blur Filter
and Leaf Brush in Adobe Photoshop 7
Original Image - Bed of Yellow
Tulips
Use of Blur Filter
and Leaf Brush in Adobe Photoshop 7
~~~~~
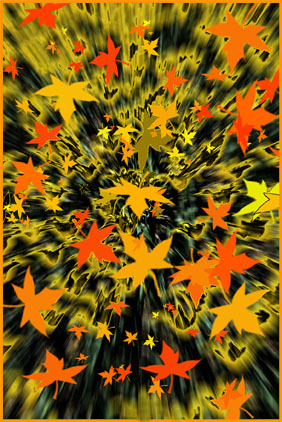
Leaf Explosion is a field of tulips
transformed into an explosion of colorful leaves.
Only the Blur Filter and Leaf Brush Tool are used. The result
depends mainly on the settings used.
This is but one example of the infinite variations possible with
these two tools.
Here are the steps used.
Layer 1
Apply the Blur filter to the original
field of yellow tulips
Filter > Blur > Radial Blur as follows:
Amount = 20, Blur method = Zoom, Quality = Best
This produces the exploding look to the yellow tulips.
Darken the background by Image > Adjustment > Replace Color.
With the + eyedropper selected, slide the Lightness bar to –
100. Save.
Layer 2
Make a new layer by Layer >
New > Layer
Set foreground custom color picker for orange (Pantone 1375C).
by double clicking on the
foreground color in the toolbox, select Custom from the Color
Picker and then search for the orange color.
Select the Maple Leaves Brush , on the horizontal tool options
bar at the top of screen.
Scroll through the various brushes until you come to the Maple
Leaves Brush and select size.
Brush > Maple Leaves > size 395, Normal, 100% Opacity and/100
% Flow
(Flow controls the intensity of the color.)
If you use the default settings for the leaves there is nothing
more to set - or set your own as described below.
Click and drag at the same time with a twist of the wrist to get
large groups of leaves to appear. Each click should produce somewhere
around 6 leaves of varying size and color.
~~ Design your own settings ~~
There are unlimited variations possible
but here is an example of what to look for:
Go to top of screen for Window > Brushes to open the Brushes
palette.
On the left side click is Shape dynamic, Scattering, Color Dynamic,
and Other Dynamic.
Double click on Shape Dynamic to open new listing on the right
side.
Set Size Jitter to 100%, Fade control to 50, Min Diameter 1%,
Angle Jitter 100%,
Roundness Jitter 56%, Control to Off, Minimum Roundness 25%.
Now click on Scattering and set Scatter @ 449%, Count 4, Count
Jitter 98 %, and Control Off.
Layer 3
Add even more leaves.
Layer > New > Layer.
To fill in with even smaller leaves set brush size to 130. Repeat
process in this layer until you like the look.
Merge Layers
Merge layers via Layer > Flatten
Image
Add a border to the image by
Select > Select All followed by File > Edit > Stroke
Keep Pantone 1375C color and set Stroke to 12 px, Inside.
Sharpen using Filter > Sharp
> Un-sharp mask.
Save.
That’s it!
Music Box
|