|
|

I designed this quilt to use 4" HSTs from a quilt swap. With 4" HSTs, it makes a large quilt.

Fabric Requirements
to make complete quilt shown above
Overall Size.....78"x102" finished
Block Size.....24" finished
Border.....2" finished
Light Green: 3 1/8 yd
Dark Green: 1 yd
Blue: 1 yd
5" charms -- mixed color: 72 charms
5" charms -- COC: 72 charms -- OR -- 1 5/8 yd
This quilt is composed of 2 blocks, in a straight set
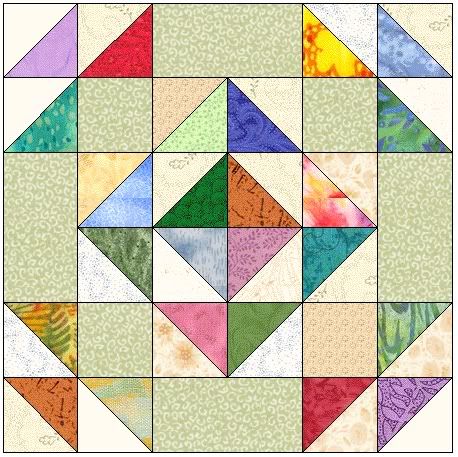
The quilt above is made with 6 of Block A & 6 of Block B
for a total of 12 blocks
At 24" finished, the blocks are much bigger than normal,
so once your blocks are done, the quilt is nearly finished
Block A
Summer Winds Block
The quilt above used 4" HST units collected in a quilt swap.
However to make a variety of HSTs I would suggest using purchased,
collected, or swapped 5" charms, trying not to have more than 4
5" squares from any single fabric.
Each block needs 24 squared up HSTs, 4" finished size,
4 1/2" unfinished.
The full quilt will use 144 finished HST units.
To make these scrappy units, you will sew 5" printed charms
to a 5" COC square, following the technique below
For the quilt top above, 144 HST units are required
You will need 72 EACH 5" squares of COC & print squares
If you choose to make all your COC charms from a
single fabric, then you will need to cut
11 strips of COC at 5" x WOF
then, cut into 5" squares
First, draw a line down the center diagonal of the COC
fabric. Then place a COC and print 5" square RIGHT SIDES
together, and sew a scant 1/4" seam on EITHER side of
the drawn line then cut apart ON the line, as the photos
below illustrate


Now gently PRESS the HST units open, pressing towards the print
fabric, being careful not to drag the iron and distort the unit
It is CRITICAL at this point to SQUARE UP your HSTs.
The cutting measurements given for the HST units
are deliberately OVERSIZED to allow for trimming.
If you attempt to piece the block without trimming,
your HST units will be too large to match the rest of the pieces.
There are different quilting rulers on the market to accomplish this.
I use the Bias Square ruler from
That Patchwork Place. You will need to trim ALL FOUR SIDES of your HSTs.
This seems unnecessary, but you will be rewarded with perfect points
by making this extra effort.
The photos following illustrate how to square up your HST units

Referring to the photo above, you will need to trim the first two sides.
Line up the diagonal line on the ruler with the seam line
of your HST as shown. Slide the ruler along until your 4 ��
line on BOTH SIDES of the ruler are slightly to the INSIDE of
the bottom edges of your square as shown in the
photo. This is very IMPORTANT, so that you will have sufficient
fabric to trim the final two sides.
The photo below shows the completed first 2 cuts.

Now, you will turn the square to position it for the last two cuts.

Referring to the photo above, you will see that the ruler is now
lined up so the diagonal matches the seam
AND the first two cuts are EXACTLY on both of the 4 �� lines of
the ruler. Carefully make your final cuts,
holding the ruler so it does not slide out of position.
The photo below shows the squared-up HST.

Now you need to cut your light green squares and rectangles
to finish your Summer Winds blocks.
Cut EIGHT (8) strips of light green 4 1/2" x WOF
FIRST, take SIX (6) of the strips and put 2 aside
cut FOUR (4) rectangles 4 1/2" x 8 1/2" from EACH
of these 6 strips. You will have enough at the end of
the strip to cut ONE (1) square, 4 1/2" x 4 1/2"
Now you should have 24 rectangles at 4 1/2" x 8 1/2"
AND
6 squares 4 1/2" x 4 1/2"
NOW, take the last 2 strips and cut into 4 1/2" x 4 1/2"
squares. You should get 9 squares from each strip
Now you should have 24 rectangles and 24 squares
of your light green fabric
Lay out your block as shown in the illustration above
and piece the block. Be sure to mix your colors to
the look that you find most pleasing
With these 6 blocks complete, now we will make the
chain blocks
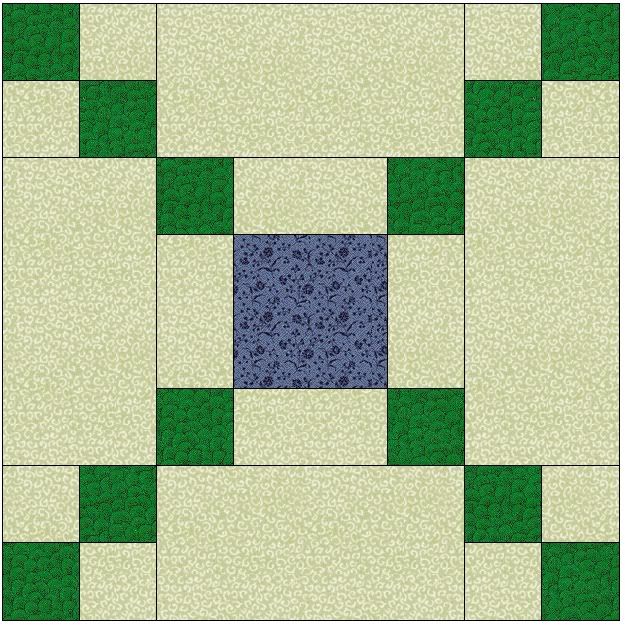
Block B
Chain Block
These blocks are easiest constructed with strip piecing
Light Green Fabric:
Cut 6 strips 3 1/2" x WOF
Cut 4 strips 12 1/2" x WOF
Cut 1 strips 6 1/2" x WOF
Dark Green Fabric:
Cut 6 strips 3 1/2" x WOF
Dark Blue Fabric:
Cut 1 strip 6 1/2" x WOF
4-patch Units:
The 4-patch units are highlighted in orange in the image
below. The 6 blocks will need 24 units

Take FOUR (4) light green 3 1/2" X WOF strips
AND
FOUR (4) dk green 3 1/2" x WOF strips
Place a light green strip and dark green strip RIGHT SIDES
together and sew a 1/4" seam the full WOF.
Repeat for the remaining strips, to give you 4 strip sets
of a light green sewn to a dark green
Press the strip sets to the dark fabric, being careful
not to drag the iron and distort the fabric
Now cut 3 1/2" units from each set, you should get
12 cuts per strip, for a total of 48 units
Finally, sew the units to make 24 4-patch units
Now, take the 4 strips of light green 12 1/2" x WOF
Cut 6 1/2" segments from each strip, you should get
6 cuts per strip, for a total of 24 units 6 1/2" X 12 1/2"
Set aside the completed 4-patches & these rectangles while
you complete the center section of the block
First we will strip piece the units highlighted orange
in the image below

For our 6 chain blocks, we will need 12 of these units
Take ONE (1) strips of 6 1/2" x WOF of light green
AND
TWO (2) strips of 3 1/2" x WOF of dark green
Sew one strip of dark green to EACH side of your
6 1/2" light green strip. Press towards the dark fabric
Cut segments 3 1/2" from this strip set, you should get
12 segments like the one highlighted above
Set units aside while you make the center portion
Finally we will strip piece the center unit highlighted orange
in the image below

For our 6 chain blocks, we will only need 6 of these units
Take your ONE (1) 6 1/2" x WOF blue strip
AND
TWO (2) 3 1/2" x WOF light green strips
Sew one strip of light green to EACH side of your
6 1/2" blue strip. Press towards the dark fabric
Cut segments 6 1/2" from this strip set, you should get
6 segments like the one highlighted above
Assembly
Now you should have all the units necessary to assemble
your blocks.
Refer to the block image and lay out the units,
then, piece in rows like a 9-patch
Finishing
Lay out the 12 blocks in 4 rows of 3 blocks.
By referring to the illustration at the top of this page,
you will see the placement of the blocks so that a chain
effect is created
Piece the top by sewing the 3 blocks for each row,
then sewing the rows together
Once the top is pieced, you may add borders.
The top above has a 2" border.
~~~ Border ~~~
For the border, you will need to cut 9 strips x WOF
IMPORTANT ... IMPORTANT ... IMPORTANT
To keep your quilt square, measure across the CENTER
of the quilt both length & width.
Do not measure the quilt along the edges to get
length of border pieces.
Measure across center, use that one measurement,
then cut both side pieces EXACTLY the same lengths
To sew on, find the center of the top on the edge you
are sewing, and the center of the border strip
and pin, right sides together. Then pin the ends
to the end of the top and then keep pinning
in this manner, easing where necessary.
Then stitch with a 1/4" seam
After the first 2 borders are sewn, press, THEN
measure again through the center to find the lengths
for the final border pieces
Cut, pin and sew the same way
Layer, and quilt as desired, finishing with the binding technique
of your choice.
| |