A fellow ATM'r Anthony Stillman offered to trepan (cut the mirror into a circular disk) the mirror blank from the 12x12 tile. After several hours of trepanning with 80 grit carborundum and a tool made from copper sheeting and a 12" wooden disk, we had only made less than 1/64th of an inch progress! Man, is this stuff hard! Anthony finally had to resort to cutting the disk using tangental cuts with a diamond saw normally used for lapidary work. This worked great but as seen below, it left the disk not quite round. I am currently working on a jig to grind the disk edges nicely round.
1/26/2002
I've finally made the Plaster of Paris Tool. I used real Plaster of Paris to make the tool. Since I only had a box of the the stuff (about 4 pounds worth) the tool came out to be only about 3/4 of an inch thick. I used a mixture of 1 cup water to 1 pound of Plaster of Paris. Thinking that I would get a cool coloured tool, I added a small bottle of Blue food coloring. All that this acccomplished is to make the tool a very pale blue/green.
I placed a 3 inch dam made of aluminum foil folded several times around the mirror blank after having covered the sital blank with Petroleum Jelly and Saran Wrap. If I had also coated the Aluminum foil with Petroleum Jelly, it would have been easy to remove the aluminum from the plaster tool once the tool had dried. As it was, it only took a minute or two to get the foil unstuck from the tool.
Now that the mold for the tool was made, I mixed the plaster of paris at one cup water to 1 pound plaster. It came out to a nice, thick molasses texture. I then poured the plaster onto the mold and let dry for about 2 hours. I then removed the tile from the mold, being careful not to drop the mirror or tool. Once the tool was free, I removed all of the excess POP that had dripped between the mirror and foil dam.
The first step involved sealing the tool from and moisture. I purchased some epoxy resin and a plastic tub to mix it in. For less than $10.00 I got the tub and resin and catalyst.
At this point, the total cost of the scope is up to about $70.00
The first step in coating the tool was to prepare my work area. If you lose control of this stuff, you could easily ruin carpets and linoleum tile. I used about 1/2 an inch of newspaper to cover my worksurface.
I then found a box slightly smaller then the tool blank and placed this on top of the newspapers. On top of this box, I put the plaster tool face up. I then mixed the Epoxy resin with the catalyst. I mixed it at 10 drops per ounce of resin. I used 6 ounces of resin and about 60 drops of catalyst. After mixing thoroughly for about 2-3 minutes, I poured the resin onto the middle of the tool. It came out much more watery than I had expected and flowed rapidly across the mirror and down the sides. I used an old popsicle stick to smear the resin around the edge of the tool and used the excess resin that spilled onto the newspaper to coat the edges too.
It took about 6 hours for the resin to cure enough that I could put the tool away to fully cure. Appearently, I didn't use enough catalyst because the tool took over a week to fully cure. Next time I will use about 15 drops of catalyst for each ounce of resin. I will also use much less resin. I could have got by with using only 2-3 ounces instead of 6 for a 12 inch tool.
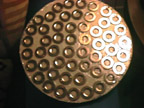
Once the resin had cured, I purchased some 9/16 inch hardened steel washers for about $8.00 from Orchard Supply Harware. I then placed the steel washers on the face of the tool and positioned them to my satisfaction. Once the washers were in place, I took a sharpie permanent marker and marked the location of each washer by putting a circle in the middle of each washer. I then removed the washers and coated the tool with quick setting epoxy glue gel. The gel was very thick and when the washers were put in place, they did not slide. 15 minutes later the gel had cured.
03/10/2002
The tool is finally dry and ready to use. The resin is still slightly tacky. I noticed that the tool takes a lot of grit to get any kind of grinding action out of it. After 2 hours of grinding, the steel washers haven't yet achieved full contact. The wear on the sital blank is nice and smooth. I'll give it another 2 hours of grinding and see where that brings me.