Repairing the Brake Light Switch on your Mk4 Jetta/Golf/Beetle
So, you got the comforting familiar Flashing Glow Plug (or equivalent), and your brake lights aren't lighting up. It's frustrating, I know. However, friend, before you scurry to the dealership to buy a new one, why not take a stab at repairing the old one? The worst that could happen is that you have to go to that dealership, jar of Vaseline in hand, but you might just be able to make the old gal work again, for free!
To repair the switch, you will have to remove the switch from the dashboard, disassemble it, clean the dirty contacts, reassemble, and reinstall. You will need a small screwdriver.
Step 1: Removing the Switch from the Dashboard
Unplug the wire harness from the Brake Light Switch (BLS). You may not have to remove the plastic under-cover (but if you do, remove the 3 screws from the top of the cover, pull the front out of the white clips - you'll have to bend it a little - and pull the back from the trim panel). Grasp the 2 smaller nibs next to the wires (not the 2 bigger outer ones), squeeze them together and pull out the plug.
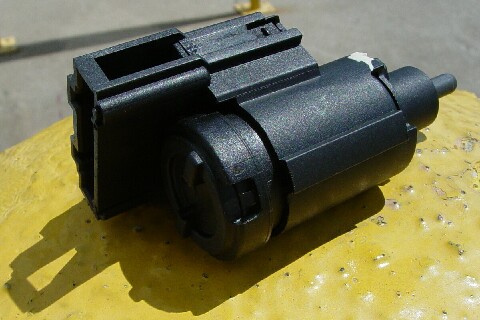
Rotate the BLS 45° clockwise (early A4s needed 90°) until it unhooks, and pull the switch straight out. Here is the BLS:
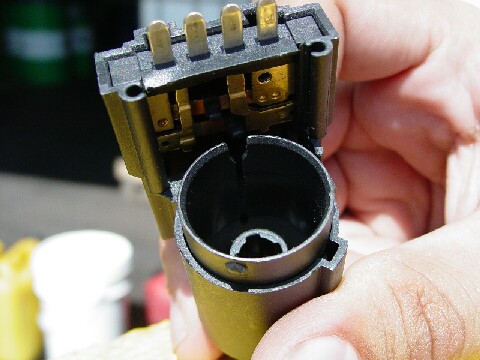
Step 2: Disassembling the connector and contacts from the BLS
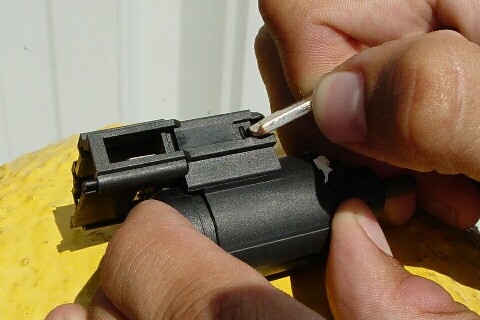
With a small screwdriver (a key is shown), push the snap locks at the base of the connector out as shown here. It may help to lift the housing out of the way before you do this:
Push the connector and contacts out the remainder of the way, and pry/slide the flat cover straight out with your screwdriver:
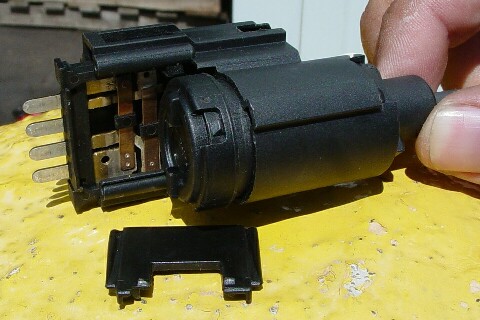
The connector/contact assembly is as shown.

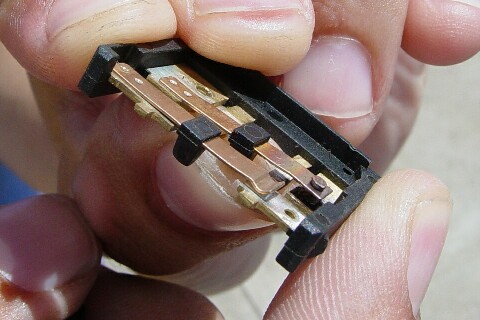
The problem is simple: the button contact on the right hand side (we're looking at Toaster-Oven technology, people) arcs and erodes the button, coating both sides of the button and contact with oxide, which insulates the connection - and that's why your brake lights will not go on - and your ECU sees a 'Implausible Brake Switch Signal' triggering a fault code.
Step 3: Cleaning the Contacts
With the tip of your screwdriver, or a nail file, carefully scrape ALL the oxide from BOTH sides of the button contact. The whole thing must be clean and shiny.
The button contacts have to sit touching at rest. You may have bent the brass arm cleaning the contact (in fact, you probably did), so you will probably have to bend it back. The first time you try this, you'll probably bend it away more. Well, fiddle with it, bending it at the end, the base, try bending with the plastic arms twisted to open the contacts, try a few times, using your intellect and patience, patience, patience. You'll eventually figure out the way to do it. It's not hard. Persistence pays off here.
Step 4: Reassembly of the BLS
Put the BLS back together in the opposite order with which it was disassembled. You are done.
Before this, be sure the centre guiding slot used for the plungers is oriented vertically to the connector as shown. You can see this with the plunger assembled as well. If it isn't, rotate the plunger body (the round part) or the lock barbs counterclockwise, until the slot is pointing at the connectors.
Try the BLS out. Good luck!