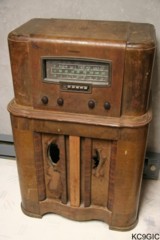
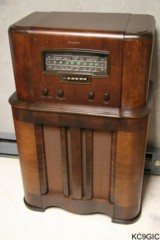
"Before" "After"
Brand: Westinghouse Electric
Corp. Year Of
Manufacture: 1940 Frequency Range(s): 550 - 1750KC, 1.4 - 4 MC, 6 - 18 MC
Tube lineup: 5Y3G Rectifier, (2X) 6F6G PP Output, 6SF5 P.Inv., 6SF5
A.F., 6H6 2nd Det/AVC, 6SK7 I.F.,6SA7
1stDet/Osc, 6SK7 R.F.
Schematic: Available here, courtesy of Nostalgia Air. Riders 12-27
Schematic: Available here, courtesy of Nostalgia Air. Riders 12-27
Not sure about the exact origins of this radio. I came home from a New Years party sometime in 2001 or 2002, and found this one sitting by my bench. I believe a family friend dropped it off, but that is still unknown. The condition looked rather bad after initial inspections. The original finish is too far gone to salvage, and the grille cloth is rather ragged. The chassis looks to be decent, but the speaker cone is damaged with several large chunks of cone missing. Otherwise, the radio is complete, and should be a fun project.
Despite the miserable appearance, restoration was not very challenging.
The chassis had the signs of a well used radio, thus many of the
original capacitors and other parts were not original. All capacitors
and the power cord were replaced, along with several wires that had bad
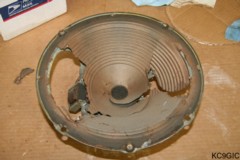
insulation. The speaker was badly damaged. Before forking out the bucks
for a replacement, I opted to try and repair the existing cone. Fabric
glue was used to repair the cone, and brown construction paper was used
to replace the missing chucks of cone.
Upon the first power up, nothing happened. Testing voltages revealed that the rectifier tube was not working. Further inspection revealed that the 5Y3 tube had suffered an internal meltdown, with the plates all melted together. Oddly, nothing else on the radio was damaged. Replacing the tube had the radio working and sounding good. An alignment was carried out to peak the performance. Below center: The damaged speaker.
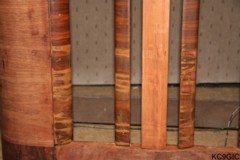
The cabinet proved to be a hefty task, partly due to my screwup! As before mentioned, the original finish was too far gone to salvage. If you look closely at the trim surrounding the grill cloth, it is covered with a paper type veneer, or photofinish. This finish is very tough to correctly reproduce, and luckily mine was in near perfect condition. With some warmer weather having arrived, it was time to do some refinish work outside. The first task was stripping the cabinet. Citri-Strip brand stripper was used during this process. Unfortunately an important thing was overlooked, masking off the parts that shouldn't be stripped, mainly the photofinish. While applying the stripper, a big glob was spilled, and ran down the front of the cabinet, instantly dissolving a few big stripes down the front of the photofinish. Below center: The damaged photofinish.
Upon the first power up, nothing happened. Testing voltages revealed that the rectifier tube was not working. Further inspection revealed that the 5Y3 tube had suffered an internal meltdown, with the plates all melted together. Oddly, nothing else on the radio was damaged. Replacing the tube had the radio working and sounding good. An alignment was carried out to peak the performance. Below center: The damaged speaker.
The cabinet proved to be a hefty task, partly due to my screwup! As before mentioned, the original finish was too far gone to salvage. If you look closely at the trim surrounding the grill cloth, it is covered with a paper type veneer, or photofinish. This finish is very tough to correctly reproduce, and luckily mine was in near perfect condition. With some warmer weather having arrived, it was time to do some refinish work outside. The first task was stripping the cabinet. Citri-Strip brand stripper was used during this process. Unfortunately an important thing was overlooked, masking off the parts that shouldn't be stripped, mainly the photofinish. While applying the stripper, a big glob was spilled, and ran down the front of the cabinet, instantly dissolving a few big stripes down the front of the photofinish. Below center: The damaged photofinish.
At this point I was rather discouraged. Gravity was on my side with the
spill, and the runs made in the photo finish were in the same direction
as the grain, so touching up the bad spots would be within means. Using
some Minwax stain sticks and some artistic skills, the runs were
blended in as best as possible. When applying the toner lacquers,
the photofinish was blended in even more.
The last step in this project was application of the decals. Besides the Westinghouse located at the top center, decals were under each knob designating the functions. Before stripping the cabinet, several photos were taken of the original decals so that they could be reallied correctly. Decals were purchased from RadioDaze. After a tedious session of precision decal application, with the addition of some loud cursing, the radio was complete!
The last step in this project was application of the decals. Besides the Westinghouse located at the top center, decals were under each knob designating the functions. Before stripping the cabinet, several photos were taken of the original decals so that they could be reallied correctly. Decals were purchased from RadioDaze. After a tedious session of precision decal application, with the addition of some loud cursing, the radio was complete!