Trace around patterns A-E onto template plastic with a permanent pen.
Cut out templates, making sure to trim off the black lines.
Mark pattern number on the template with a permanent pen.
Cut the fabric:
If you want your block to match the one shown, turn your templates up-side down and draw around each one on the paper side of the fusible web. Leave at least 1/4" between templates for cut-out allowance. Reverse and trace template A again for the other tulip petal.
Cut out each template, leaving approximately 1/8" of paper around drawn line.
Iron fusible web to BACK of desired fabric, following manufacturer's instructions for heat setting and time.
Cut out fabric pieces along the line drawn on the fusible web.
Make the block:
Remove paper backing from applique pieces.
Fold background square in half and finger crease to find vertical centerline. Position pieces on background square per layout diagram (reverse the design if you didn't reverse the templates). You don't need to be exact.
Iron applique pieces in place on background, following manufacturer's directions.
Position, cut and press bias tape pieces in the order indicated (1 through 21), overlapping edges about 1/8". The central design requires just over a yard of tape, depending on where you position the background "leading." Try to avoid too much bulk under overlapped areas. Note that piece "21" might not be required, depending on how you position your leaves and bias leading pieces.
Add border strips, attaching shorter pieces to sides of block first, then adding top and bottom strips. Use a 1/4" seam allowance.
Position, cut and press bias tape pieces in and along edges of border as shown, #22-26.
Top stitch the bias tape:
Using thread to match your bias tape, topstitch close to both edges of the tape (one at a time), using a short stitch (about 15/inch). I shortened my stitch length even more at the tape ends to secure them (20+ stitches/inch for 3-4 stitches, then switch to 15/inch).
Where possible, draw the top thread to the back side of block before clipping threads.
Adding block to prepared tote bag: (NOTE: It's a little tricky, but you should be able to ease the bag around under the sewing machine mechanism as you sew)
Trim block to 10" square. Cut a piece of cotton batting the same size, or just slightly larger.
Position block in place on side of tote bag and pin in place, using straight or safety pins. It helps to put a barrier (e.g., cardboard, plastic ruler) between the two sides of the bag so you don't pin through both layers.
Fold a binding strip in half lengthwise, wrong sides together, and press. Lay the strip along one side of your block with raw edges matching (folded edge towards center of block, just as you would attach binding to a quilt), and pin near the starting spot to hold it while you place bag under your sewing machine needle. You might change your bobbin to match the inside of the tote bag if you don't want your threads to show.
Leaving 1/4" free at ends of strip, sew binding strip 1/4" from raw edge through all layers (binding, block, batting & bag).
Repeat on opposite side.
Fold binding strip back over seam allowance and batting (towards outside of block) and pin. Stitch binding to bag (leave 1/4" at ends free) using matching or invisible thread on top; straight, zig-zag or invisible-hem stitch as desired.
Attach the remaining two sides, but trim and fold ends under before the final step.
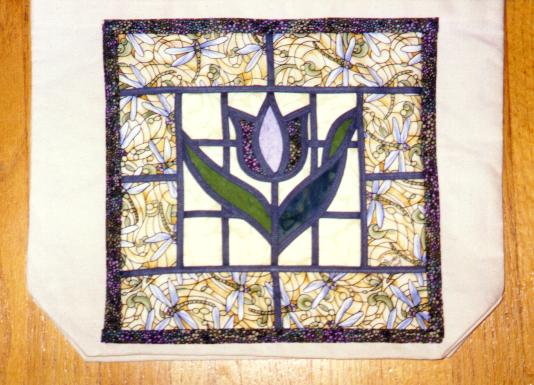
You're finished! Enjoy your Stained Glass Tulip Tote Bag!