|
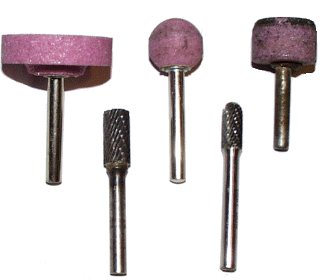
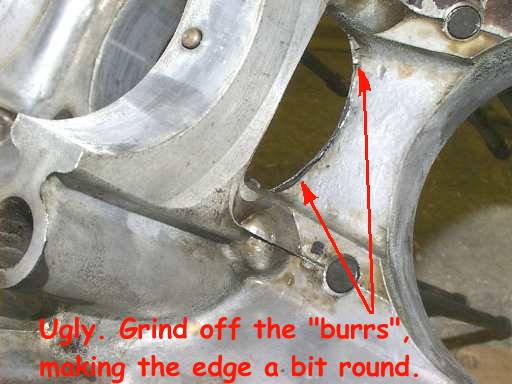
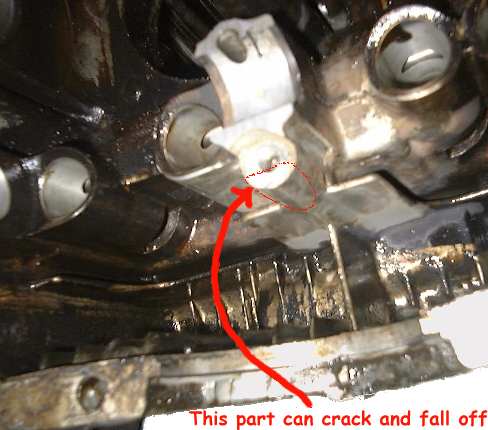
Okay, so now you hopefully have two clean case halves infront of you. I'd recommend scraping off all old sealant residue, my cases had quite a bit of old sticky gooey stuff inside, result of using too much sealant. It's pretty hard if it's dry, but the solvent I used made it softer. I don't want it to get loose when I have hot oil circulating in the engine. One of the first things to check is the oil pickup tube support. The oil pickup tube is held in place by a long bolt that goes through the case (not the bolt that goes through the oil pickup tube, that is connected to the bolt I'm talking about). When someone overtightens the bottom nut of the oil pan, the force applied to that nut will pull the oil pickup tube downwards, and the upper bolt which the oil pickup tube is connected to, will bend down too, and as a result, a huge chunk of aluminum will crack and fall off at the threaded boss right above. The threaded hole is part of the middle cam bearing saddle. This problem can be fixed by drilling the hole deeper, and tapping new threads (M8) all the way to the bottom of the hole, following closely the remains of the original threads. A longer bolt will have to be used. It may be a good idea to do this modification to a healthy hole as well, plus use a stronger bolt that won't bend as easily. I'm not sure if it will be enough to prevent this from happening though. Above you see the tools I use for the next phase. I use a tool similar to a Dremel multi-purpose tool, but mine is more heavy-duty, more like cordless powerdrill. I love it when I don't need to mess with the powercord.. I use this tool everywhere, I carry it with me in the car too..:-) The bit I used most was the lower, right one. The small metal grinder bit that has the round end. Excellent for smoothing out things. Easy to clean, doesn't get "clogged" like the stones do, when grinding aluminum. The bit I used was made for metal work, please note that some of them are meant for wood and plastic only. They might work on aluminum too, but I haven't tried. The most important part to "shave" is naturally the inside of the case. There are lots of places where the machining left "burrs" and rough cast seams. I clean those carefully, some of them are so fragile that I can flip them loose with my fingernail. I do NOT want metal particles floating around inside myengine when it's finally running. Here's a picture of the absolutely *worst* spot, lots of grinding required.
Also inspect the crank bearing saddles, (also visible in the picture above), the surface should be smooth to all directions, when you feel it with your finger. No ridges etc, if you have those, the surface has been "pounded" by the crank, and the case has to be line bored. That's a job for a skilled and well-equipped machine shop, not for you. Small shops cannot afford decent line boring tools. You might want to do the same to the outside of the case, there it is not so critical but personally I would rather handle a case that does NOT cause cuts and bruises to my hands. Lots of shaving to do on the outside too, also to make the case look smoother and more pleasing to the eye. God idea if you are planning to paint the case too. (BTW, if you do paint it, I'd recommend leaving the oilpan unpainted, better heat dissipation) Again, don't go wild with the outside either, you can polish the most visible parts of the case if you like, but leave the rest "unfinished". Just grind off the sharp edges and cast "residue". One important thing to check on the outside is at the flywheel area, you do not want to see any cracks there. Look closely, the smallest hairline cracks are hard to see. Don't let cast seams etc. fool you..:-) Lastly, inspect the case sealing surfaces, clean off all old sealer/glue remains with solvent (Do NOT use any metal tool! Use wood if you have to). The surfaces must be ultra smooth. A screwdriver "scratch" may cause an oil leak later on. You may see some dimples there, old screwdriver tip marks, as some ignorant fool pried the case open with a sc5rewdriver between the sealing surfaces. Bad idea. If the edge of the "dimple" is higher than the surrounding sealing area, you can carefully file it down, but do not let the file touch the flat sealing surface around it. File just enough to smoothen out the little bump. I guess at this point the case should be more or less ready, you can put it aside until it's time to test fit the crank etc.. Coat the bearing surfaces with light oil, and do the same to all non-aluminum parts too. Why not the sealing surfaces as well. This will prevent oxidation, which you would have to clean off later if your project schedule happens to "stretch a little". |
Return to Case Prepping Page 1
BACK to Type 4 conversion start page