 Fixing a broken exhaust stud.
Text and pictures by Jan Andersson, Feb. 4th 2000
The stock VW head has (among others) one very common problem; The exhaust studs rust with age and break when you try to open them.
The threads are also often in really poor condition. What you need to do in both cases, is to get the original stud out, and a new one in. Not so easy especially when the old stud broke.
The best way to fix this is as follows:
Hacksaw the end of the broken stud flush with the head, get a surface as flat as possible. Use a metal file if you need to. Then take a metal punch, or some other sharp metal object and a hammer, and hit a small "dimple" exactly in the middle of the broken stud. This helps you drill a hole dead center without the drill bit slipping to the side. You want to drill straight, and right in the middle.
Start with a drill bit slightly smaller than the stud, so that you will end up with a "hollow" stud. This may be enough to get the remaining part of the old stud out, if you manage to drill the wall of the stud thin enough. With a sharp thin tool you may be able to make the stud walls "crumble", leaving you with nice, intact head threads ready for a new stud.
in most cases though, you need to step up to a larger drill bit, and drill the whole stud out. Some people say to drill a hole big enough to use the correcty size thread tap, then just tap new threads and install new bolt -voil�. I would however not recommend this, you are making new threads into a hole that has some remains of the original stud still left in there, and you will effectively DESTROY the head threads with the tapping procedure. You cannot guide the tap to follow the original threads accurately, I know it would be nice if you could just use the tap to "clean the old threads. It just doesn't work, you will cross-thread the original threads. No stud will hold there as well as it should.
What you should do (what a machine shop would do for you) is install Heli-coil thread inserts. You can buy a kit from your local auto parts store, it shoudl cost around 20-30 dollars.
The kit has detailed instructions, but here's the scoop:
You take a drill bit the size they recommend to use with the Heli-coils, and drill an oversize hole in the head. Then with a tap (comes with the kit) you thread the hole you just drilled, and then install a Heli-coil insert there. Use Loc-Tite thread locking glue. Let it dry, and you have a very strong STEEL thread where a weak aluminum thread used to be. Now screw in a new stud and never worry about it again.
HOWEVER.
There are times when you cannot use a Heli-coil insert, you either cannot find a kit, or don't have time to goo look for one, or you are stranded too far away from civilization and that VW was your only transportation out of there. Well, there is a cheap trick I figured out many moons ago. This you can use with minimal tools. It's not pretty, but it's fast and easy, and the end result is reliable.
Ideally, you should pull the engine and remove the cylinder tin. But I'm showing here how this could be done with the engine in the car, most tin in place. This is an engine that was built only for performance, not looks, so I didn't worry about some minor damage to the tin.
Ok let's begin:
This is what you have to deal with. The stud either pulled out, or you had to drill it out. You have a hole in the head. :-)
The rear engine tin has to be removed.
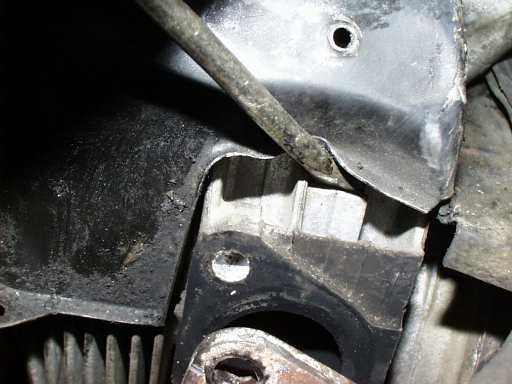
This picture shows you how to bend the cylinder tin out of the way the "ugly" way. You could loosen the generator strap, fan shroud, cylinder tin screws etc, and lift the cylinder tin UP.
I took the quick and dirty route. The more attention you pay to this, the less damage you will get. You may need to remove the small piece of cooling tin that sits just below the exhaust port, attached to the large upper tin that gets bent here. In these pictures it is already removed.
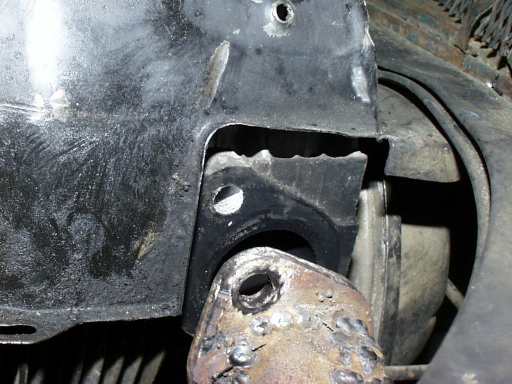
Here's my trick. You see there is a recess, a hole *behind* the stud, between the fins. There's just enough space in there for a nut, when you file two sides of the nut flat, and take some material off the top too, to make a "wedge" shaped nut. You can also try to remove some material from the head to make more space for the nut, a Dremel tool is great for this. Then drop the nut in there, and screw a long stud in it through the old stud hole. This will hold like crazy, use LocTite again for maximum hold, then the stud won't get loose when you pull the exhaust the next time. The nut won't have space to turn when you tighten the exhaust nut later, because of the wedge shape.
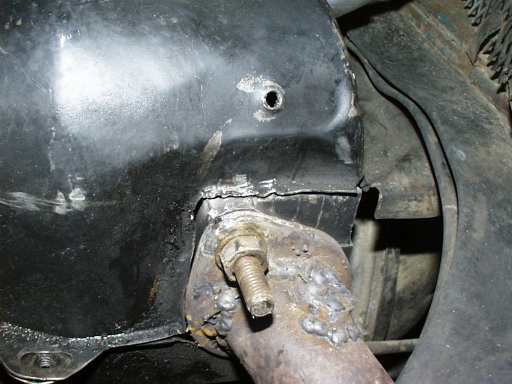
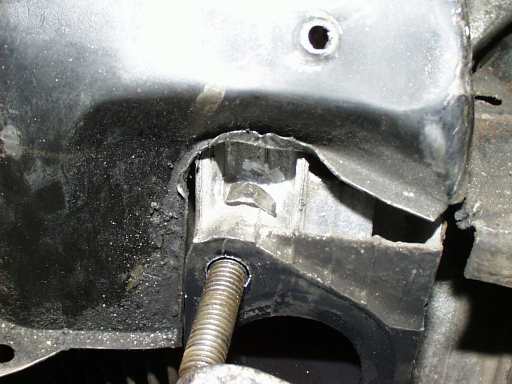
This is what the "fix" looked like afterwards. If I had paid more attention to the removal of the cooling tin, you couldn't tell it was touched at all. I just didn't bother.
This trick really works, I have used it myself several times, and others who I explained it to, have reported great success too. Not all the heads have the little space there though, check yours before deciding what to do. This applies to stock VW dual and single port heads. I just got confirmation that the 25hp and 36hp heads have this space there too. However, for the really old heads, and "correct" rebuilds, I would not recommend this. It's alow-budget solution, not the "proper way".
I'm pretty sure many aftermarket high-power heads do not have space there.
I would also recommend reading John Henry's general instructions and advice regarding snapped-off bolts etc, here's a direct link to that page: http://www.geocities.com/MotorCity/4000/bsfqtool.htm
Do yourself a favor and read his other stuff too, you won't be disappointed. John's Main Page
If you have any questions or comments, feel free to email me.