
Above is a screen shot of the Database Form Wizard.
Your First Database Application
This page is for Delphi beginners
who have not yet made a database application with Borlands Delphi.
If you have worked with
databases before then you would probably want to skip this web page.
Start a new project, then
save the project by going to File|Save Project As...
Create a new folder and
call it FirstDBApp.
Save Unit1.pas and then Project1.dpr or rename Project1.dpr to a name you want.
Go to Database in the Delphi menu, then click on Form Wizard.
Above is a screen shot of the Database Form Wizard.
Leave the Form Options on "Create a simple form" and leave DataSet Option on "Create a form using TTable objects".
Click on the "Next" button.
On the next page click on the "Drive or Alias name:" ComboBox and scroll through the list until you find DBDemos, click on DBDemos so it is selected like in the image below.
![]()
Then go to "Table Name:" and click on biolife.db like I have done in the image below.
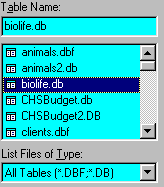
Click on the Next button.
You are now presented with
a page which allows you to choose which fields you want to include in the
database.
The left listbox is called
Available Fields and the right listbox is called Selected Fields.
The left listbox has listed
all the available fields that you can use, while the right listbox will
hold a list of all the fields you want to use in your database.
For this example we want
to use all the fields so please click on the ">>" button.
You will notice all the
fields listed in the left listbox moved over to the right listbox.
You can use the ">" button to move individual fields over to the right listbox.
You can also use the "<"
button to move a field from the right listbox back to the left listbox,
this means you don't want to use that field in your database.
And you can use the "<<"
button to move all the fields in the right listbox back to the left listbox.
You can also use the up and down buttons (The buttons with up and down arrows on them) to move selected fields up and down in the right side listbox.
To choose only some of the
fields you can press the Ctrl key and then select the fields you want from
the Available Fields list then click on the ">" button.
Click on the Next button.
The next page in the Database Wizard gives you some options about how you want the database fields arranged on the form. Read the information under each radio checkbox.
With Horizontally checked click on the Next button.
You are now on the final
page of the wizard, you can choose to use the back button to make changes
if you want.
Leave "Generate a main form"
and "Form Only" checked and then click finish.
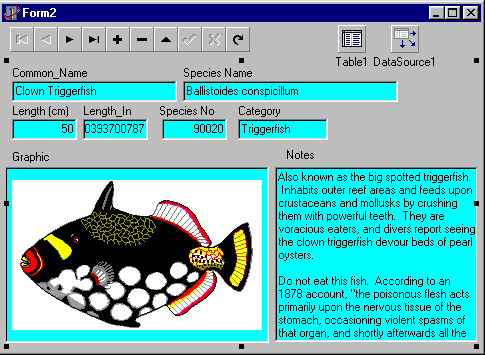
You should now have a form called Form2 with some components on it.
Here are some of these components:
DBNavigator:
![]()
The DBNavigator is used to navigate through the records, edit a record, and lots more, you may have already used an application that has a DBNavigator in it.
Table1 and DataSource1:
![]()
To the left in the image
above is the non-visual TTable component.
TTable is used to access
the data in a single database table that is using the Borland Database
Engine (BDE).
To the right is TDataSource
component.
TDataSource is used to provide
a connection between the dataset and data-aware controls on the form.
Click on the TDataSource
component and look in the Object Inspector and you will notice that the
property DataSet has Table1 in it. This can be changed at run-time and
at design-time depending on your needs.
If you double-click on Table1 then you will see the Fields editor.
Next click on Table1 then go to the Object Inspector and change the Active property to True.
Notice that the data is now
in the data-aware controls.
The DBNavigator has also
changed and some of the buttons now have black images on them, such as
the + button.
Click on Table1 then go to the Object Inspector and change the Active property to False.
Biolife.db has images and we do not see them, so we have to make some changes.
First click on the DBEdit called Graphic, it is under the label that has the caption "Graphic", then press the Delete button on your keyboard.
![]()
Next go to the DataControls tab on the component palette and click on DBImage, click on your form under the current fields, you should now see the DBImage component.
To make the DBImage component active click on it and then go to the Object Inspector and change these properties:
DataSource = DataSource1
DataField = Graphic
Click on Table1 then go to the Object Inspector and change the Active property to True and you should now see an image of a fish in the DBImage, resize it if you need to and move it to the left and bottom of the form.
You will now notice that the Notes: label has a DBEdit under it, this is not what we want.
Next go to the DataControls tab on the component palette and click on DBMemo, click on your form next to the DBImage, you should now see the DBMemo component.
To make the DBMemo component active click on it and then go to the Object Inspector and change these properties:
DataSource = DataSource1
DataField = Notes
Change the DBMemo ScrollBars property to ssVertical.
Put the Graphic label over
the DBImage and put the Notes label above the DBMemo.
Don't forget to delete the
DBEdit called EditNotes since we don't need it now.
Your project should look something like this:
Run the project. If you are
prompted to save Unit2.pas then do so.
Use the DBNavigator to browse
through the records.
If you want Form1 to be seen
first you can press the Ctrl + F12 keys then double-click on Project1.
Next make this change:
program Project1;
uses
Forms,
Unit1 in 'Unit1.pas'
{Form1},
Unit2 in 'Unit2.pas'
{Form2};
{$R *.RES}
begin
Application.Initialize;
Application.CreateForm(TForm1,
Form1);
Application.CreateForm(TForm2,
Form2);
Application.Run;
end.
In other words move the line
Application.CreateForm(TForm1, Form1);
above the
Application.CreateForm(TForm2, Form2);
line.
Add a button to Form1, double-click on the button and then add this code:
procedure TForm1.Button1Click(Sender:
TObject);
begin
Form2.Show;
end;
Change the buttons Caption property in the Object Inspector to "Biolife DB" .
Run the application, click
on the button and you should now see Form2.