
My old "Wallpapering Howto" seems to have disapeared from Geocities... Anyways I've re-wrote this so you might get an idea as to how I wallpaper and maybe even be able to create your own.
Right now I use The GIMP because its cost is right and most importantly it runs on Linux. There is also Windows and Macintosh versions of The GIMP. The Windows version is pretty stable on my Windows box. Some Windows systems however it is not even close to being stable. So until you know how stable it'll be save your work often!
The source image is the most important aspect of making a great wallpaper. So it is important to make sure it is both appealing and large enough. I prefer to make my wallpapers as large as possible (1600x1200). However this isn't always easy or possible. So the minimum size I would recomend is 1024x768. A good place for to get art for your own desktop and practice wallpapers is fan sites.
Let us first try Googling for "Billy Hatcher Art". We're in luck. This piece I found after a little searching will more than work.

Because the image is in jpeg format the background is a flat white. So the first thing I'm going to do is select the layers dialog, right click on the background layer and select Add Alpha Channel. Now I'm going to use the Select continuous regions tool (the wand shaped button) and set the threshold to about 60 and click in the white portion of the image and press Ctrl+k to clear the area. If anything gets deleted that shouldn't select the Eraser tool and select the Anti-Erase option. Then brush it back in.

Now there is something wrong with this image. Its got some white blocks around the edges that the Select continuous regions selection tool didn't remove. There are many ways to remove this, some are more painful than others.
Luckily this time its a snap. Right click on the background layer in the layer dialog and select Alpha to Selection Now on the image window click the Select menu and then Shrink. One pixel should do fine here. So click Okay. Now click Select and then Invert. Now Filters > Colors > Color to Alpha.... Select the color box and change the color to white. Beautiful, a nice clean image for pasting into the the new image you'll now need to make, 1024x768 in this case.
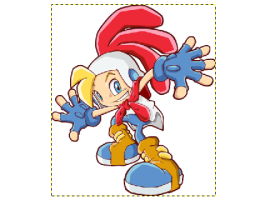
Note: Remember to clear the selection (Selection > None) before you copy and paste.
Now we apply the above steps to the games logo (also found by Googling).

Hmm, not bad. But because white backgrounds are usually to plain as well as being to bright for most people, I'm going to make the background look sort of like the logo. To do this I first make sure that I've got the logo layer selected (Note: Its good practice to name all your layers!) and then I'm going to use the eye dropper tool and click on the brightest part of the yellow in the egg. Next I'll select the background color in the main dialog and then select the darkest part of the yellow in the egg.
Now we need a new transparent layer. (Layer dialog, the white piece of paper button.) With that done I'm now going to use the Select elliptical regions tool and click out in the middle of no-man's-land in the image box and then drag it down to the lower left hand corner of the image.
Now we use the Gradient tool (a box with a gradient in it) to fill the now "eggish" shapped selection on the new layer. This is done by simply clicking on one end of the image and then dragging it to the other. Now we can clear the selection. Highlight the logo layer again and use the dropper tool to fill both the foreground and background colors with the light and darker blue-green color. Now select the background (white bottom) layer in the layer dialog and use the gradient again to fill it up. Now we're done.
| Was this howto helpful? |

Tip: Remember to always save your original file as an .xcf this is GIMP's native format and will allow you to edit your work later.