|
Input type="text"
|
|
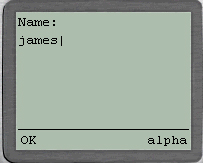
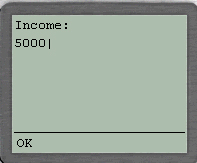
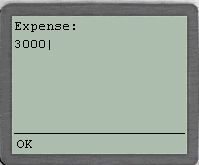
The code below shows How to accept text info from the user
|
<?xml version="1.0"?>
<!DOCTYPE wml PUBLIC "-//WAPFORUM//DTD WML 1.1//EN"
"http://www.wapforum.org/DTD/wml_1.1.xml">

<wml>
	<card title="Input">
	<p>
		Name: <input name="Name" size="15"/><br/>
		Income:  <input name="Income" size="15" format="*N"/><br/>
		Expense:  <input name="Expense" size="15"  format="*N"/>
	</p>
</card>
</wml>
|
|
Running the code
|
1) save the above file as input.wml in E:\wml\ Directory
2) Open UPSDK Browser, which will be a shortcut created during installation
3) Type in the URL file://e:/wml/input.wml next to GO Button Text Box, Hit Enter ..........
4) Always remember whenever u make changes to the wml script, u must click on Edit Clear Cache to View New Screen and Re-Enter URL
|
|
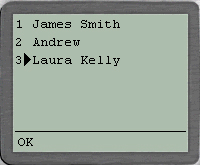
Using Radio Buttons
|
|
Here even though Radio Buttons use select tag, they are not similar to the select tag as u seen in HTML.
u can as well consider them an Option to select a Single element if given multiple element list
|
<?xml version="1.0"?>
<!DOCTYPE wml PUBLIC "-//WAPFORUM//DTD WML 1.1//EN"
"http://www.wapforum.org/DTD/wml_1.1.xml">

<wml>
	<card title="Radio Button Demo">

	<p>
	<select>
		<option value="James">James Smith</option>
		<option value="Andrew">Andrew</option>
		<option value="Laura">Laura Kelly</option>
	</select>
	</p>

</card>
</wml>
|
|
Running the code
|
1) save the above file as radio.wml in E:\wml\ Directory
2) Open UPSDK Browser, which will be a shortcut created during installation
3) Type in the URL file://e:/wml/radio.wml next to GO Button Text Box, Hit Enter ..........
4) Always remember whenever u make changes to the wml script, u must click on Edit Clear Cache to View New Screen and Re-Enter URL
|
|
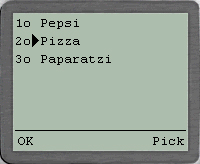
Using CheckBoxes
|
|
Here u can make multiple selections of any set of Given Objects
|
<?xml version="1.0"?>
<!DOCTYPE wml PUBLIC "-//WAPFORUM//DTD WML 1.1//EN"
"http://www.wapforum.org/DTD/wml_1.1.xml">

<wml>
<card title="CheckBox Demo">

	<p>
		<select multiple="true">
		<option value="pepsi">Pepsi</option>
		<option value="pizza">Pizza</option>
		<option value="paparatzi">Paparatzi</option>
		</select>
	</p>

</card>
</wml>
|
|
Running the code
|
1) save the above file as check.wml in E:\wml\ Directory
2) Open UPSDK Browser, which will be a shortcut created during installation
3) Type in the URL file://e:/wml/check.wml next to GO Button Text Box, Hit Enter ..........
4) Always remember whenever u make changes to the wml script, u must click on Edit Clear Cache to View New Screen and Re-Enter URL
|
|
Using FieldSet
|
Here u give Border and Title for a set of Objects something similar to Java Swing's
jpanel1.setBorder(BorderFactory.createTitledBorder(BorderFactory.createEtchedBorder(),"My Border"));
|
<?xml version="1.0"?>
<!DOCTYPE wml PUBLIC "-//WAPFORUM//DTD WML 1.1//EN"
"http://www.wapforum.org/DTD/wml_1.1.xml">

<wml>
	<card title="Fieldset">

	<p>
		<fieldset title="My Border">
		Name: <input name="name" type="text"/><br/>
		Hobby: <input name="daughter" type="text"/>
		</fieldset>
	</p>

	</card>
</wml>
|
|
Running the code
|
1) save the above file as border.wml in E:\wml\ Directory
2) Open UPSDK Browser, which will be a shortcut created during installation
3) Type in the URL file://e:/wml/border.wml next to GO Button Text Box, Hit Enter ..........
4) Always remember whenever u make changes to the wml script, u must click on Edit Clear Cache to View New Screen and Re-Enter URL
|
|
What Next ? Jumping Between WML Pages, Refresh
|
|
Reach me!
|
|
|
Java, J2EE, J2SE and all Java-based marks are trademarks or registered trademarks of Sun Microsystems, Inc.
in the United States and other countries. 
|


 If you like this article and/or code