| |
|
Software Requirement
|
1. I am using JavaTM Development Kit 1.2.1 even thought I have higher version I don't want to use it
file name: jdk1_2_1-win.exe
Download URL: http://java.sun.com/
[ This also works with jdk1.3.1 file name is j2sdk-1_3_1_02-win.exe ]
2. Jakarta-Tomcat 3.2.1 Higher versions I had bad experience with them so I prefer this
file name: jakarta-tomcat-3.2.1.zip
Download URL: http://jakarta.apache.org/
Download URL: If they have lost the above zip Try to Download from here !
[ This also works with Tomcat 4, file name is jakarta-tomcat-4.0.2.exe somehow i dont love this version ] 
3. MySQL Database
file name: See the URL
Download URL: http://www.mysql.com/downloads/index.html
4. MySQL Java Driver : mysql-connector-java-3.0.8-stable
file name: mysql-connector-java-3.0.8-stable.tar.zip
Download URL: http://www.mysql.com/downloads/api-jdbc-stable.html
5. My Java MySQL Codes :
file name: javamysql.zip
Download URL: javamysql.zip
6. Macromedia Homesite 5 [Optional] I say one of the best Editors Available
file name: Homesite5.exe
Download URL: http://www.macromedia.com/software/homesite/
[ Smart Guys can crack the key too ] 
|
Step 1 : Telnet your Linux Box and Open Mysql connection from your Windows XP Machine
GRANT ALL PRIVILEGES ON [databasename].* to username@ip_address_of_java_machine identified by 'password'
|
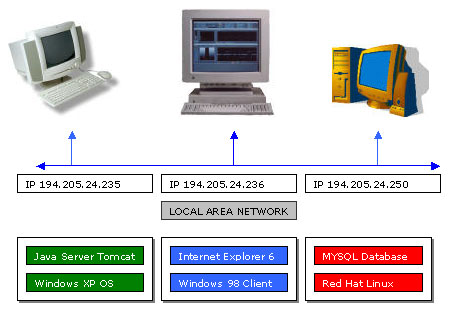
Now the problem is my java server Tomcat [Servlets] is running on Win XP [194.205.24.235] and my MYSQL database is running on Red Hat Linux [194.205.24.250],
I would like the mysql to understand requests from the Win XP box [Machine] and deliver data to the Java Servlets which are calling from the
XP Machine so do that i use telnet and connect to mysql on Linux box and grant all privileges to this XP Machine to access data from MYSQL
|
D:\>Telnet
Microsoft Telnet>open 194.205.24.250
Red Hat Linux Release 6.1 (cartman)
Kernel 2.2.12-20 on i686
login : james
password : ******
Welcome to James Smiths Linux Box !!
[james@server james]$ su
password *****
mysql -u root -p123456
mysql>create database mystudents;
Query OK, 1 Rows affected
mysql>GRANT ALL PRIVILEGES ON mystudents.* to [email protected] identified by '123456';
Query OK, 0 Rows affected
mysql>use mysql
Database changed
mysql>select * from user;
7 rows in set
mysql>exit
Bye
[james@server james]exit
Microsoft Telnet>Lost connection to 194.205.24.250
Microsoft Telnet>quit
D:\>
|
| Step 2 :: Setting Environments for TOMCAT |
Open your notepad and write the lines shown below and save it as m.bat under D:\
Run m.bat from your Command promp OR DOS Prompt by typing
D:\> m
| ------------------------ Contents of m.bat |
| d: |
| SET JAVA_HOME=d:\jdk1.3.1 |
| SET TOMCAT_HOME=d:\tomcat |
| SET CLASSPATH=d:\tomcat\lib\ant.jar;d:\tomcat\lib\jaxp.jar;d:\tomcat\lib\servlet.jar;
d:\tomcat\lib\parser.jar;d:\tomcat\lib\webserver.jar;d:\tomcat\lib\jasper.jar |
| CD d:\tomcat\bin |
| startup |
------------------------
|

|
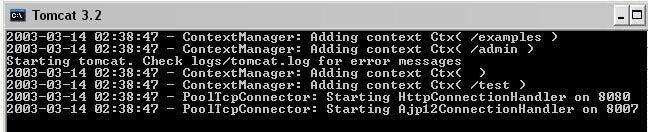
| If things go well then TOMCAT SERVER will open in a NEW WINDOW |
|
|
| Step 3 :: If things go Wrong and you dont see TOMCAT Window Then ! |
If things Go Wrong and your Tomcat Server Goes Off or Gives Error or Some Problem then checkout
1) Windows 98, Windows 95 users :: Open your C:\autoexec.bat and Edit it using notepad
u must be able to see something like this
SET JAVA_HOME=d:\jdk1.3.1
SET PATH=c:\windows;c:\windows\command;d:\jdk1.2.1\bin;D:\ORACLE95\BIN;c:\
SET TOMCAT_HOME=d:\tomcat
2) Windows XP, Windows NT, 2000 and Advanced Server users ::
Right Click MyComputer
Click on Properties
Click on Advanced
Click on Environmental Variables
u must be able to see something like this
JAVA_HOME=d:\jdk1.3.1
PATH=%systemroot%\system32;%systemroot%;%systemroot%\system32\wbem;d:\jdk1.3.1\bin
SET TOMCAT_HOME=d:\tomcat
3) If you get out of environment error message Win98 users
Right Click DOS
Click on Properties
Click on Memory
Select Initial Environment = 2816
ALWAYS RESTART YOUR COMPUTER IF YOU CHANGE ANY SETTINGS
|
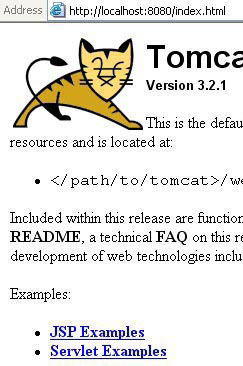
| Step 4 :: If things go Right and TOMCAT Started ! |
open your internet Explorer and type in http://localhost:8080/index.html and u can play with servlet and JSP examples
|
| Step 5 :: Package not found Error When you Compile ! |
Dont ask me why ? , But it is nessasary that all your java files must be in this Directory
D:\tomcat\webapps\examples\WEB-INF\classes so u are in this directory and
wanna compile a java file say index.java u can give the command like this
D:\tomcat\webapps\examples\WEB-INF\classes>javac index.java , If its your good
day u wont get any errors , else u will get a screen like this
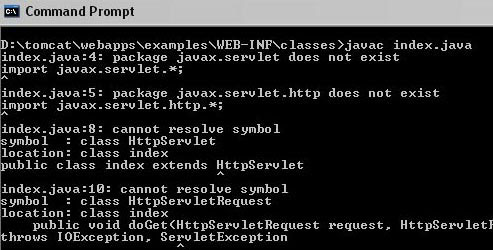
SOLUTION : all u need to do is setup ur classpath properly just copy & paste (Type in MSDOS)
this line in bold at
D:\tomcat\webapps\examples\WEB-INF\classes>
SET CLASSPATH=d:\tomcat\lib\ant.jar;d:\tomcat\lib\jaxp.jar;d:\tomcat\lib\servlet.jar;
d:\tomcat\lib\parser.jar;d:\tomcat\lib\webserver.jar;d:\tomcat\lib\jasper.jar
Be carefull about any unwanted spaces !
and Re-Compile the java file
D:\tomcat\webapps\examples\WEB-INF\classes>javac index.java
If compiling goes right then u will not get that class not found Errors
|
|
Step 6 :: Setting up J-Connector Java to MySQL Driver
|
1. unzip the zip file into D:\ of your Windows XP Machine so this creates a directory D:\mysql-connector-java-3.0.8-stable directory i renamed this into
D:\mysql-connector-java-3.0.8 , now the .jar file in here is to be added to your classpath for your java files to compile
so i change my D:\james.bat as follows
|
SET JAVA_HOME=D:\jdk1.3.1
SET PATH=%path%;D:\jdk1.3.1\bin
SET TOMCAT_HOME=D:\tomcat
SET CLASSPATH=%classpath%;D:\tomcat\lib\ant.jar;D:\tomcat\lib\jaxp.jar;D:\tomcat\lib\servlet.jar;D:\tomcat\lib\parser.jar;
D:\tomcat\lib\webserver.jar;D:\tomcat\lib\jasper.jar;D:\mysql-connector-java-3.0.8\mysql-connector-java-3.0.8-stable-bin.jar
CD D:\Tomcat\bin
D:
startup.bat
|
|
Step 7 :: Creating MySQL Database, student_det , Inserting Data and Verifying Entered Data
|
D:\>Telnet
Microsoft Telnet>open 194.205.24.250
Red Hat Linux Release 6.1 (cartman)
Kernel 2.2.12-20 on i686
login : james
password : ******
Welcome to James Smiths Linux Box !!
[james@server james]$ su
password *****
mysql -u root -p123456
mysql>use mystudents;
mysql>CREATE TABLE student_det (
-> RegistrationNo int(4) NOT NULL auto_increment,
-> StudentID varchar(30) NOT NULL,
-> Name varchar(30) NOT NULL,
-> Address varchar(30) NOT NULL,
-> FName varchar(30) NOT NULL,
-> Sex varchar(30) NOT NULL,
-> Yearsel varchar(30) NOT NULL,
-> Sectionsel varchar(30) NOT NULL,
-> SSLC int(4) DEFAULT '0' NOT NULL,
-> PHOTO int(4) DEFAULT '0' NOT NULL,
-> CHARCERT int(4) DEFAULT '0' NOT NULL,
-> NCCCERT int(4) DEFAULT '0' NOT NULL,
-> imagename varchar(30) NOT NULL,
-> PRIMARY KEY (RegistrationNo)
-> );
mysql>Query OK, 0 Rows affected
Database changed
mysql>Show Tables;
+ --------------------------- +
| Tables_in_mystudents |
+ --------------------------- +
| student_det |
+ --------------------------- +
mysql>INSERT INTO student_det VALUES ( '1', '02-PCM-2C-2', 'James Smith', '41A Crescent Rd Caterham Surre', 'Mr Laura L', 'Male', '2nd PUC', 'Section C', '1', '1', '1', '1', 'James.jpg');
mysql>Query OK, 1 Rows affected
mysql>INSERT INTO student_det VALUES ( '2', '02-PCM-2B-2', 'Laura', '507 - 20th Ave. E', 'Mr Laura L', 'Male', '2nd PUC', 'Section B', '1', '1', '1', '1', 'Laura.jpg');
mysql>Query OK, 1 Rows affected
mysql>INSERT INTO student_det VALUES ( '16', '02-PCM-1B-7', 'Michael', 'Coventry House Miner Rd', 'Mr Michael M', 'Male', '1st PUC', 'Section B', '1', '1', '1', '1', 'Michael.jpg');
mysql>Query OK, 1 Rows affected
mysql>INSERT INTO student_det VALUES ( '17', '02-PCM-1A-8', 'Robert', 'Edgeham Hollow Winchester Way', 'Mr Robert R', 'Male', '1st PUC', 'Section A', '1', '1', '1', '1', 'Robert.jpg');
mysql>Query OK, 1 Rows affected
mysql>INSERT INTO student_det VALUES ( '12', '02-PCM-2C-3', 'Andrew', '908 W. Capital Way', 'Mr Andrew A', 'Male', '2nd PUC', 'Section C', '1', '1', '1', '0', 'Andrew.jpg');
mysql>Query OK, 1 Rows affected
mysql>INSERT INTO student_det VALUES ( '13', '02-PCM-2B-4', 'Janet', '722 Moss Bay Blvd.', 'Mr Janet J', 'Female', '2nd PUC', 'Section B', '1', '0', '1', '0', 'Janet.jpg');
mysql>Query OK, 1 Rows affected
mysql>INSERT INTO student_det VALUES ( '14', '02-PCM-1A-5', 'Margaret', '4110 Old Redmond Rd.', 'Mr Margaret M', 'Female', '1st PUC', 'Section A', '1', '1', '1', '0', 'Margaret.jpg');
mysql>Query OK, 1 Rows affected
mysql>INSERT INTO student_det VALUES ( '15', '02-PCM-2B-6', 'Steven', '14 Garrett Hill', 'Mr Steven S', 'Male', '2nd PUC', 'Section B', '1', '1', '1', '1', 'Steven.jpg');
mysql>Query OK, 1 Rows affected
mysql>INSERT INTO student_det VALUES ( '18', '02-PCM-1A-9', 'Nancy', '4726 - 11th Ave. N.E.', 'Mr Nancy N', 'Female', '1st PUC', 'Section A', '1', '0', '0', '1', 'Nancy.jpg');
mysql>Query OK, 1 Rows affected
mysql>select count(*) from student_det;
+ ----------- +
| count(*) |
+ ----------- +
| 9 |
+ ----------- +
mysql>exit
Bye
[james@server james]exit
Microsoft Telnet>Lost connection to 194.205.24.250
Microsoft Telnet>quit
D:\>
|
|
Step 8 :: Actual JDBC MYSQL code
|
The code remains same as that with our MS Access Database code except that 2 lines are to be changed from the exisiting one they are
Class.forName("com.mysql.jdbc.Driver").newInstance();
con = DriverManager.getConnection("jdbc:mysql://194.205.24.250/mystudents?user=root&password=123456");
//.getConnection("jdbc:mysql://IP_MySQL_Machine/Database_Name?user=mysql_username&password=mysql_password");
//Simple JDBC MYSQL Code by James Smith
//Code Date 09-Sept-2003
//Email : [email protected]
//set classpath=%classpath%;D:\mysql-connector-java-3.0.8\mysql-connector-java-3.0.8-stable-bin.jar
//File Name Test.java
//javac Test.java
//java Test

import java.sql.*;
public class Test
{
 public static void main(String[] args)
 {
  try
  {
   Class.forName("com.mysql.jdbc.Driver").newInstance();
   java.sql.Connection con;
   //Below Single Line
   con = DriverManager.getConnection
   ("jdbc:mysql://194.205.24.250/mystudents?user=root&password=123456");
   Statement s = con.createStatement();
   s.execute("select mystudents.student_det.Name from student_det");
   ResultSet rs = s.getResultSet();
   if (rs != null)
   while (rs.next())
   {
    System.out.println("Data from column_name: " + rs.getString(1) );
   }
   s.close();
   con.close();
  }
  catch (Exception err)
  {
   System.out.println("ERROR: " + err);
  }
}
}
|
D:\>set classpath=%classpath%;D:\mysql-connector-java-3.0.8\mysql-connector-java-3.0.8-stable-bin.jar
D:\>javac Test.java
D:\>java Test
Data from column_name: James Smith
Data from column_name: Laura
Data from column_name: Micheal
Data from column_name: Robert
Data from column_name: Andrew
Data from column_name: Janet
Data from column_name: Margaret
Data from column_name: Steven
Data from column_name: Nancy
|
|
|
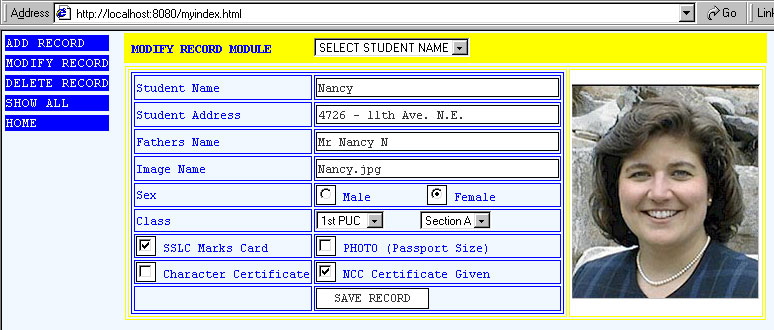
Downloading Installing my Servlet codes to make it work
|
1. Unzip javamysql.zip into D:\
2. This creates a directory into D:\javamysql
3. For time being u cut n paste the already existing java files in D:\tomcat\webapps\examples\WEB-INF\classes directory into someother place
4. Copy and paste all my .java [addrec.java, addrecresp.java etc..] files into D:\tomcat\webapps\examples\WEB-INF\classes
5. Start your tomcat with my batchfile D:\james This will start your tomcat with required classpaths set
6. In my java files Edit IP address, MySQL database username and password to suit your requirement and setup
7. Go to D:\tomcat\webapps\examples\WEB-INF\classes compile all java files here
8. D:\tomcat\webapps\examples\WEB-INF\classes\>javac *.java
9. place all image files .jpg, .gif, and .html files under this directory D:\tomcat\webapps\ROOT
10.On your Internet Explorer Browser Type in http://localhost:8080/myindex.html or http://194.205.24.233:8080/myindex.html
|
|
Final Output at http://localhost:8080/myindex.html or http://194.205.24.233:8080/myindex.html
|
|
|
My Dream to be your Friend and Create a Group of Intelligent and Understanding Programmers
|
 If you like this article and/or code mailme or Join our small Java User Group which is by the Programmers for the Programmers , If you like this article and/or code mailme or Join our small Java User Group which is by the Programmers for the Programmers ,
Till we meet next time BYE  Kind Regards - James Smith Kind Regards - James Smith
|
|
Java, J2EE, J2SE and all Java-based marks are trademarks or registered trademarks of Sun Microsystems, Inc.
in the United States and other countries. 
|
|