|
Session Bean
|
1. Non-Permanent: They are non permanent that is they dont exist after the browser is closed .
2. Non-Sharable: Most of them are non sharable unless u are using "Handles".
3. Non-Storage: They are not stored in Database for later retrieval.
|
|
Hardware and Software Requirements
|
1. JDK1.2.2 and above Download for this example i am using JDK1.3.1
file name : j2sdk-1_3_1_02-win.exe
Download Location : http://java.sun.com
2. J2EE i am using 1.2.1 as i am yet to download that higher version
file name : j2sdkee-1_2_1-win.exe
Download Location : http://java.sun.com
2. Jakarta-ANT i am using 1.4.1
file name : jakarta-ant-1.4.1-bin.zip
Download Location : http://ant.apache.org/
|
|
Installation
|
1. I am using Windows XP Operating System
2. Click on j2sdk-1_3_1_02-win.exe you will be able to install it easily in D:\JDK1.3.1 Directory
3. Click on j2sdkee-1_2_1-win.exe its installation is also easy
4. My Installation directory is D:\j2sdkee1.2.1
5. Unzip this jakarta-ant-1.4.1-bin.zip into D:\ this will create D:\jakarta-ant-1.4.1-bin directory rename this to D:\Ant
|
|
Configuration on Win98
|
01. EDIT c:\Autoexec.bat to make it look something like this
SET JAVA_HOME=D:\jdk1.3.1
SET J2EE_HOME=D:\j2sdkee1.2.1
SET ANT_HOME=D:\Ant
SET PATH=c:\windows;c:\windows\command;c:\;\D:\jdk1.3.1\bin;D:\j2sdkee1.2.1\bin;D:\Ant\bin
|
02. Save and Exit
03. Restart your computer (for changes to take immediate effect)
|
|
Configuring on Windows NT/XP/Advanced Server
|
01. Right Click on My Computer, Select Properties Menu Item
02. Click Advanced Tab , Select System Variables Button
03. You see New System variable
04. Click New Button , in the variable name box type in JAVA_HOME
in the Variable value type in D:\jdk1.3.1 Hit OK Button
05. Similarly set up J2EE_HOME=D:\j2sdkee1.2.1 and ANT_HOME=D:\Ant
06. Your path variable must be edited something like this
path={All other paths};D:\j2sdkee1.2.1\bin;D:\jdk1.3.1\bin;D:\Ant\bin
06. Re-start your computer
|
D:\>set
JAVA_HOME=D:\jdk1.3.1
J2EE_HOME=D:\j2sdkee1.2.1
ANT_HOME=D:\Ant
path={All other paths};D:\jdk1.3.1\bin;D:\j2sdkee1.2.1\bin;D:\Ant\bin
// And few more lines which are not important to us //
|
|
|
Step 1 : Creating our Stateless Session Bean :
|
1. create a Directory D:\J2EE
2. D:\J2EE\Beans and D:\J2EE\ClientCode
|
|
Step 2 : Create the HTML Page : --------> Save in D:\J2EE\ClientCode\homepage.html
|
Our purpose will be to build the most easiest Simple Session Bean, we start with writing a html
code which accepts 2 numbers and adds them and shows the sum,
<HTML>
<TITLE>Code by James Smith : [email protected]</TITLE>
<BODY bgcolor="WHITE">
<CENTER><FONT face="arial" size="2">Session Bean Demo</FONT></CENTER>
<FORM method="GET" action="MyAlias2">
 <TABLE border="0" cellspacing="2" cellpadding="2" align="center">
  <TR>
	<TD><STRONG>First Number</STRONG></TD>
	<TD><INPUT TYPE="TEXT" NAME="numb1"></TD>
  </TR>
  <TR>
	<TD><STRONG>Second Number</STRONG></TD>
	<TD><INPUT TYPE="TEXT" NAME="numb2"></TD>
  </TR>
  <TR>
	<TD></TD>
	<TD><INPUT TYPE="SUBMIT" VALUE="ADD"></TD>
  </TR>
 </TABLE>
</FORM>
<BODY>
</HTML>
|
|
Step 3 : Create the Session Beans : --------> Save in D:\J2EE\Beans\
|
The home interface is the book-keeping interface.
It helps clients create a new instance of an EJB, or to find an existing instance of an EJB.
The methods used to find existing EJBs are known as "finder" methods.
Since session beans are not designed to be shareable,
there are no session bean finder methods
1 : HOME INTERFACE : Save in D:\J2EE\Beans\AddHome.java
package Beans;
import java.rmi.RemoteException;
import javax.ejb.CreateException;
import javax.ejb.EJBHome;

public interface AddHome extends EJBHome
{
	Add create() throws CreateException, RemoteException;
}
2 : REMOTE INTERFACE : Save in D:\J2EE\Beans\Add.java
Remote Interface is just like declaring RMI interface , all methods are declared here which are available to the end user
and all methods must throw RemoteException, Remote interface just defines the basic functionality of the bean.
The remote interface is the business end of the EJB. This is the set of actual services provided by the EJB.
The remote interface, however, needs an implementation which is supplied by the EJB programmer.
package Beans;
import javax.ejb.EJBObject;
import java.rmi.RemoteException;

public interface Add extends EJBObject
{
  public int calcSum(int numb1, int numb2) throws RemoteException;
}
3 : Session Bean class extends SESSIONBEAN INTERFACE : Save in D:\J2EE\Beans\AddBean.java
Eventhough Remote interface defines the basic functionality of the bean the actual implimentation happens in Session Bean
Interface .The home interface doesn't actually need an implementation!
This is because its tasks are straightforward enough that the EJB container can automatically provide the implementation.
package Beans;
import java.rmi.RemoteException;
import javax.ejb.SessionBean;
import javax.ejb.SessionContext;

public class AddBean implements SessionBean
{
	public int calcSum(int numb1, int numb2)
	{
    	int sum = numb1+numb2;
    	return sum;
	}
  	public void ejbCreate() { }
  	public void setSessionContext(SessionContext ctx) { }
  	public void ejbRemove() { }
  	public void ejbActivate() { }
  	public void ejbPassivate() { }
  	public void ejbLoad() { }
  	public void ejbStore() { }
}
|
|
Step 4 : Compile the Session Bean :
|
D:\>CD J2EE
D:\J2EE>set CPATH=.;D:\j2sdkee1.2.1\lib\j2ee.jar
D:\J2EE>javac -d . -classpath %CPATH% Beans/AddBean.java Beans/AddHome.java Beans/Add.java
|
|
Step 5 : Create the Servlet : --------> Save in D:\J2EE\ClientCode\MyServlet.java
|
Retrieves the user data
Looks up the session bean
Passes the data to the session bean
Upon receiving a value back from the session bean,
creates an HTML page to display the returned value to the user.
import javax.servlet.*;
import javax.servlet.http.*;
import java.io.*;
import javax.naming.*;
import javax.rmi.PortableRemoteObject;
import Beans.*;

public class MyServlet extends HttpServlet
{
 AddHome homeadd;

 public void init(ServletConfig config) throws ServletException
 {
   try
   {
     InitialContext ctx = new InitialContext();
     Object objref = ctx.lookup("MyJNDI");
     homeadd = (AddHome)PortableRemoteObject.narrow(objref, AddHome.class);
   }
   catch (Exception NamingException)
   {
     NamingException.printStackTrace();
   }
  }

  public void doGet (HttpServletRequest request, HttpServletResponse response)
  throws ServletException, IOException
  {
       String socsec = null;
       int multiplier = 0;
       double calc = 0.0;
       int sum = 0;
       PrintWriter out;
       response.setContentType("text/html");
       out = response.getWriter();
       out.println("<HTML><HEAD><TITLE>[email protected]</TITLE></HEAD><BODY>");

	try
	{
	   Add theCalculation;

	   String numb1 = request.getParameter("numb1");
   	   int integernumb1 = Integer.parseInt(numb1);

	   String numb2 = request.getParameter("numb2");
   	   int integernumb2 = Integer.parseInt(numb2);

	   theCalculation = homeadd.create();

	   sum = theCalculation.calcSum(integernumb1, integernumb2);
	}
	catch(Exception CreateException)
	{
	   CreateException.printStackTrace();
	}
	out.println("<P>SUM OF NUMB1 + NUMB2: " + sum + "<P>");
	out.println("</BODY></HTML>");
	out.close();
  }

  public void destroy()
  {
    System.out.println("Destroy");
  }
}
|
|
Step 6 : Compile the Servlet :
|
D:\J2EE>CD ClientCode
D:\J2EE\ClientCode>set CPATH=.;D:\j2sdkee1.2.1\lib\j2ee.jar;D:\J2EE
D:\J2EE\ClientCode>javac -d . -classpath %CPATH% MyServlet.java
|
|
Step 7 : Start the J2EE Application Server :
|
D:\J2EE>j2ee -verbose
|
|
Step 7 : Start the Deploy Tool :
|
D:\J2EE>deploytool
|
|
Step 8 : Create J2EE Application : ( myApp.ear ).
|
1. Create a new J2EE application ( myApp.ear ).
2. Create a new enterprise bean ( myBean.jar ).
3. Create a new web component ( myWebComp.war ).
4. Specify JNDI name for the enterprise bean ( MyJNDI ).
5. Specify the Root Context for the J2EE application ( myRoot ).
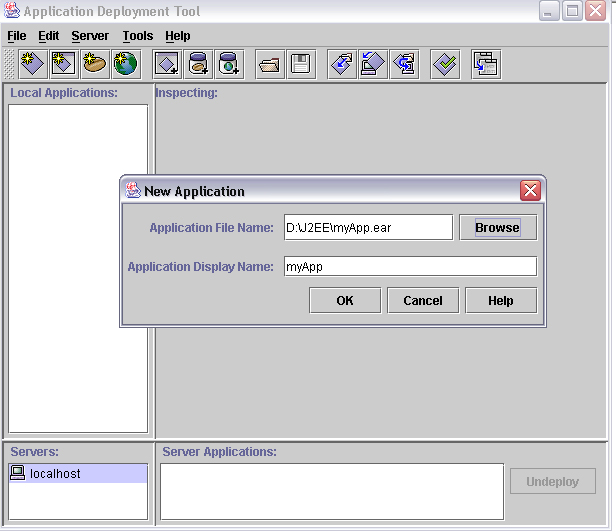
a. from File menu : Select New Application .
b. we would like to put our Application in D:\J2EE Directory
c. Click on Browse Button Select D:\J2EE Directory
d. In the file name type in myApp.ear
e. Click on new Application
|
|
Step 8 : Create Session Bean :
|
1. from File menu : Select New Enterprise Bean
2. Hit Next
2. Enterprise Bean will go in : myApp
3. Display name: myJAR
4. Description: Small Code to add 2 numbers
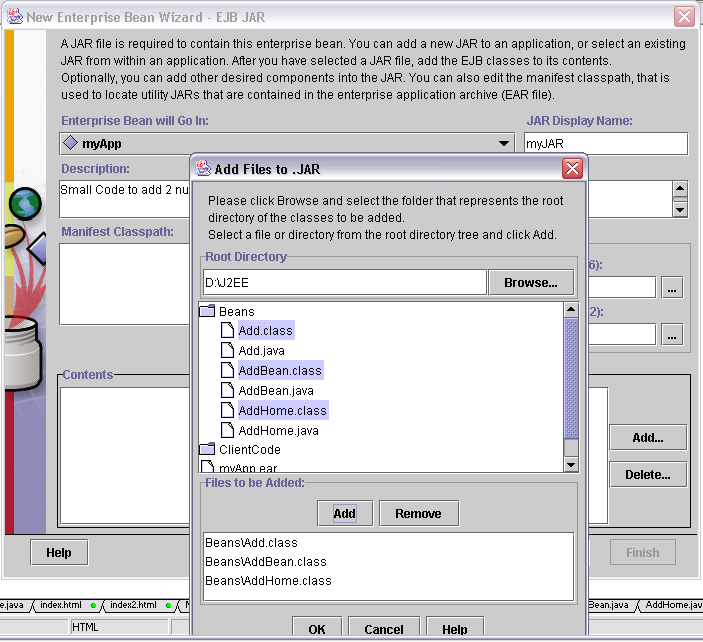
5. Click Add Button next to contents Window
5. Root Directory must be D:\J2EE
6. Double click on Bean Directory
7. Highlight Add.class, AddBean.class, AddHome.class
8. Click on Add Button and OK so that contents window will have
Beans\Add.class
Beans\AddBean.class
Beans\AddHome.class
9. Click Next
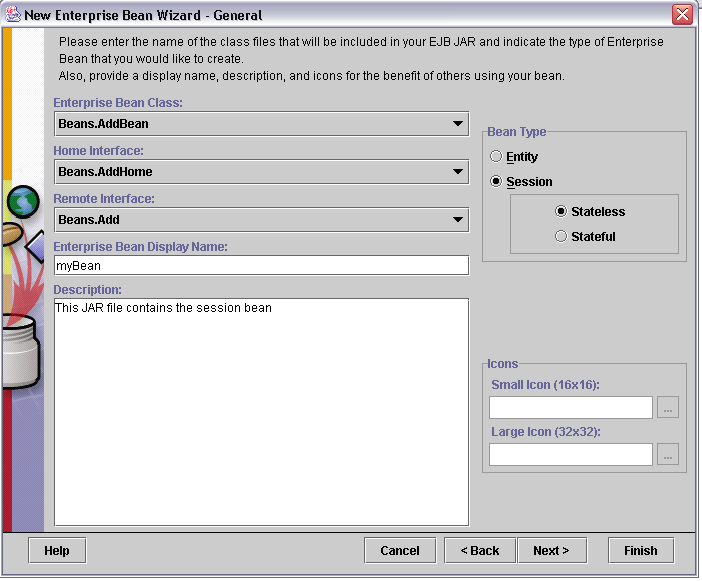
 10. classname: Beans.CalcBean
11. Home interface: Beans.CalcHome
12. Remote interface: Beans.Calc
13. Bean type: Session and Stateless
14. Display name as myBean
15. Description: This JAR file contains the session bean.
10. Click Next . and FINISH
|
|
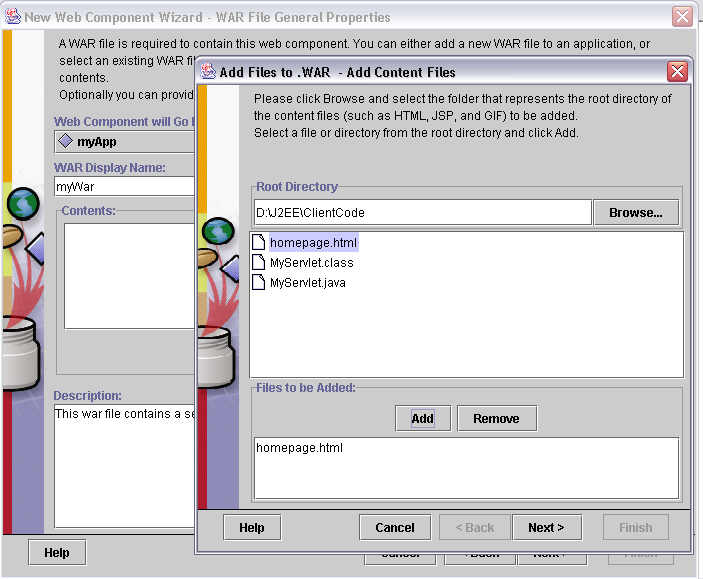
Step 9 : Create Web Component :
|
1. File menu : Select New Web Component Click on NEXT
2. WAR file: myApp
3. Display name: myWar
4. Description: This war file contains a servlet and an html page.
5. Click on Add Button Select D:\J2EE\ClientCode Directory
6. Highlight homepage.html click on Add then Next
7. Similary add MyServlet.class and click FINISH
8. Click Next and then Select Servlet Radio Button Next Again
9. Servlet class MyServlet
10. Web Component Display Name: WebComp
11. Add Aliases and Enter MyAlias2 in the Text Box provided and FINISH
|
|
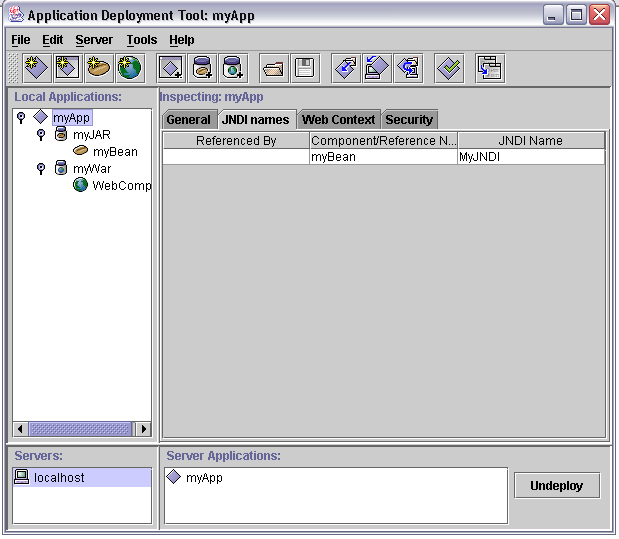
Step 10 : Specify JNDI Name
|
1. Select the MyApp file in the Local Applications window.
2. Then Select JNDI Names. The Inspecting window shows a three-column display with one row. myBean is listed in the middle column.
3. In the far right column under JNDI name, type MyJNDI. This JNDI name is the same JNDI name passed to the MyServlet method. Press the Return key.
|
|
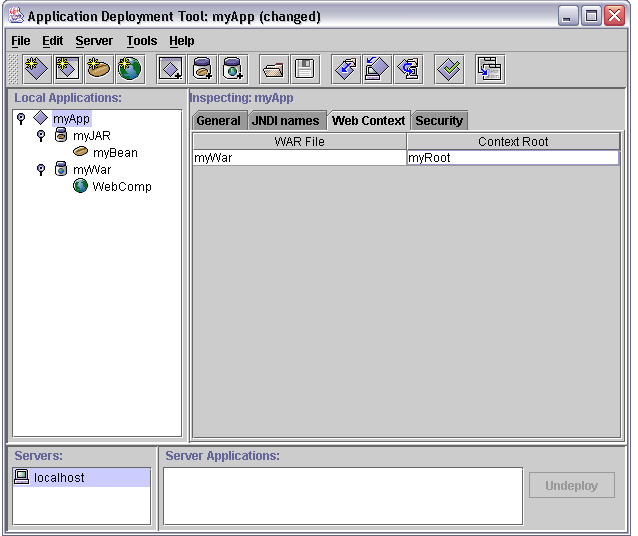
Step 11 : Root Context :
|
1. Click the Web Context tab at the top of the Inspecting window. You will see myWar in the left column
2. Type myRoot in the right column ad Hit Enter Key
|
|
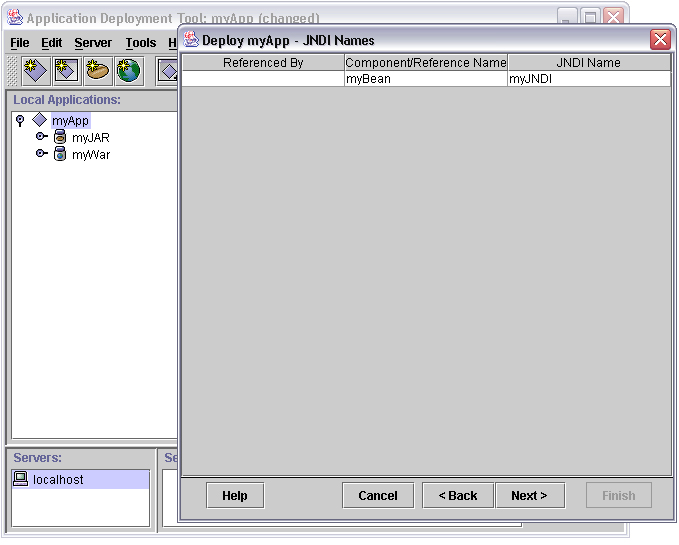
Step 12 : Deploy the J2EE Application :
|
1. From the Tools menu, choose Deploy Application . A Deploy MyApp dialog box pops up.
Verify that the Target Server selection is either localhost
or the name of the host running the J2EE server.
2. Click Next . Make sure the JNDI name shows myJNDI . If it does not, type it in yourself, and press the Return key.
3. And component/Reference Name is myBean
4. Click Next . Make sure the Context Root name shows myRoot . If it does not, type it in yourself and press the Return key
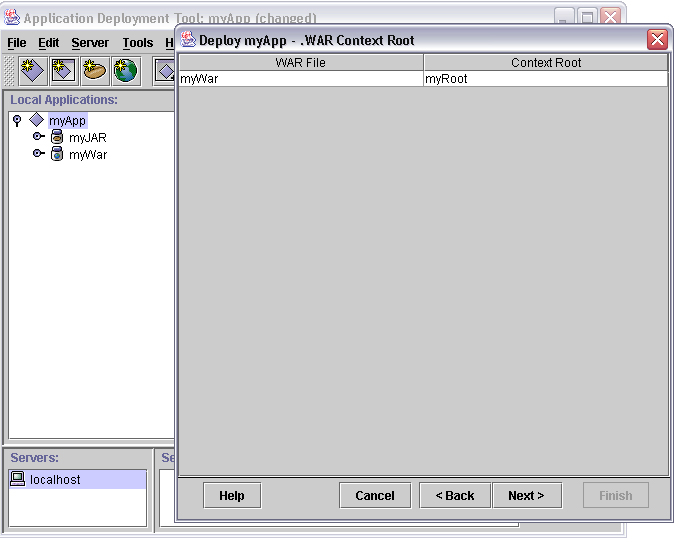
5. Click Finish to start the deployment. A dialog box pops up that displays the status of the deployment operation.

|
|
Step 13 : Run the J2EE Application :
|
1. In your Browser Type in http://localhost:8000/myRoot/homepage.html
2. Enter 2 numbers may be 2 and 4 and when u click ADD u will get Total to be 6 WOW,
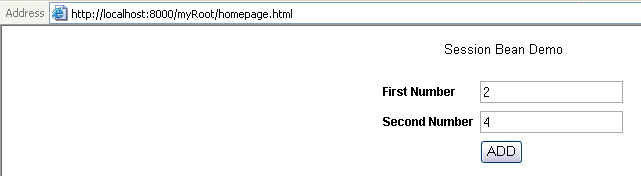
3. If u were a PHP programmer u would be laughing all the way to your home so much work done in J2EE to display total of 2 numbers 
4. Instead u would have done
<?
$sum = $numb1+$numb2;
println("The sum is $sum ");
?>
|
|
What Next ? >> Entity Bean >>
|
|
My Dream to be your Friend and Create a Group of Intelligent and Understanding Programmers
|
 If you like this article and/or code mailme or Join our small Java User Group which is by the Programmers for the Programmers , If you like this article and/or code mailme or Join our small Java User Group which is by the Programmers for the Programmers ,
Till we meet next time BYE  Kind Regards - James Smith Kind Regards - James Smith
|
|
Java, J2EE, J2SE and all Java-based marks are trademarks or registered trademarks of Sun Microsystems, Inc.
in the United States and other countries. 
|