*if in any doubt - consult your local guitar shop
Setting up a guitar can make a huge difference to how easily - and how quickly
you'll be able to play. Even if your guitar is brand new it may benefit from
'setting up'. Many shops don't bother with setting up and those that do often
set the action high - too high for my liking. The setup described here is for
soloists who want speed, and are prepared to accept a small amount of string
buzzing on loud notes - unnoticeable if you've got the 'Overdrive' switched
on! The procedures described here are not difficult, but require patience and
care. It's a good idea to practice first on a cheap old guitar and see how well
you can get it to play.
For the complete setup you might need all the following
Screwdriver or spanner - whatever fits the Bridge adjusters on your guitar.
Socket spanner with perfect fit for the truss rod
Warding files (very small files of different shapes) for Top Nut
Feeler guages (as used for car spark plugs) for measuring the action
An accurate guitar tuner - unless you've got a really good ear.
For the easiest and fasted playing the strings of the guitar need to be very
close to the frets. If they are too close the frets may cause the strings to
buzz - and deaden the note. If the strings are too high it needs more pressure
and takes more time to push
the string down.
The strings should be 'played in' - not brand new and tuned to your normal
pitch.
Check the clearance between the strings and the 20th fret. The bottom E (fattest
string) should have about 1.5 to 2 mm clearance. The top E (thinnest string)
should have 1 to 1.5 mm clearance.
If the gap between the string and fret is greater, lower the bridge down a little at a time. A drop of thin oil on the adjusters might be helpful and it may be necessary to slacken the strings. If the 'action' is too low, and you have to raise the bridge up, be sure to slacken the strings a little first. If the strings buzz too much when you test the guitar you may have to raise the action a little, but check the truss rod first - as described below.
Make sure you have the right weight of strings fitted. If you want to aim for
speed use 'lighter' i.e. thinner strings. My own choice is Ernie Ball Super
Slinky which have sizes 42, 32, 24, 16, 11, 9, however, there are many types
of strings to choose from. Whenever you try a different make or weight of string
you need to check the tuning at the bridge (see below).
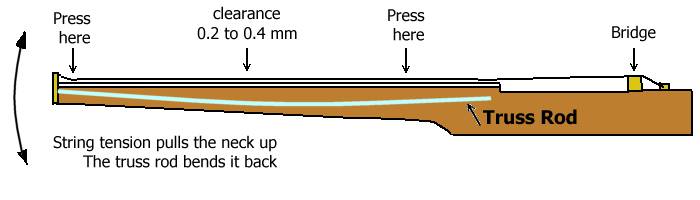
2. Adjusting the Truss Rod
With the hieght of the strings set, check that the neck of the guitar is 'straight'.
Press down the string on fret 1 and fret 18. There should be about 0.2 to 0.4mm
clearance at fret 8.
Clearance more than 0.4mm at fret 8:
If the clearance is greater the neck is too curved i.e. the tension of the
strings is bending the neck upwards. To adjust this, slacken off the strings,
fit the socket spanner to the truss-rod adjusting nut at the end of the neck
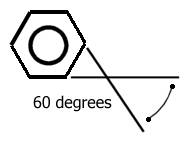
and slowly tighten the truss rod by turning the nut clockwise -
ONE 12TH TO 6TH OF A TURN ONLY (30 to 60 DEGREES.)
Retune the strings and measure the clearance again. Adjust the truss rod a
little at a time, overtightening the truss rod can destroy the neck!
Clearance less than 0.2mm at fret 8:
If the string is touching the fret the neck does not have enough curve. In this case the Truss Rod needs to be slackened, working as above but turning the Truss Rod adjusting nut anti-clockwise. NOTE: if you have lightwieght strings fitted, it may take time for the neck to settle into a new position (the strings are not pulling hard) so turn the adjusting nut, retune the guitar and leave it for an hour before checking again. If you find that you've slackened off the truss rod to the point where the adjusting nut is lose - and the neck still isn't giving clearance at fret 8, fitting slightly heavier gauge strings might help, or temporarily raising the bridge will give the strings more leverage.
3. Checking the Top Nut
Some guitars have a fret '0', close to the Top Nut, in this case the nut is only for keeping the strings in line. On other guitars the nut sets the height of the strings so if it's worn the strings may be too low. Fitting a new top nut is straightforward but needs care.
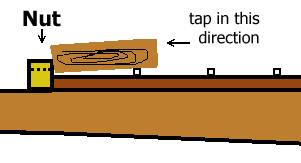
First, score all round the edge of the nut with a craft knife - to avoid breaking off chips of varnish. Put a piece of wood against the nut, resting on fret 1, and tap it with a hammer. The nut should come off easily.
Clean off old glue with a strip of sandpaper.
Using the original nut as a guide, mark out the new nut for the string positions
and start them with a junior hacksaw or the edge of a narrow file. Fit the new
nut with craft glue, remember you may want to replace the nut again in a few
years so don't use 'super glue' or epoxy resin - unless you only use a couple
of small blobs. When you stick the nut you must apply firm pressure for a few
minutes to seat it well.
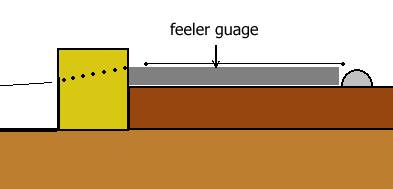
Now the slots in the nut must be cut to the correct depth, i.e. so that the slot is the same height above the fingerboard as a fret (or just fractionally higher). The slot should also have a slight angle as in the picture:
The angle ensures that the string is resting on the edge of the nut. Placing a feeler guage of the correct thickness (the same height as a fret) against the nut makes cutting the slots to the correct depth easier.
Tuning the Guitar
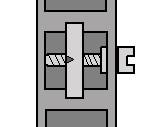
After adjusting the truss rod or bridge height or fitting different strings it may be necessary to retune the guitar with the adjustable bridge pieces. Most electric guitars have some adjustment at the bridge which allows the support for each individual string to be moved backwards or forwards along the length of the string.
Plug the guitar into the tuner and tune the first string accurately. Now press the string down on the 12th fret and check the tuning. If the result is the same as the open string it's ok. If the fretted note is higher than the open string the string needs to be lengthened, so adjust the support away from the neck. If the fretted note is lower than the open string the string needs to be shortened, so adjust the support towards the neck.
Note: it's not always possible to get every string perfect due to limited adjustment. My old Les Paul copy only has 4mm of adjustment on each string - so it's a case of getting it as good as possible.