 |
|---|
| Floor Liners : I have the front and rear set of Husky Liners Floor Liners in Black. Purchased from Cabela's web site. They are made of a rubberized thermo-plastic material. These are a great in protecting the truck's Oak colored carpeting, especially in the winter. I have the new version which have stay put nibs (SPiN) on the bottom, the mats do not move around at all. The driver's pedal area does NOT need to be trimmed, as some have had to do with the older versions. |
|||||||||||||||||||||||||||||||||||||||||||||||||||
|
|||||||||||||||||||||||||||||||||||||||||||||||||||
| |
|||||||||||||||||||||||||||||||||||||||||||||||||||
| Wind Deflectors : I have a 4 piece set, (front and rear doors) of WeatherFlectors by ClimAir. Purchased from MacNeil Automotive Accessories web site. I chose these because of their optically transparent properties and the fact that they mount without the use of tape. They fit into the window channel and have a slimmer profile on the vehicle than other brands. Also the cut and quality of the cast acrylic material seems to be of high quality. |
|||||||||||||||||||||||||||||||||||||||||||||||||||
|
|||||||||||||||||||||||||||||||||||||||||||||||||||
| |
|||||||||||||||||||||||||||||||||||||||||||||||||||
| Toyota Sunroof Wind Deflector : Purchased from Texas Toyota Wholesale Parts web site. This is the original equipment manufacturer sunroof wind deflector. The option code is SD. At highway speeds it greatly reduces the wind noise in the cabin. But when driving between 25-40 mph with the sunroof completly open and all windows closed an unbearable interior noise is created. To counteract this situation, open the cargo window 1/4 inch, the pressure is released and the sound fully disappears. |
|||||||||||||||||||||||||||||||||||||||||||||||||||
|
|||||||||||||||||||||||||||||||||||||||||||||||||||
| |
|||||||||||||||||||||||||||||||||||||||||||||||||||
| Toyota Cargo Net : Purchased from Texas Toyota Wholesale Parts web site. This is the original equipment manufacturer cargo net. The option code is CN. This is installed by drilling a 1/4 inch hole on each side of the cargo compartment at 14 inches above the floor level and about 4 13/16" in from the weatherstripping. The net keeps loose items from bouncing around the cargo area. |
|||||||||||||||||||||||||||||||||||||||||||||||||||
|
|||||||||||||||||||||||||||||||||||||||||||||||||||
| |
|||||||||||||||||||||||||||||||||||||||||||||||||||
| Factory Roof Rack Rail Removal : I have removed the 3 inner rails from the factory roof rack. These 3 rails were mounted flush against the painted roof of the vehicle. There were a few reasons for removal. Washing and waxing is easier without them. Water drained slowly from between them after raining, removing them keeps stagnant water off the roof. Dirt and dust would get trapped under them and over time can buff the paint. Since I only use the inner rails a few times per year if that, removal is a good idea. They store conveniently in the cargo area, and can be installed in seconds with no tools when needed. There is no need to remove the square nuts that are left inside the side rails after removing the inner rails. Just put back the bolts and hand tighten them down, then they will not move around. |
|||||||||||||||||||||||||||||||||||||||||||||||||||
|
|||||||||||||||||||||||||||||||||||||||||||||||||||
| |
|||||||||||||||||||||||||||||||||||||||||||||||||||
| Cargo Organizer : This is a handmade piece. The idea here is a low budget storage unit that does not intrude on the space between the wheelhousings. This organizer takes advantage of the underutilized space above and in front of the passenger side rear wheel. The legnth is 30", 11" of which is in front of the wheel and 19" on top of it. The interior width is 7 1/4". Overall height is 14" which keeps it below the tonneau cover. The height of the inner shelf is 8" which makes it lay directly on the top of the wheelhousing. I used 1/2" pine plywood for the two sides and the top, 3/4" pine for the front, back, bottom and inside shelf. I purchased 3 yards of carpeting at a local automotive parts store for $10. The carpeting is mounted using a can of spray type adhesive. The color does not match the interior exactly but still looks good, great considering the price. I did find trunk carpeting at a local stereo installers shop which would match the factory color very close but for the price it was not worth it for my purposes. It was $10 a yard and would have to be special ordered requiring a 5 yard minimum purchase. Add shipping and tax and the carpeting bill alone would total $70+. The organizer is mounted securely in place yet not permanently. Two screw eyes are positioned on the box in unobtrusive locations. One on the upper back, and one on the front portion of the bottom. The rear screw eye is cable tied to the rear seatback latch, and the front screw eye to the cargo tie down. If I need to access the factory rear quarter panel storage area, I just cut the front cable tie. |
|||||||||||||||||||||||||||||||||||||||||||||||||||
|
|||||||||||||||||||||||||||||||||||||||||||||||||||
|
|||||||||||||||||||||||||||||||||||||||||||||||||||
| |
|||||||||||||||||||||||||||||||||||||||||||||||||||
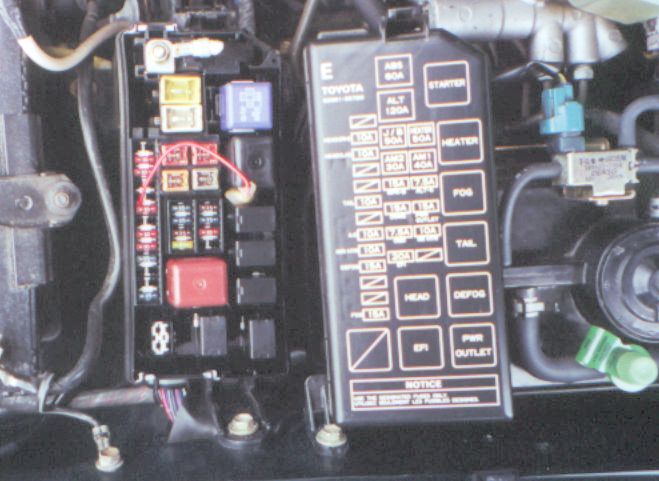
| Factory Fog Lamp Re-Wire : The factory fog lamps are wired to illuminate only if the headlamps are on. They also shut off when the high beams are activated. I prefer to have the ability to switch on the fogs when only the parking lamps are on and I like them to stay on while the high beams are activated. To accomplish this remove the fog light relay located in the engine compartment fuse panel and bend its top prong so that it no longer inserts into its usual location. That was where it was getting power from the headlamps. Take a short piece of 16 gague wire and crimp on a female disconnect with a 0.187 inch tab. Do not try to use a standard 0.250 inch tab disconnect because it will not fit tightly enough. Connect the disconnect to the top prong of the fog light relay. Run the other end of the wire to the left side of the 10amp taillamp fuse. Now power is available to the fogs when the parking lamps are on and they do not stop receiving power when the high beams are switched on. Update: A visitor to my site who owns a year 2000 4Runner has informed me of his results with this modification... "After installing the jumper like you did, I'm able to keep the driving lights on with the high beams, but they still don't come on with the parking lights." The 2000+ Runners come standard with daytime running lights (DRL's) and this must have something to do with it. |
|||||||||||||||||||||||||||||||||||||||||||||||||||
|
|||||||||||||||||||||||||||||||||||||||||||||||||||
| |
|||||||||||||||||||||||||||||||||||||||||||||||||||
| Fire Extinguisher : I rely on a 2.5 pound Halotron Fire Extinguisher for fire saftey. This was purchased from Fire End Corporation. I chose the Chief Croker Halotron I model # A385TS with vehicle mounting bracket. It is made by Amerex, using Halotron-1 which is manufactured by American Pacific Corporation. Halotron-1 is environmentally acceptable, meets EPA approval and is the government approved and specified clean agent alternative intended to replace Halon. It is ideal for protecting office computer areas, data storage, telecommunications and high tech clean rooms. Halotron-1 is a clean agent fire extinguishing system that is electrically nonconducting, volatile, or gaseous and does not leave a residue upon evaporation. Basically it is great for automotive applications. The extinguisher comes with a sturdy mounting bracket which I mounted to my cargo organizer.
|
|||||||||||||||||||||||||||||||||||||||||||||||||||
| |
|||||||||||||||||||||||||||||||||||||||||||||||||||
| Sun Shade : I purchased a UVS100 Heat Shield from Performance Products during their 15% off sale. It is made by CoverCraft. I wanted this to reduce interior temperatures and fading when parking outdoors during the daytime. It is custom patterned to the exact 4Runner windshield. It's made using laminated and insulated construction, the outside being a silver reflective material and the inside being soft felt. It accordian folds up and stores in a vinyl case.
|
|||||||||||||||||||||||||||||||||||||||||||||||||||
| |
|||||||||||||||||||||||||||||||||||||||||||||||||||
| Front Splash Guards : Whenever you take your vehicle off road there is a chance of damaging the factory running boards. It takes very little time to remove them. Sometimes I will remove them and when I do I like to install these Toyota Splashguards. They are made to fit the factory SR5 black textured flares I have on my Highlander.
|
|||||||||||||||||||||||||||||||||||||||||||||||||||
| |
|||||||||||||||||||||||||||||||||||||||||||||||||||
| Black Pearl Antenna Nut : I had the dealer install my black pearl emblem package before I accepted delivery of my new vehicle. What I did not realize at the time was that a black pearl antenna nut was available. The antenna nut was the last piece of chrome left on my 4Runner Highlander. The black pearl antenna nut matches the emblems. It is very easy to install. I was able to unscrew the old nut off by hand and that is how I installed the new one as well.
|
|||||||||||||||||||||||||||||||||||||||||||||||||||
| |
|||||||||||||||||||||||||||||||||||||||||||||||||||
| Lev-O-Gage Inclinometers : A LEV-O-GAGE inclinometer or 'tilt meter' indicates precise incline up to 45 degrees. One Lev-O-Gage which is mounted on the dashboard to the left of the steering wheel above the headlight dimmer switch measures side-to-side tilt angle. A second Lev-O-Gage mounted on the side pillar above the passenger seat belt anchor shows angle of climb or down grade. The gauge is 3.50" wide and 1.75" tall. The brass ball rides in special damping fluid to indicate angle. I ordered them from 4x4 Connection.
|


