NOTE: I realize that this guide may seem long at first, but this guide is rather long because there are settings you have to change initially. After these settings have been changed you won't have to change most of them again; except in Virtualdub.
1) Install Smartripper 2.41, DVD2AVI, VFAPIRC, CDEX, DVTool.31, the Divx.502 codec and Virtualdub.
***PLEASE DON'T COPY THIS GUIDE AND USE IT ON YOUR OWN SITE It is scary how long this guide took to make. Please respect the time I have invested in this project and just link to my site.
*NOTE: When you install VFAPIRC make sure to go into the program folder and double click the setup program otherwise virtualdub won�t recognize the file you are going to import into it.
Smartripper 2.41
2) First, you must start the movie in the player you use to play your DVD (WinDVD, PowerDVD, etc.)
� Pause the movie when the actual movie starts; do not pause it on the thx trailer or during the motion picture intros.
� Now the DVD drive is unlocked.
� Open up Smartripper
� There will be a prompt that comes up about ASPI, just click ok
� Keep the settings at the default, but make sure the movie tab is selected in the left upper corner
� Change the file name at the bottom, and then hit start
* It will alert you when the rip is complete. Exit out of Smartripper and the DVD player
DVD2AVI
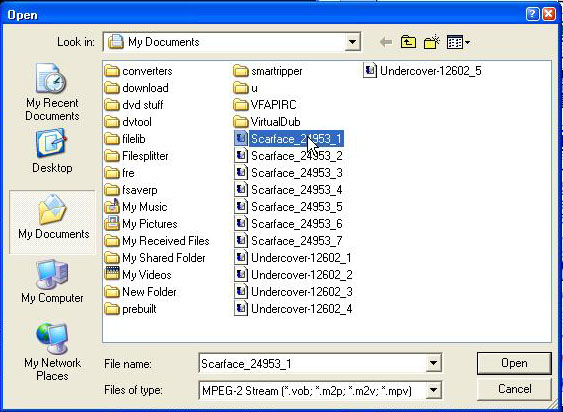
3) Go to open and select vob file 1 of the movie you are ripping.
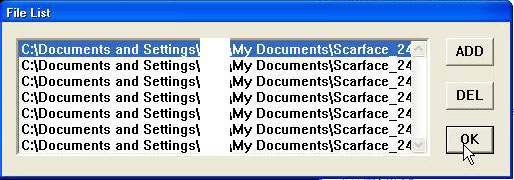
� You will get a prompt next that lists the all the vob files pertaining to that movie � select the top 1 and hit ok
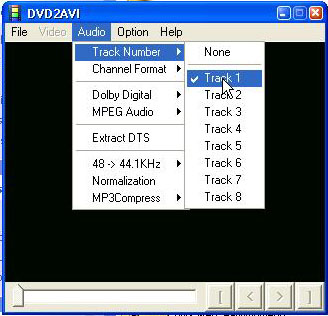
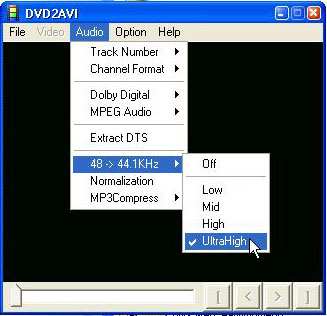
� We need to make some alterations to the audio tab.
o Track number should be set to 1
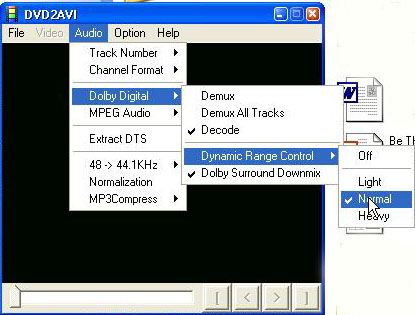
o Channel Format should be at autoselect
o Dolby Digital should be set to decode, �dynamic range control� should be on normal, and dolby surround downmix should also be selected.
o MPEG audio should be set to demux
o 48-44.1 khz should be set to ultrahigh
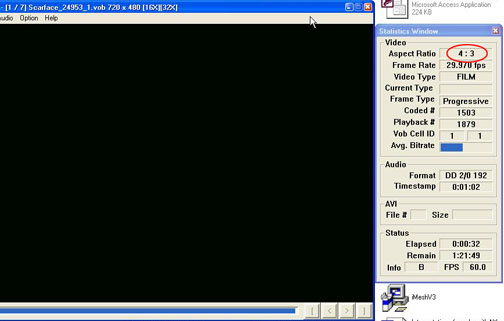
� Now hit F5 to see what video format the movie is in: 4:3 or 16:9. Write this down. Hit escape to stop this process.
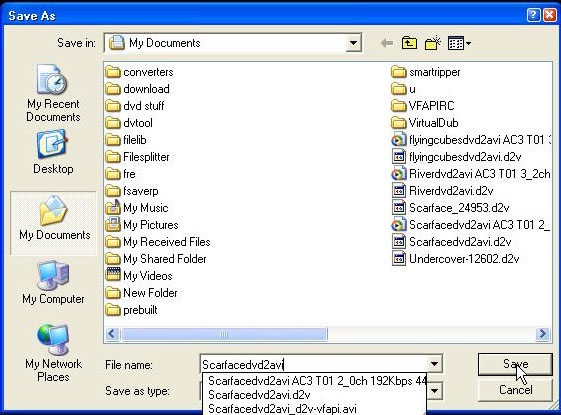
* Go to save project and save it as something that differentiates the file you created from the other d2v file that smartripper creates: save it as movie namedvd2avi. This process will take about the length of the movie.
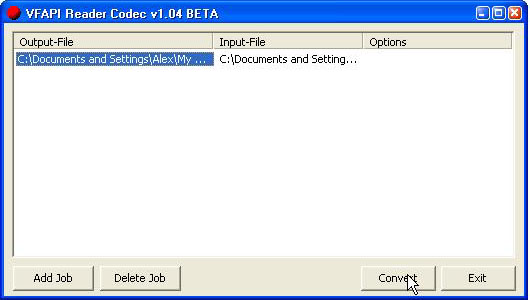
VFAPIRC
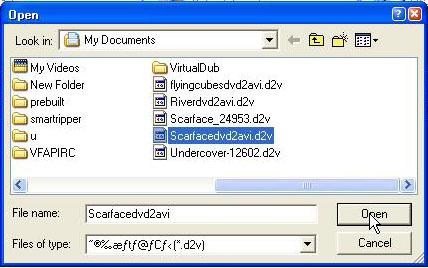
4) Click Add Job and select movie namedvd2avi.d2v that you just created with DVD2AVI. Make sure that both of the check boxes on the left in "Reference AVI Settings" is checked. If you accidentally select the other file you won�t be happy after the ripping process is over so be sure to select the correct d2v file.
Notice in the picture there are two d2v files for Scarface. Make sure you select the one I have highlighted in the picture!
o Click convert: this process will take about 30 seconds or so.
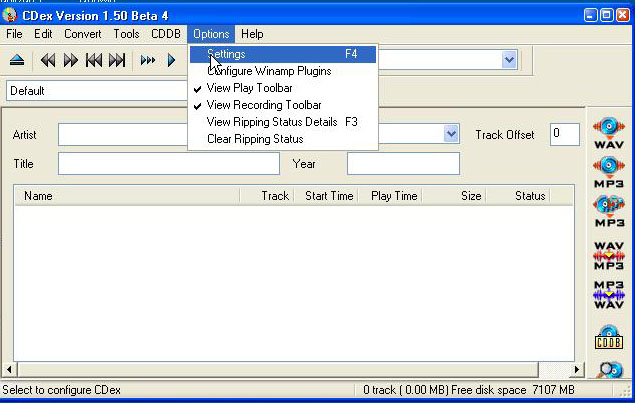
CdeX
5) Go to options and then go to settings
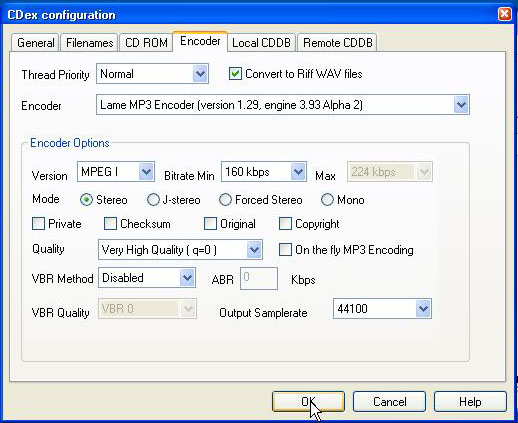
o Next go to the encoder tab
o Check the convert to riff-wave box
o Under this check box you need to select �Lame MP3 encoder� as the encoder
o You want it to be MPEG1, the mode should be stereo, and the quality should be set to very high.
o If �mp3 encoding on the fly� is checked please uncheck it.
o Output samplerate should be set to 44100 khz.
o Make sure that VBR encoding is not checked
o Very Important: the bitrate that you use depends on if you intend to make one disc or two.
If you want to make a movie on one disc (recommended for movies around 1 hour and 30 minutes or so) then use 96 kb/s. If you want to make a movie on 2 discs (recommended for movies that are two hours long or so) then use 160 kb/s.
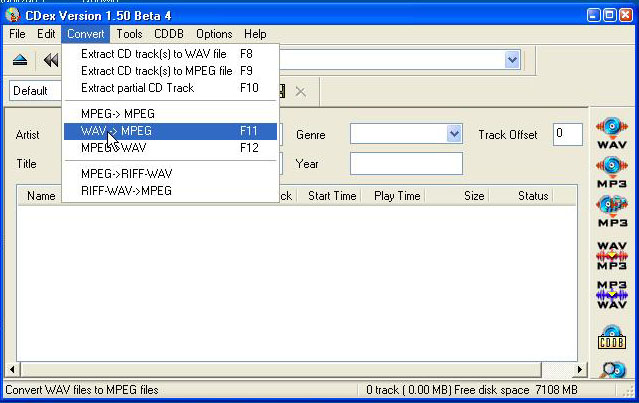
Now, just follow the two pictures to finish the process. Please pay attention to which check boxes are checked on the second photo.
Dvtool.31
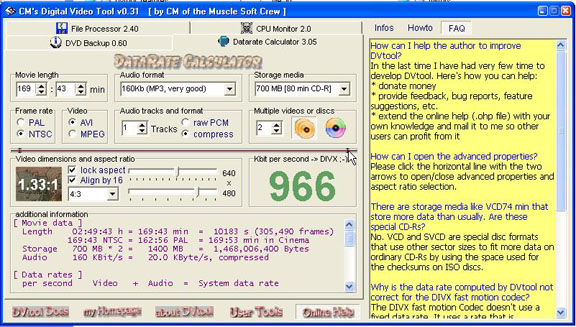
We use this program to determine the proper bitrate for the video file.
6) Input the exact movie length in the upper left corner ( for example: if the movie is 1 hour and thirty minutes long then it would 90 minutes).
o Under audio format put in the bitrate you used for the audio (96 kb/s or 160 kb/s)
o Set storage media to 700 MB
o Set video to avi
o Then, set the number of discs
o This bitrate is what you are going to use in Virtualdub
Some of these features won't be visible unless you select the vertical arrow just to the right of the bitrate (see pic)
Virtualdub
Now we are going to create the Divx.502 avi
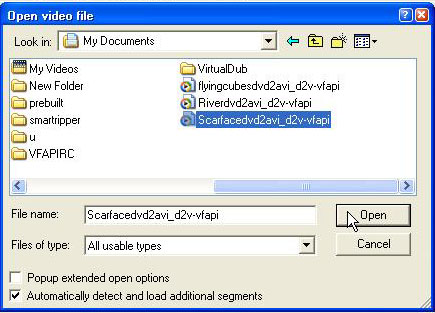
7) Go to file, then open video file. There, open the file named File Namedvd2avi_d2v-vfapi
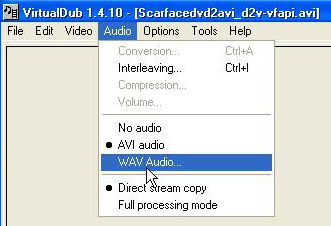
o Now go to the audio tab and select wave audio instead of avi audio.
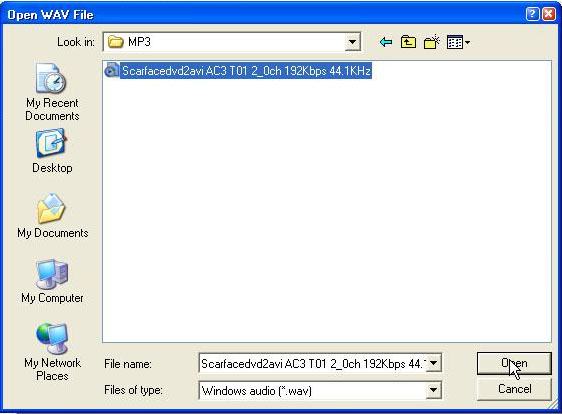
The file name should be something like this: File Namedvd2avi AC3 T01 3_2ch 448Kbps 44.1KHz
o Make sure you select the file that is compressed: it should be around 75 MB to about 175 MB tops. If you use the uncompressed wav file created from DVD2AVI you again will not be very happy with the results
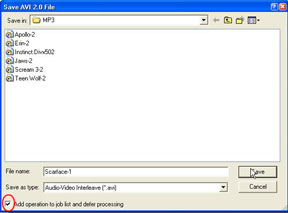
The default setting where you can find this file is My Documents to My Music to MP3
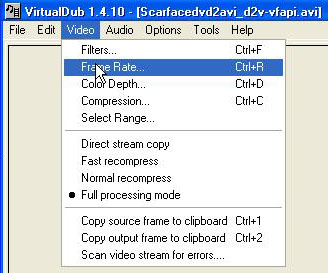
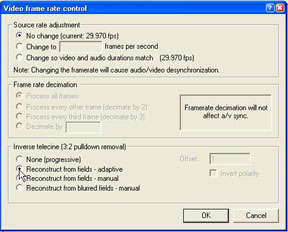
o Under video, go to framerate
o Under inverse telecline select �reconstruct from fields � adaptive�
o Click ok
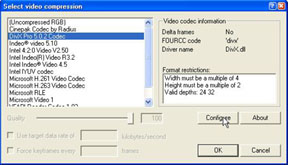
o Still under video, select compression
o Select the Divx Pro 5.0.2 codec
o Click configure on the bottom right hand corner
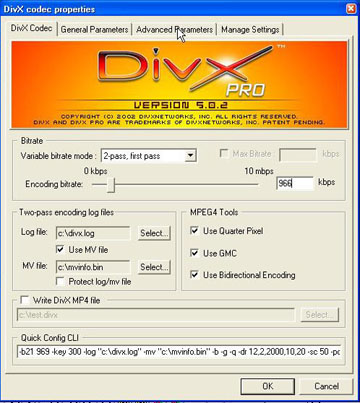
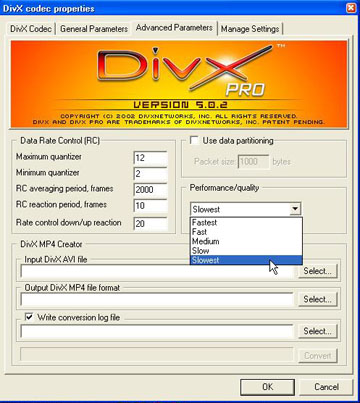
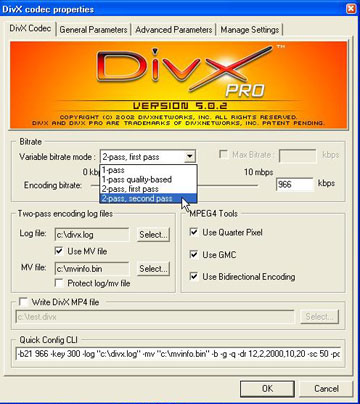
o On the Divx codec tab make sure that you set the variable bitrate mode to �2 Pass, First Pass�
o Put the bitrate you got from DVTool in the bitrate box
o Check all three boxes in the MPEG4 tools as well
o Now go to the �Advanced Parameters� tab. The Performance/Quality dropdown box should be set to slowest. Hit ok twice.
o Now go to video again and select filters
o We are going to use the format we wrote down with DVD2AVI.
� If the video is in 4:3 we are going to resize to 640 X 480
� If the video is in 16:9 we are going to resize to 640 X 360
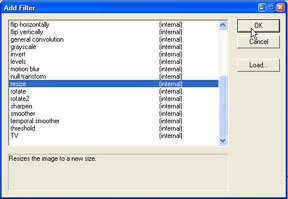
o Click add in the filters section and select the �resize� filter.
Resize the video to one of the two sizes listed just above and the Filter mode should be set to precise bicubic (A=0.60). Click ok.
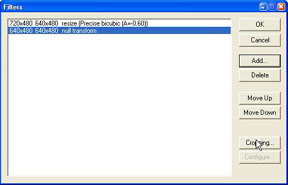
o Click add again and select �null transform only if the video is in 16 X 9 format, or if it is an odd breed such as Scarface is. It is a letterboxed version of a 4:3 so we have to crop it. So, click cropping.
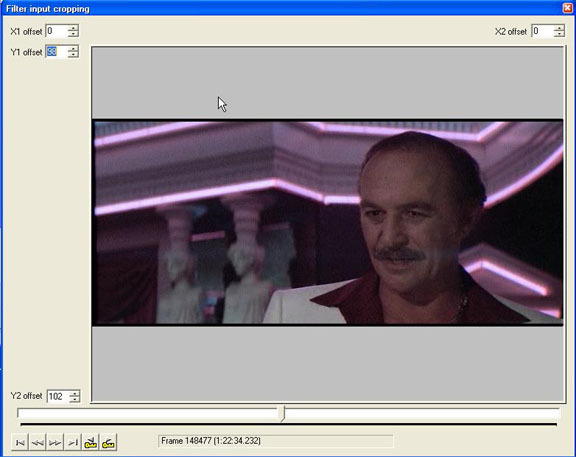
� We are going to crop ONLY vertically, not horizontally.
� Ideally, we want to change the Y1 and Y2 offsets so the final size will either be 640 X 272 or 640 X 352. In this case, going to 640 X 272 will crop into the picture. This is a no-no. Only do this if there is some black to crop off. Do not cut into the picture! Make sure that the number you crop off is divisible by 8! So, I am going to get the final size down to 640 X 280. Click ok and ok again to get back to actual program.
o Go to save avi under the file menu. Name it File Name-1 and make sure to check the �Add operation to job list and defer processing� box.
o Go back to compression in the video menu. Again click configure and change the Variable Bitrate mode to 2 Pass, Second Pass.
Click ok and save avi again under the file menu naming the file Name-2 (ie: Scarface-2.
Make sure to check the �Add operation to job list and defer processing� box again.
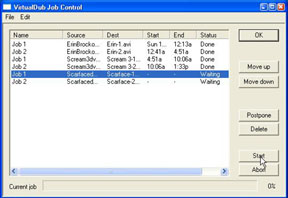
o Now, go to job control under the file menu and click start. After 9 hours File Name-2.avi will be the best looking video imaginable.
Splitting the avi in Virtualdub
8) Do this step only if did the 2 disc bitrate creating a file around 1.36 GB or about 1400 MB.
o Open up Virtualdub again to split the avi
o Click video and select direct stream processing
o You will notice that there are a bunch of tabs on the bottom left corner: Click the tab that is 2nd from the far right (looks like an arrow pointing left only the bottom part of the point is missing)
o Now move the slider (while holding in the shift key to keep the video on the key frame, if you ignore this it will create sync problems later) to where you think the video is about have complete and then click the tab on the far right (looks like an arrow pointing right only the bottom part of the point is missing)
o Go to file and then save avi.
o Now we are going to click the tab with a key on it and point to the left (which controls the key frames) and click that tab once. Now do the same thing as before. Click the tab that is 2nd from the right and then move the slider to the very end and click the tab on the far right. Again, save the avi as part 2 and you are done.
Exhausting isn�t it?!
Any copying or Duplication of content is strictly prohibited. (C) JackDaRippa's
Guide.