 |
|
|
|
|
|
|
|
|
|
|
|
|
|
|
|
|
|
|
|
|
|
|
|
|
|
|
|
|
|
|
|
|
|
|
|
|
|
|
|
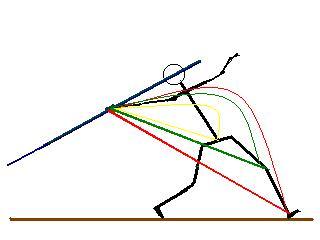
THE BASE of the PULL and the importance of DOUBLE SUPPORT |
|
|
|
This graphic ilustrate how important is to be as far posible from the Base in order to achieve the long pull. |
|
|
 |
|
|
|
|
|
|
It is important to understand that the base will change depending on the position achieved by thrower before and durring the release. |
|
|
|
|
|
This graphic show 3 diferent locations for the base of the throw. |
|
|
|
|
|
Yellow = Arm Thrower - No that much pull the Base is located at the level of the Hips. |
|
|
|
|
|
Green = Arm Thrower + some Hip - Feels the pull but can't tranfer energy from the run up to the throw the Base is located at the Knees. |
|
|
|
|
|
Red = Arm Thrower+ Hip + Momentum from the run up. -Feels the pull, get the tranfer of energy from the run up to the throw the Base is located at the Left "Plant" Leg. The right leg stay pasive and create balance that allow the delay of the arm strike. |
|
|
|
Take a look at the positions of ( Tom Petranoff, Jan Zelezny) in the following pictures but keep in mind that this is a quick and fast action and that everything happen in fractions of a second.
I just want to show here how important is to be in the right position previous to take any action with the spear. This are the basis for the long pull (1) The thrower needs to keep the arm still and as far back as posible, (2) wait for the impact of the plant leg and (3) needs to achieve the double support durring the pulling action.. |
|
|
|
 |
|
|
 |
|
|
|
|
|
|
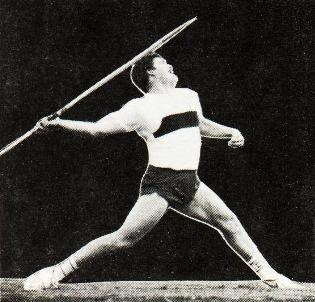
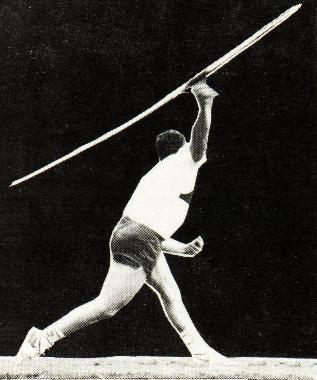
Look at the full body extension when the left leg made contact with the ground..
This position is the same as the red line shows. |
|
|
|
The C position. |
|
|
|
|
|
 |
|
|
|
 |
|
|
|
|
|
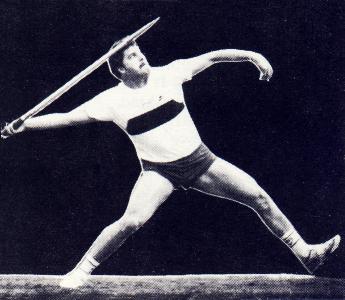
The Solid left leg, and the action of the right leg that makes posible the transfer of energy from the impulse creating the elastic reflex. The left arm to the rib cage blocking the left side. |
|
|
|
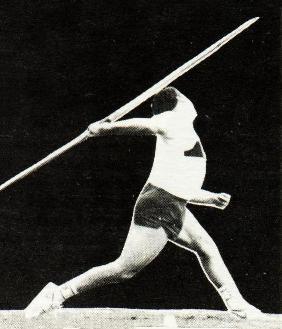
Take a closed look the right leg still in contact with the ground and the javelin is just released. |
|
|
|
|
|
 |
|
|
|
Look how Jan Zelezny get into the same position ->Red line of the Graphic Picture # 1. and how the right leg works to maintain the double support durring the release. |
|
|
|
 |
|
|

|
|
|
|
|