| "Shorty" - TBL-100 Tennis Ball Launcher |
 |
 |
 |
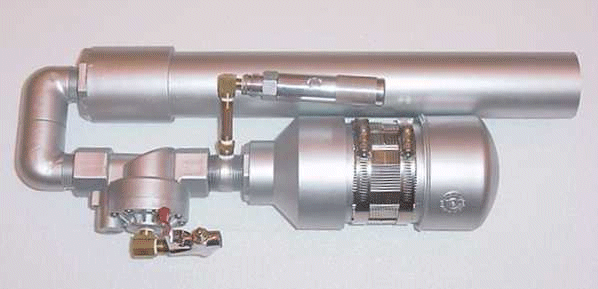
| Here's "Shorty", my version of Joel's small LP tennis ball launcher. I sports a "chopped" sprinkler valve activated by a blowgun pilot valve. I originally had a Schrader valve to fill it, but I later bought a CO2 adapter and attached in in it's place. I saw no reason to add a gauge nor a safety pop-off valve since the 12 gram cartridge provids about 100 PSI. I wanted a metallic look so I painted the launcher silver chrome. It's not anywhere close to chrome, but I like the end result. The chamber has a "No-hub clamp" (under $5 at Lowe's) installled around it. Originally I thought this might give me some added protection if the chamber blew up, but it doesn't. Still, I think it gives an overall "high-tech" look to the launcher.. This little launcher gives me from 80-100 yds distance with 100 PSI and a "dry" tennis ball. I understand that the ball can be "injected" with water to give it more weight for better performance. I have not tried that yet. All in all, I am very happy with "Shorty" (it's OAL is just over 17"!). The hardest part of building it was finding the 2.5" pipe and fittings. Otherwise, the building was pretty straight forward. |
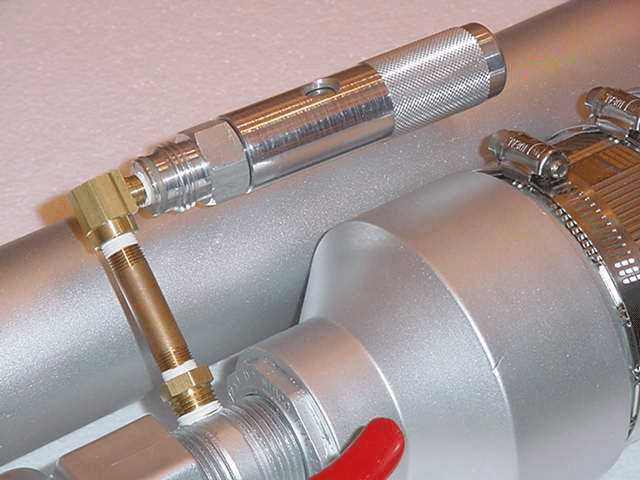
| Here's a closeup of the CO2 cartridge adapter It's a little "hokey", but... Make sure the exhaust part of the cartridge adapter is pointing "to the sky" so that you do not inject "liquid" CO2 which could damage the pvc components. The part where the adapter attaches is a 1" steel close nipple which has been tapped for a 1/4" NPT port. I prefer to drill the nipple as opposed to the pvc chamber. As shown in the drawing, you could opt for two more ports, one for a Schrader (1/8" NPT) valve and one (1/4" NPT) for a safety pop-off valve if you are using an unregulated pressure source. |
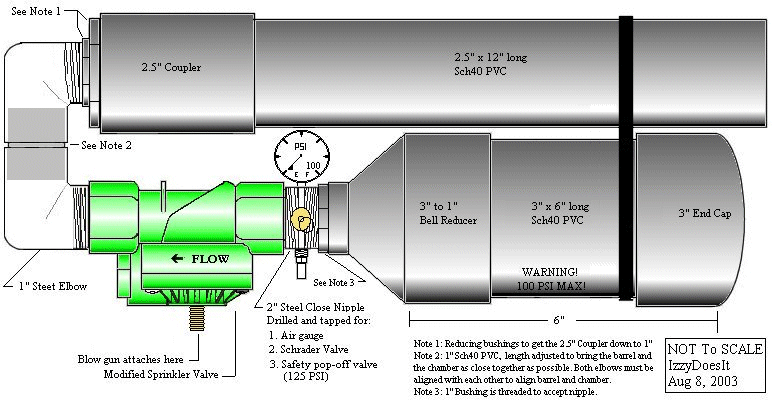
| This drawing includes just about everything needed to build Shorty. The sprinkler valve is a "chopped" 1" Orbit Watermaster. Note that the length of the 1" pipe that connects the elbows is sized to allow the chamber and the barrel to be as close together as possible. This give extra support to the elbow joint. On mine, there is no space between the two. Also it is important to work quickly when gluing the elbows to make sure the are aligned. If not, the barrel and the chamber will be skewed, not a pretty sight! |
 |