At the June 18th WOR SCCA rallycross, I noted a bad wheelhop problem, that got worse as the day went on. As I was watching my friend Jon pull up to the starting line near the end of the day, I happened to see a big crack in the rear wheelwell. Ran up and looked, and the rear upper control arms had pulled right out of the chassis. Only held in my little thin strips along the inside. Driving 4 hours home was *fun*...
Short YouTube video. It's hard to tell but the suspension moves a LOT on apparently smooth roads, it looked like about 3" of motion just in the normal swells and dips in the highway.
Of course, this situation needed to be rectified. And as with any fix, we should *improve* things at the same time. I'm known to speak long and hard about the evils of the stock Mazda four-link geometry, and for good reason. This was the perfect opportunity to do a fix I'd been thinking about for some time.
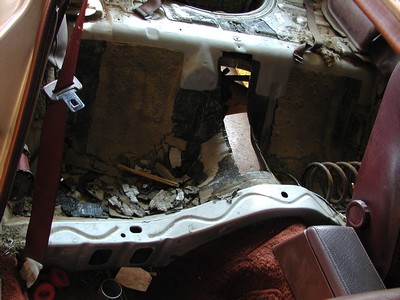 One (1) FB, well used, bin area removed, tar coating strategically chiseled off. I used the hammer-and-putty-knife method, which is very entertaining when it is 90 degrees and the air is fully populated, and there is no wind at all. A while later, the top of the hump was cut out, just so I could sit back and look at what I was doing, take measurements, figure, measure some more, etc. Fully 75% of any project is the beginning "sit back and look" stage. The other 90% is finding time to do the actual, you know, *work*.
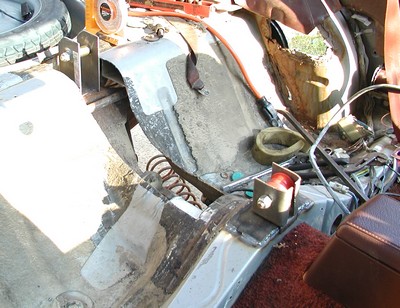
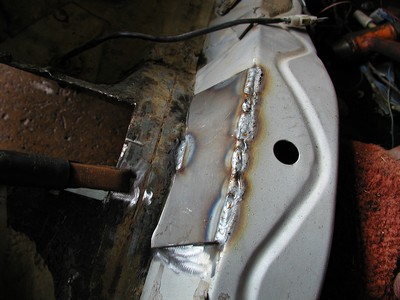 First thing, we need to add some beef-metal. Used some cardboard to make a template for a piece to fit the multi-curved section here, cut that out of some 3"x.125 flat stock, welded a bit, hammered it down some, welded soem more, hammered some more, etc. We're halfway through here, just before I discovered how NASTY undercoating fumes are. The whites of my eyes turned red. Burning paint fumes are downright pleasant compared to undercoating.
 And a similar, less involved piece on top. I figure, 1/8" plate will be much stronger to reinforce the front pivot to than 18-gauge sheetmetal, or whatever Mazda used. When in doubt, beef it out. No kill like overkill. Etc.
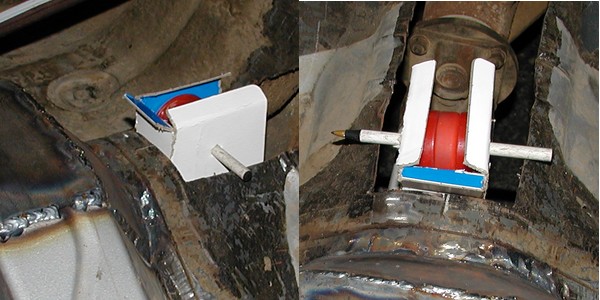 Here's the new idea. I make this semi-box-section piece out of 3"x.125 plate. The floor just afore of the box section will be snipped with two 45 degree angles, bent down front, side, and side, and welded to the box section on all three sides. Before that, a strip of 2"x.125 will be welded on top, to string fore to the crossmember.
I'd been trying to figure a way to solidly, overkilledly make a box section for the front pivot that would *not* create a mud shelf under the car. This is the best I could come up with on short notice. Undoubtedly I'll think if something better, but that can go into the next bodyshell.
Update 7/24: Raining a lot. Hard to get work done outside. But we did figure that to get zero anti-squat, and clear the Watts linkage, we need to put the axle pivot centerline 3 3/4" above the top of the housing, and the front pivot centerline 1 3/4" above the plate on top of the crossmember.
Why zero anti-squat? Well, the Group 4 Escorts are zero anti-squat, and Ford probably had a very good reason for that. Thinking about it, anti-squat only works when there is drive torque, when there is not (such as when the wheels leave the ground) then you lose that. But was my thinking correct?
I found this thread with some very interesting info, in a "duh, why didn't I see that before" way. As in, well, there cannot be more load transfer than what is defined by wheelbase vs. center of gravity. You can make it happen faster but overall it will not change. And, if the torque reaction is working on the *axle*, and not the suspension, then it's essentially locking the suspension out, through load bind of the linkage. It stiffens the suspension, which is just what you don't want to happen.
And it's gonna be rainy all week....
Further update, 7/24: The rains stopped at about 1pm. Then it got sunny, and turned all of that nice precipitation back into obscene humidity. At least it's not expected to dip below 90 degrees all week, except for the times it is raining, and not immediately before or after either.
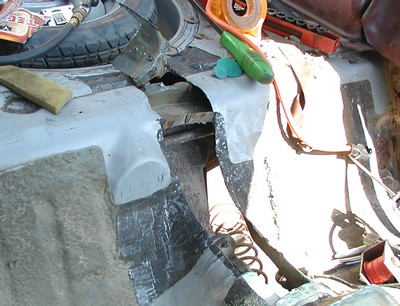 After mocking up a zero antisquat geometry setup that managed to clear the upper Watts arm under all conditions (you have to check lean angles! Minimum clearance is with the left side fully drooped and the right side partially compressed), the suspension was cycled with the springs and bumpstops removed and we discovered *hard* contact with the proposed diff mount vs. the upper crossbrace. So it has to come out! This is after relocating the tank vapor line which passes directly beneath, attacking with a cutoff wheel, and attempting to pop spotwelds with a prybar. Just before borrowing the neighbor's Sawzall (aka The Tool, if you read Car Craft) for the only real way to deal with the mess.
 Annoying metal removed, some new metal added. This is shortly before I discovered that my MIG no longer wants to weld smoothly. Feels like a lack of argon issue. First test will be to borrow a known-good argon tank.
The suspension is fully compressed, the spring perches hit the framerail before they hit the stopless spring towers. It will probably never be this compressed in the real world, but one must plan for *all* contingencies.
Yeah, that's the original chassis mount from the first line of thought. Waste not want not!
And just think, this has to be finished before the shotgun engine can even go in!
Epilogue: Well, the car is long gone due to finally overheating and overrevving the (211,000 mile, non dowel pin leaking) stock engine one too many times, and the body was too far gone to be worth putting another engine in. I did get a FTD at the rallycross that weekend, which is astonishing considering how underpowered the car is. Towards the end, I'd used angle iron, square tubing, MIG, and zip screws to shore up the lower link attachment points, since THOSE were starting to tear free from the floor.
But before that, I did eventually relocate the link's forward pivot as far down as it could go on the floorpan. What I'd originally done was braced the "turret" to the rear floor with a pair of 1"x.125" pieces of angle iron. This helped wheelhop but not enough. So, I simply drilled a couple lengths of 2"x.125" stock as far towards the end as clearance would allow, bolted in a link pivot, and welded that as far down on the aft-facing surface of the crossmember as possible, then welded the other ends to my angle-iron bracing. THAT did the trick. 7000rpm launch, 3.45 First, 4.78 final, 65cm Michelin rally tires, no hop, minimal spin, just *go*. Same for corner exit, it would just bite. So much for theory...
A 3-link will be going into the new car. One other thing I found was that the geometry imposed by the 3-link's instant center, combined with the high Watts roll center, conspired to create some weird handling effects over bumps. The back end squirmed all over the place. Roll steer, in other words, and lots of it. I found that keeping the lower links horizontal greatly mitigated it, but this reduced suspension travel unless the springs were kept stiff. I am hoping that a Panhard setup and possibly the re-installation of a rear swaybar will help things along. That will be another page.
Home
modified Dec. 26 2007
Pete Remner aka peejay or sometimes ???