MS Paint
The basic art program
Sidney Wagner
810
MS Paint is an often overlooked program. It has poor quality, few options, and can be especially
difficult to use for most people. Most people who actually use MS Paint do it just for the purpose of
doodling around out of boredom. Few people actually understand the program and use it for advanced
artistic purposes. Those who seek a good artistic program usually go for Photoshop. Photoshop is
expensive and complicated though. MS Paint can be used effectively by any artist, and it comes free
with Windows operating system. I fully intend to inform viewers of this website of the beauty and wonders
of MS Paint.
Please Note
*MS Paint is not "miss" paint it is MS Paint. MS stands for Microsoft.
How Do I Get to MS Paint?
*First, you open the "Start Menu".
The Basic Tools
![]()
*While not having as many features as Photoshop, with hard work it is very possible to do
what you need to in
MS Paint.
*You can use a tablet in Paint, as much as you can use a mouse.

*You then move your cursor up to "Programs".
*Allow it to arrow over, and move up to "Accessories".
*You should then see the "Paint" program. Click this, and the program will open.
These are the basic tools
that are used in MS Paint. You are probably already familiar with what they do
if you have used MS Paint before. Just in case you are completely
unacquainted with these tools, I will give a brief run down.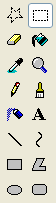
Button Appearance
Official Tool Name
Usage of Tool
Dotted Star
Free-From Select
This tool allows you to select a certain
part of picture in a freeform manner. The area within this area
can be edited by being stretched, moved, or various other things.
Dotted Box
Select
This tool allows you to
select a certain box-shaped part of a picture to be edited, much like
the Free-Form Select.
Yellow Eraser
Eraser/Color Eraser
This tool erases anything on the picture. The color
of your right-click-palette* will be the color that shows up in the path
of what you erase.
Bucket
Fill With Color
This fills in a certain area of color (or
lack-thereof) in the picture.
Dropper
Pick-Color
This allows a color on the picture to be added to
your left-click-palette* to use.
Magnifying Glass
Magnifier
This tool zooms in on a certain area of the pictures.
There are different magnitudes of zoom.
Pencil
Pencil
This draws a one-pixel line when the left or right
click is pressed on the mouse. It creates a line as you drag it by
holding down the mouse-clicker.
Paint Brush
Brush
This functions in the same way as the Pencil tool
except for the fact that you can change the number of pixels that are
used to draw, and what shape they take.
Spray Paint Can
Air Brush
This tool also works in the same fashion as the
Pencil and Brush tools, except it creates a design that vaguely
resembles spray paint splatter. It has various sizes. Different speeds
that it's moved can change the results.
Large "A" Icon
Text
Using this tool, a text box is created in which one
can type in text. Various fonts can be chosen from, as well as styles
and colors.
Straight Line
Line
This tool draws a straight line as you drag it.
There are various sizes to choose from as well.
Curved Line
Curve
This works similar as the Line tool, except you can
click around after the line is formed to curve it (twice).
Rectangle
Rectangle
This creates a rectangle or square shape. There are
various styles. The size of the line tool affects the lines that
it comprises of.
Boxy Shape
Polygon
You can connect various straight lines to create a
straight-sided shape. The size of the line tool affects the lines
that it comprises of.
Oval
Ellipse
This works much like the Rectangle tool, except you
create circles and ovals as opposed to rectangles and squares. The
size of the line tool affects the outline of your ellipse.
Rounded Rectangle
Rounded Rectangle
This also works much like the Rectangle tool, the
only difference being that the rectangle has rounded corners. The size
of the line tool affects the lines that it comprises of.
*Will be explained in depth at a later time.
 Left Click: When you left
click on a color using the left-click button on your mouse, it will be added to
your left-click palette. When you draw by pressing down on the left-click
button, that will be the color that shows up.
Left Click: When you left
click on a color using the left-click button on your mouse, it will be added to
your left-click palette. When you draw by pressing down on the left-click
button, that will be the color that shows up.
Right Click: The concept is basically the same, except it uses the
right-click button on your mouse. Also, when you move objects using the select
tools, this color will be in the removed object's place.
The Eraser tool isn't solely used for erasing. It can be used to change one color to another, as well. This is a little complicated, so it make take a few readings to understand. Here are the basic steps:
1. Left Click the color that you want to change. You can also
use the pick color tool to select directly from the canvas.
So if you want to change red to green, left click red.
2. Right click the color that you want the new color to be. Using the previous example, if you want to change red to green, right click green.
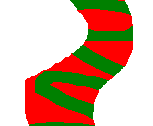
3. Now, use the eraser tool to change the color. To do so, use the right click to draw on the canvas. Run your cursor over the area (holding down the right-click) you want to change (in our example, the red areas). The old areas (red) should turn to the new color (green), and only the old area should change.
Your Palette should be:  Your original:
  Using this technique:
Submenus

 This option will remove all areas
that you have selected using the selection too.
This option will remove all areas
that you have selected using the selection too.
This option will remove all areas except the color that is in your right-click palette. The default is white. This helps to move foreground objects but to leave the background color so that it does not overlap other things.


These are the different sizes you can use to erase. Simple as that.


These are the different magnitudes of zoom. "1x" zooms the less, and the "8x" zooms in the most.


These are the different shapes and sizes of the brush tool. The top row are circles, the second row are squares, the
third and fourth row are diagonal brushes, which give an effect that looks much like a ribbon.


These are the various sizes of the Air brush tool. The smaller the size, the closer together the particles are.

 This option
makes the background of the text a solid color. This color depends on what your
right-click palette is.
This option
makes the background of the text a solid color. This color depends on what your
right-click palette is.
This option gives the text a transparent background; the text will be directly typed onto the image.

 These are the
different line widths of the line tool. The width selected here also
affects the outline width of the shape tools.
These are the
different line widths of the line tool. The width selected here also
affects the outline width of the shape tools.

 This
option just makes an outline of that shape.
This
option just makes an outline of that shape.
This creates an outline that is filled in. The outline is the left-click palette
color, the shading is the right-click palette.
This creates just the shading. The shading is the left click color.
These are just the basics of MS Paint. There are very many other ways to make use of this program, and there are many techniques that can be used. Use your imagination and you'll do fine.