CHRISTCHURCH
International Plastic
Modellers' Society
IPMS Christchurch (Nz) Inc

|
|
CHRISTCHURCH
|
|
|
|
|
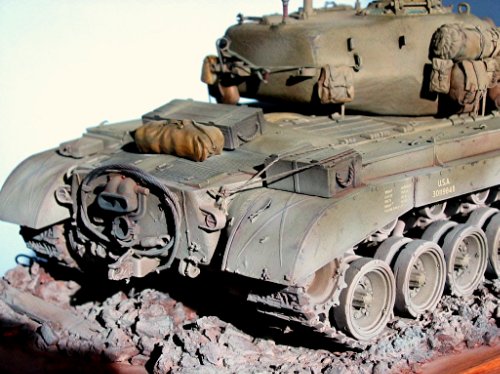
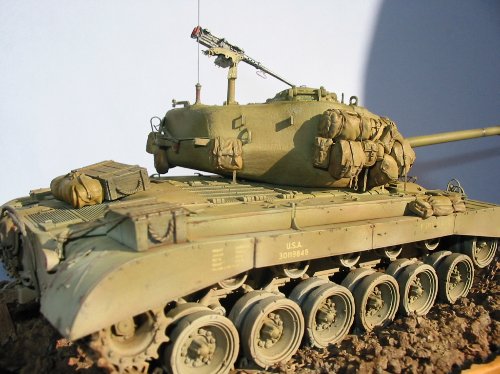
T26E3 PERSHING "FIREBALL" by les smith. |
||
|
Well, as I stated in a previous article I promised to construct another allied vehicle and the vehicle was to be the T26E3 ( PERSHING ) well as promised. Firstly I'll start by commenting on the kitset , which was the Dragon release, I had purchased this kit prior to the release of tamiya's and although there was some considerable debate on which kitset was the best option I decided to stay with my original choice. Comparisons between the two kits were many and varied and in the final analysis either kitset would build into an accurate model of this late war tank. I started this kitset in the usual manner, beginning with the suspension and also the lower hull. Everything went together very well and progress was quick, until I began the individual track, boy! this system can be a real chore at times. If finances permitted I would purchase the excellent fruilmodel (cast metal) tracks for each modeling project. When I use individual link track I often spread there construction over many modeling sessions to help ease the boredom .I found no problems in the construction of the lower hull/suspension and must say that so far I was very impressed with this kit. I moved on to the hull and it was here I decided to leave off the track guards at this stage to help ease the painting of the tracks, the guards had locating tabs to make attachment easy and would not upset any paint finish. Progress carried on as per the instructions and I encountered no real problems building the hull, there were some small details that I changed such as grab handles and also periscope guards which were replaced with fine wire to give a better scale effect. Also I used some stainless steel fishing trace for the vehicles wire rope,( which came up very nice once painted) I finished the hull with the tail lights, lift hooks and other small details as per instructions. Moving on to the turret which was very nicely detailed, I built up the upper and lower halves making sure that the prominent cast seam was not lost during construction. I noticed that there were some foundry casting numbers missing on the top of the turret and also the gun mantlet, I remedied these omissions with some numbers carved off the kit's sprue and cemented in place with m.e.k this gave a very acceptable result. At this stage I also decided to add a mantlet cover, and to achieve this I used milliput (fine) I used an old brush handle to shape. The barrel of my pershing was simply the kit one,a bit of fill and sanding, and presto! Spot the difference. With the turret nearing completion all that I needed to add were some small items to finish, as well as some crew kit I planned to hang on the vehicle. After arranging the packs and crew gear on the turret ,to see which items would suit I then removed them so I could paint them individually, this was done so as to give each item a separate colour .On the crew kit I added straps which once finished would hang below the gear, giving a realistic look once finished.
PAINTING: After I had decided which vehicle I would portray I started the painting process, firstly adding a toned down olive drab (Tamiya XF62) this colour was applied to the whole vehicle, including road wheels and the detached mud gaurds. Following this I sprayed a thinned solution of flat earth (XF52) on the lower hull and suspension Followed by a shot of buff (XF57) this gave the lower hull and suspension a nice dusty look.I carried on with the main body of the vehicle, spraying a thin coat of dark yellow (XF60) to lighten the over all effect that I was trying to achieve. Now that my main coat had been applied, it was time to begin with the weathering process, this was the fun part, and I always enjoy it, I started with some washes of oil in colours of browns, black and dark green. After the washes had dried it was time to add some scratches and chips on the paint work, these were added with dark green and also a dark brown. Once I was satisfied with this stage of the weathering I then added some filters using a variation of colours to highlight the overall effect that I wanted. Once all was dry the next thing to add was the vehicles markings these were added with the aid of the very impressive Archer dry transfers which I have a growing supply. This vehicle was to represent one of the tanks used in the Zebra mission, a period were the U.S.A rushed into the closing stages of WWII, all types of weaponry that was either in prototype stage or untried under battle conditions. FIREBALL, the tank I have modeled here was the first pershing to be knocked out, I am uncertain if this was a total loss or not. Anyway back to the project in hand, with my weathering nearing its final stages it was time to consider the way in which to display my model, after some thought I decided a simple base with a small amount of ground work would be all that was necessary to portray the local conditions of battle. Once the vehicle was attached to the base it was only a matter of tying in all the small finishing touches to finish my model. Lastly I must say that I intended to add a .50 cal mg to the tank but as of this article I had not yet built up the beautiful example from verlinden productions which I had purchased from Historex agents out of the UK. And this was in my hot hands in 5(FIVE) days!!!! On completion, I must say that this is a splendid kitset and if you haven't built one yet, do so. |