PM 4-1(Sheltering Doubt)
PM 4-2(The Savage)
PM 4-3(The Secrets of Worship)
PM 4-4(Slanderous Utterings)
4-1:
| At the same time, Safehold's AH and Mogpost services are up for use once you have entered Chapter 4 (connects direct to Jeuno). The AH is on the middle floor in the area Opposite from the Nomad Moogles. The AH are the NPCs on the upper portion and the Delivery box NPCs are on the bottom portion of that side. |
4-2:
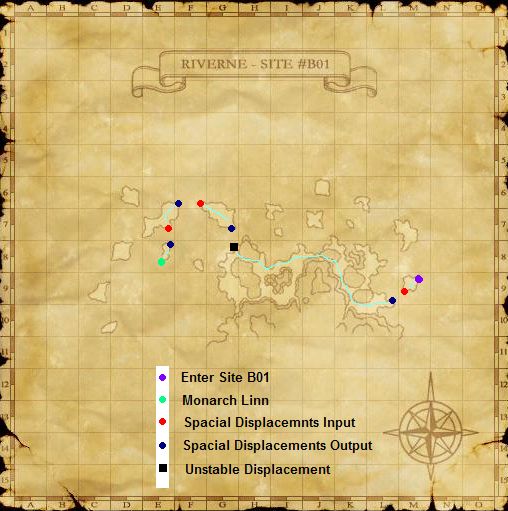
| Riverne Site B01 is level 50 cap. You will need 1 Giant Scale from the Pyrodrake wyverns to pass through the Unstable portal. The final spatial displacement at (E-8) will bring you to the BC holding area of Monarch Linn. You only need 1 scale . Scales from #A01 work in #B01 and vice versa. |
|
Mobs and the Site: Mobs are: -Ignidrake N/A Riverne - Wyvern: Aggros by Sight. -Lesser Roc 53 - 54 Riverne - Greater Bird: NO AGGRO. -Lunantishee N/A Riverne - Morbol: I don't know if it aggros, but if it does, it's Sneak based. Make sure you have Sneak on just incase... -Nimbus Hippogryph N/A Riverne - Hippogryph: TRUE SIGHT. -Pyrodrake Wyvern N/A Riverne - Wyvern: Aggros by Sight. -Strato Hippogryph N/A Riverne - Hippogryph TRUE SIGHT. |
|
Monarch Linn battle: Oreo (Ouryu) The Dragon. -there have been many ways I've heard about this being done. here is your Info followed by all the possible suggestions for battle.
-Earth Based Dragon
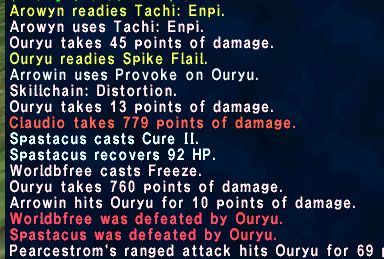
Oreo can spike flail:
-It puts up Stoneskin which you need to Dispel.
Oreo Attack Outline:
|
|
Here are the Guides as Mentioned. I'll post what we did last.
|
|
*****Alternate Oruyu Strat: Last night I beat him with smn smn pld pld rng blm. Really no one did much of anything except for the 2 smns, 2 people were there just to see if we could do it. Anyway onto strat. 2 SMNS each with Refresh Drinks and ethers can easily handle the dragon. Pop Garuda and then have both smns use aerial armor. (Garuda blinks herself for those who didn't know.) Leave the summons out while the blood pact timer runs down. Then have the 2 smns assault Ouryu, Yag Drink, Astral Flow, Aerial Blast him, hi-ether, wait, Aerial Blast, hi-ether, wait, Aerial Blast. At this point the battle should be over or you should only have to take him down a little farther to win. If you don't have a rng to EES at the end whatever 4 other party members you brought should be able to finish him pretty fast. For this battle you WANT him in the air, his in-air standard attack will only do ~15 damage to a garuda per hit. Bring along some kind of tank if things go wrong; IE summons die close together and Ouryu goes after one of the smns, and someone like a rng that can EES for quick high damage. All in all this type of battle will be all about resists to Aerial Blasts. I went on Windsday with double wind weather, so we had resisted AB's for ~650, to normal AB at around 890-930, to AB with day effect around 980 and then AB with day effect and weather effect for ~1056. 3-5 SMNS would make it easier as you could lay down 6-10 aerial blasts in a shorter amount of time, 6 SMNS would be sick where you probably could beat this guy inunder 2 minutes. Other things to take into consideration: 1. Don't heal the SMNS until the Astral Flow cycle is done, summons hold hate pretty well after Aerial Blast but it get dangerous when you have to recast and have no hate buildup on the avatar. 2. Generally speaking all the other members should stay far enough away from the battle as to not get caught in touchdown so that you don't have any unecessary damage/healing taking place. 3. If you have austere gear borrow/bring it. a couple seconds less BP timer is good here as it can mean a dead wyrm(not dragon) or you having to resummon and risk him coming after you. Try it and have fun. We almost set the record this way. It's realativly painless and low cost, not farming mismelts or tons or items for anyone other than the summoners with the refresh drinks and the hi-ethers. Also you can bring just about any job/level along to leech the battle, esp if you have 3 smns. |
| *****My party setup had whm, rdm, blm, smn, pld, mnk(or drk) and that was the basic setup. Pld went in and they all got TP and melees got weaponskills off. Oreo then started flying, so, we mistmelted and slept him. when he woke up the smn did his first astral and the Pld Invincibled to get enough hate, mistmelted again to bring him back, blm and smn got off another round. Mistmelted again, Smn and blm got off a third round and he was dead. My party isn't a very High-Damage party... so, we had to have a good mistmelt and 2 hour strategy. we were able to repeat this strategy for a second win as well. |
| *****Generic 95% win: ICE DAY PREFERRABLE. Pld, healer, X, Blm, Blm, Blm. 3 mistmelts. enter, ES sleepga and pld provoke. all 3 blms Freeze. pld mistmelt and ES sleepga. blms regain MP and then all three recast Freeze. pld invincible when it wakes. ES sleepga. all three blackmages manafont when Freeze timer is up. all three freeze third round. the end. good bye oreo. This is the one i do when i take people through PMs. credit given to omnipresence linkshell. |
4-3:

|
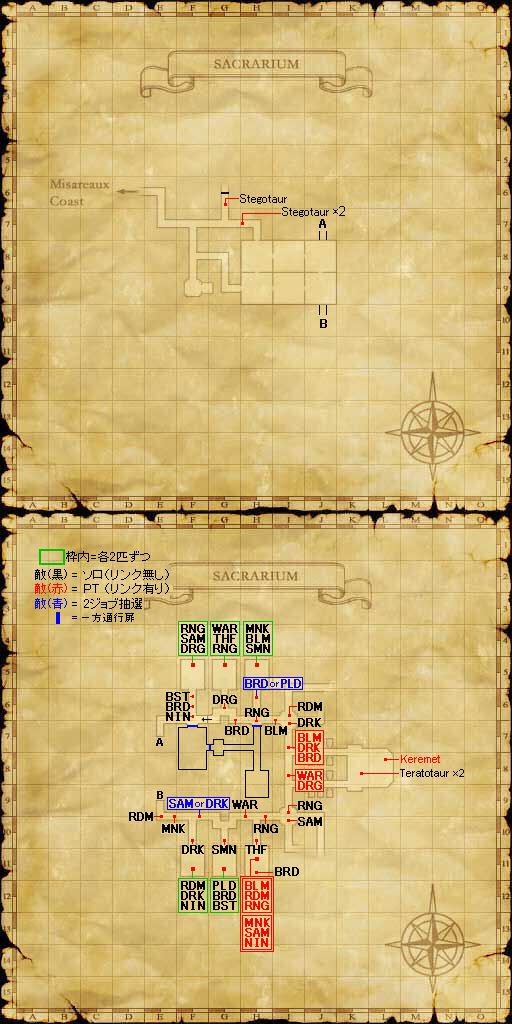
Bestiary: -Fomors as usual -Lich, Mummy, Uttuku (usual undead mobs) -Gazers and bubblereyes (eye mobs, sneak aggro) -Taurus Mobs -Keremet -Azren Kuba, Azren Kugusa (Keremet's skeletons) -Old Professor Mariselle (ghost) -Mariselle's Pupil (ghost) -Elel (Corse NM, hard) |
| Coral Crest Keys drop off of -Fomors- so don't erase your hate before then or it's a waste. you can give them to either the same person or two different people. it doesn't matter with the crest keys. the Sealion Crest Key drops off the NM Keremet. |
| Keremet: Is a corse type mob. he is undead. he has pet skeletons that he -can- summon to help him. those skeletons are lined up outside of the 2 halls to his room. they are VERY easy to kill. 1 person can solo them easily. so take them all out prior to entering Keremet's room and he's got nothing. Corses are BLM types. they can also Charm one of your party members (whichever has hate) make sure as soon as this happens that you sleep that party member before he can kill the others in your party and/or himself. (yes, you can kill your own party member when they're charmed ^_~) Otherwise, he is relatively easy for a single party to kill so don't panic. (kill the stegataurs in the room beforehand if you need to). |
| After this is done, get out of Sacarium and go clear all your fomor hate . this -must- be done. After you accomplish this and EVERYONE has 0 fomor hate you can continue on. |
| If you do not trade the Sealion key very shortly after the Coral key, it will disappear. So, have different people with each keys like I mentioned earlier. |
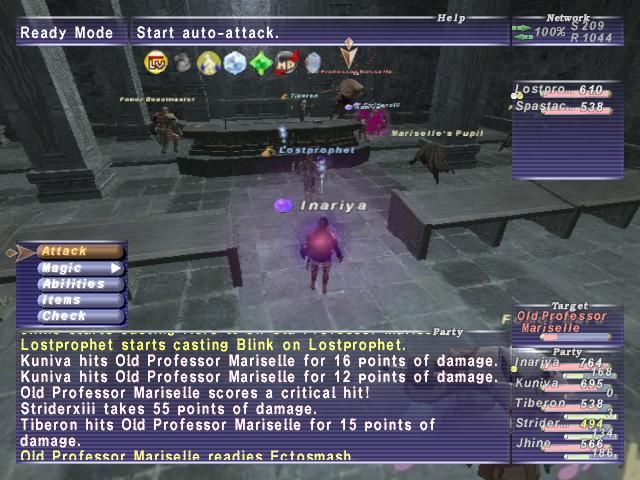
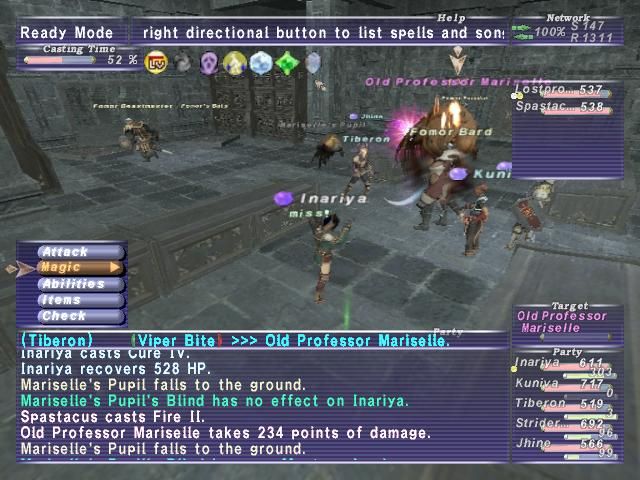
| A '???' pops randomly either at one of these locations: (F-5), (G-5), (H-5), (F-11), (G-11), or (H-11). Which are the ???s on the Desk found in each of the 6 rooms. (the ??? that pops on the bookshelf is something for a quest). Make sure your entire party goes together because the ???s are in every room and you have to check them till the NM spawns. If you have your party split up and everyone check a room, someone's going to fight it but your party member will be all alone when it pops. Old Professor Mariselle pops with 2 ghost pupils. Do NOT fight the pupils they will respawn when you kill them. They are also not targetable for a portion of the time. When they become targetable, have a person provoke them if needed, but do not waste any effort on them. The NM will teleport around the room so when it teles, make sure your party identifies and continues it's onslaught. It is a ghost type and has ALL the ghost type attacks and abilities, this includes AOE curse and sleepga. When Professer dies, the pupils despawn. make sure everyone rechecks the ??? to get the key item. if you do not check it fast enough you will have to kill Professer again to activate it once more. It is a good idea to have poison potions and it is a good idea to have RR items. If you cannot kill it inside the room, have a tank pull the mob each time the disappears out to the hallway and kill it there. Lastly it is a good idea to have two tanks, one for professer and one for voking his pupils. |
4-4: