
PM 2-1(Invitation West)
PM 2-2(Lost City)
PM 2-3(Distant Beliefs)
PM 2-4(Eternal Melody)
PM 2-5(Ancient Vows)
2-1:
| Before you continue with the mission you need to have a way to enter a Locked Iron Gate. This gate can be opened either with a EX/RARE Bronze Key or with Thief's picking tools. Bronze Keys drop off of fomors. |
|
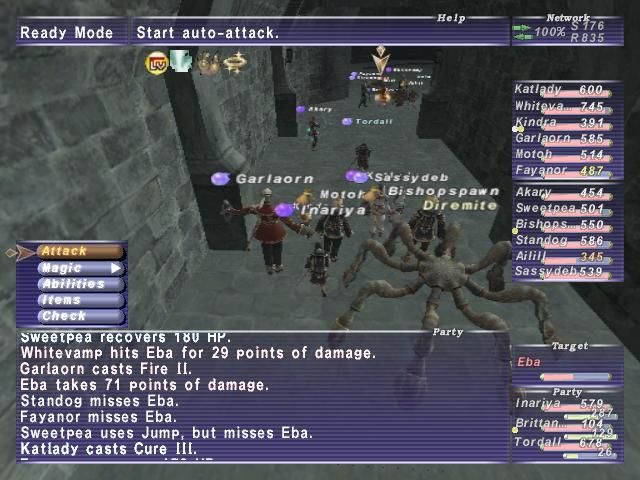
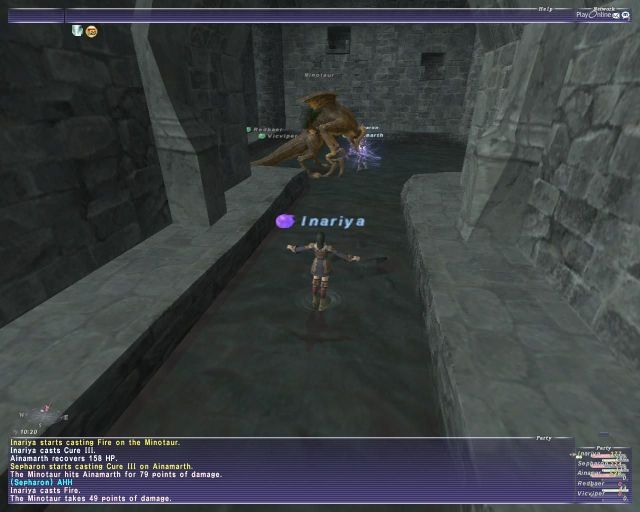
Promiuna Aqueducts is level 40 cap. Minataur is easy to kill. Have about 2 tanks for precautions. 1 party is completely sufficient. (I have done this 10+ times, parties of 5 to 7 people were very easy to kill with whereas an alliance is very hard) Beware that if anyone approaches near J-2, the whole alliance MAY be suddenly teleported to the Minotaur without warning. (This makes for a nifty trick after the patch where you can send one person to mina while the rest of your party/allianceis magically teleported across zone) which means in the hall after the 2 stegataurs and 2 fomors before you hit water you need to rest. when you approach minataur he will pull your whole party iin reguardless of where they are in the Aquaducts. thus, reraise is worthless if your party wipes in there.
 Yes... I know it makes your eyes bleed. Sneak and enter the library. If you went in the door to your left, go behind the right bookcase to your right in the library and look for a ??? which will open a door on the right side of that room next to the ???. if you went through the left door pull the ??? behind the left side bookcase in that library which opens a door on that side wall. You'll reach an area with targetable Oil Lamps. You do not need sneak if you stay in the middle of that hallway. Look at what elemental day it is in game. pull that element oil lamp and the oil lamp of whatever element is weak vs the element day it is AT THE SAME TIME. If it is firesday, pull the fire oil lamp and the water oil lamp at the SAME time. it will open a door in the middle of the hall. |
Mobs and attacks in the 'ducts:

|
-Diremite: No aggro. don't attack them. not worth much. has Spinning Top AOE damage attack as well as a single Slow attack." -Hell Bat: No aggro. Don't attack them. Normal Bat mob. Links with Fomor's Bat. -Makara: No aggro. No attack... it's a normal pugil. -Gloop (DC) and Oil Spill (IT): Sneak Aggro. Jelly Mob. Annoying... Oil Spills are dangerous. -Tarurus (DC) and Stegataur (IT): TRUE SIGHT. bad perefrial (spelling?) vision. don't run infront of them. has about a 50 degree sight range. Attacks: Back Swish is an AOE attack that hits only behind them. Mow: dangerous AOE damage plus Poison for about 15-20 HP a tick. Frieghtful Roar: AOE attack down. Mortal Ray: Doom. If you are not facing it it will have no effect just like lizard petrify. Death with a 10 second timer, this can be countered 2 ways: Crusna has about a 10% chance to get rid of it (erase no work). Holy water has about 50% chance to work. If your initial Cursna or Holy water doesn't work, please spam it until it does. I've seen more people die because they don't. You have to kill some of these in the tunnels usually because they're in the way. They are ultimately unavoidable. Weak vs Fire and Light. |
|
-Fomors: Sneak Aggro after you build up hate. Just sneak around them anyways to make sure there's no hate. Special Attacks: Carnal Nightmare: all TP reduced to 0 (Dorin likes this one). Neitherspikes: Damage plus Bind to those in it's degree range of about 10 degrees. Foxenfire: damage attack to single person. Dancing Chains: AOE DROWN. causes about 20 HP a tick and can only be cured by erase (don't freak out. one healer per party that's not a whm can keep everyone alive. It's not that scary asumming the mage doesn't have it on themselves). Agies Schism: very bad defense down. My war/nin friend with Agies Schism and berserk had a total of 1 def. Certain Fomors have certain Abilities since they come in all jobs as well. All debuffs work on them, and ES + sleep does infact work, though it's not very good, don't expect to ever sleep fomors. Fomor's Wyvern Sleeps like a baby. Fomor's bat resists sleep... then resists sleep again, then resists Sleep + ES... you get the idea. Fomor Drk and Drg have AOE damage attacks that cause a lot of damage due to their weapons. unfortuately, Nin spell interruption rate is nearly impossible, they can cast Utsesemi easily. Monk Fomor can do Shackled Fists which is the level 40 equivalent to Asuran Fists. Weak vs Light and Fire. and i know they have one other attack i'm forgetting. >.< ------------------------Minataur is a taurus/stegataur mob. |
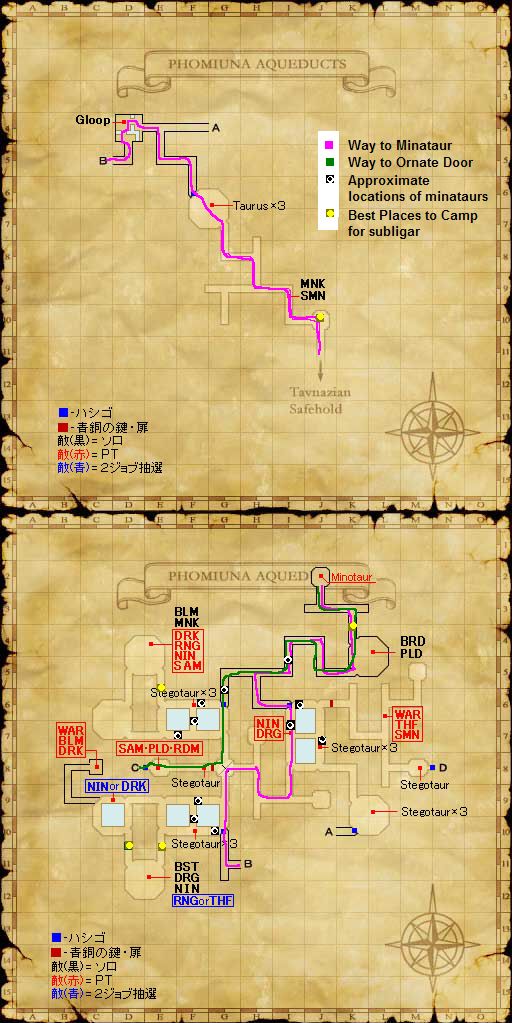

uh... sorry about the bad map.. also... "approximate locations of minataurs" means stegataurs... i just tend to call them all minataurs. UPDATE: SE got rid of the stegataurs in the hallways. disregard them on the map except for the ones on library level. they are -still- there.
2-5:
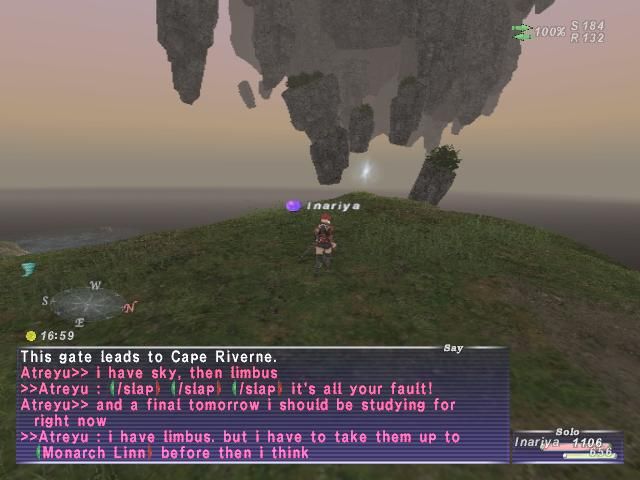
| Be prepared for LV40 cap area. You'll have to go to the Dilapidated Gate at (F-7) to access a warp point marked 'Spatial Displacement'. This will warp you to another area called "Riverne Site A01". i marked out your path on the map here. You need 2 Giant Scales which drop off the drakes (or as i like to cal them "mini-bunes"; rdm thing...) in the Riverne total. Trade them to the displacements I have marked on the map. Have everyone there before you trade the scale because the displacement only stays open for a short while. The (F-10) major island has drakes and cluster bombs. please watch yourselves) Continue to the end of the area i have marked. the final displacement transports you to Monarch Linn. The area before and after theh BC do not have a level cap. the cap IN the BC is level 40. |
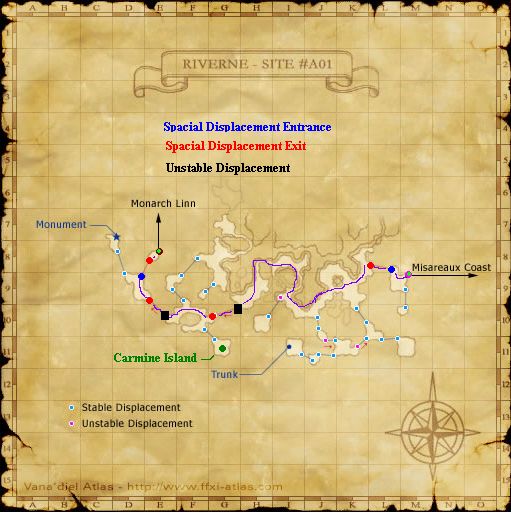
map overview: there are other spacial displacements than the ones i marked. disreguard them. you only need to use the ones marked.
I know it's ugly, i don't know why i had to use blue/purple for the path... looks bad o.O
|
Brief overview on the mobs: Hippogryph: True Sight Drakes: Sight, but not true sight. you need 2 Scales total from them to get to the BC. Atomic Cluster: aggro sight and magic and are only located on one island you must go through. Flies, Hawkertraps, vultures: No aggro. |
|
2-5 BC: 3 Humanoids. They can shift jobs throughout battle between blm, war, drg. Blm AOEs, keep silenced at all times. war attacks fast. it is unfavorable especially for a ninja. Drg has an extremely slow attack speed. all have absorbing powers. Yelloow liquid can make it so they cannot change jobs for 30 seconds or so. If you want to use them go ahead, but they are not needed. --- Immune: Sleep, Gravity --- Works: Bind, Silence, Paralyze, Slow, Blind.
Overview of Mammet Specials/Abilities: Come up with your strategy. most use kiters. If you need an opinion on jobs that work well as kiters: Ninja, Summoner, Bst. Rdm and Blm can kite, but is 100x more dangerous. Paladins can be used but make bad tanks for 2-5. \( ' ' )/
|
| We went with whm nin nin drg (yes lol) war/nin and rdm/nin. As you said most go with kiters. That's what we did, 1 nin kited while the rdm/nin kited the other. I tanked the main one. It was dangerous though, the rdm almost died. We had to reraise at one point due to bad blm timing and won with like 2 minutes left. As nin the war form was actually easiest to tank because it seemed to have the worst accuracy. -Waef |
|
If you would like a generic, cookie-cutter setup i suggest: Nin, Nin, Nin, Whm, Rdm or Blm, DD. |