| the magician's looking glass: WhiteMage_1's Cosplay |
| I want to belong... |
| Cosplay: |
| Conventions: |
| Miscellaneous: |

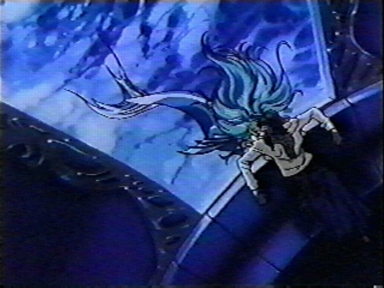
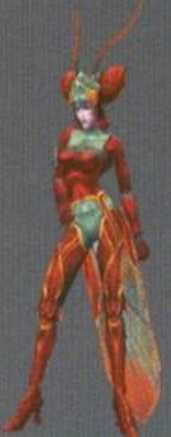
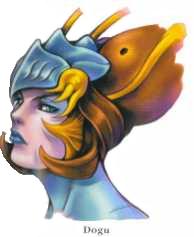
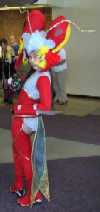
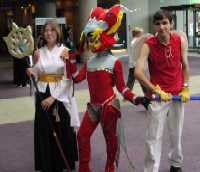
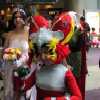
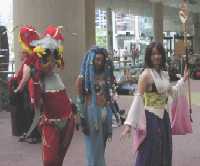
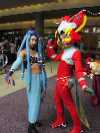
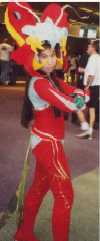
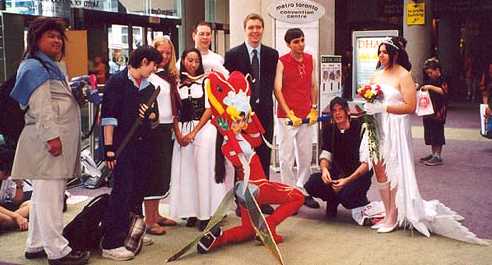
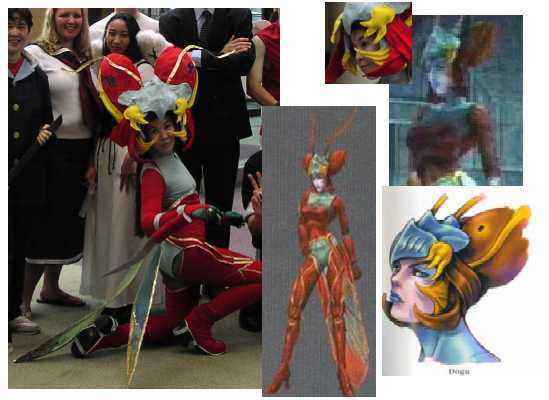
| Dogu // Sandy Final Fantasy X Magus sister Aeon I love Summons...they rock my world. Even though I hadn't played FFX, SMA and people on their messageboard had decided to cosplay from it for CNAnime '02. I decided that Yuna needed an Aeon or two to summon and, since Reiciel was doing Shiva, I wouldn't be alone. I loved this design and thus violated my previous rule that I'd cosplay only from series/games I knew very well. This costume was well-received, but only a couple people recognised the character. |
 |
 |
| Proud to be CANADIAN. |
 |
| [Dogu] |
| Costume Stats: Start: August 2002 || Finish: August 2002 Length of Process: 1 months approx. (the planning of this costume started earlier, but I wasn't able to start construction until August) Creator: WhiteMage_1 Appearances: Canadian National Anime Expo 2002 Approx. Cost: $60 Future Appearances?: Unknown Awards: First Place (UTMAnime Hallowe'en) |
| Construction: Leotard: Used the same pattern I had used for the Nanaki costume, except this time I included the sleeves and modified both the ends of the sleeves and the neck. I opted to not make the leotard attach to the headpiece, but since it appears as though that is the case with the character, I made the neck like a turtleneck. Instead of trying to make the leotard in panels of the teal and red, I chose to make a red tube top-ish piece to go over top of the leotard. There were some errors in terms of accuracy with this, but that plagued the whole costume. I was actually very pleased with how parts of this turned out. I did a much, much better job on the zipper than I did with the Nanaki |
| costume, which is mostly due to the fact that I discovered I had a zipper foot to go with my sewing machine (Yes, I'm a dumbass). Also, the neck worked out really well and the only reason the arms didn't work well was because I should've used the pattern for one size bigger, since I have rather chunky arms. >.<; Bodice: This was the top layer of the body of the costume. I made the mistake of thinking that, since the material was stretchy, it would be okay for me to make it without a zipped up the back. As a result, this is extremely difficult to get on and off, since I have such wide shoulders...>.<; I may decide to take this apart and add in a zipper, but I'm not sure I'm willing to risk wrecking it, since I don't have enough of the original fabric to make a new one. I made the pattern for this from scratch and I'm sure it shows. The two long pieces of fabric sticking out have velcro on the ends and attach to the bootcovers, since I needed a way of holding said bootcovers up (though at the con I discovered that that wasn't very effective, since it meant the red bodice kept sliding down, instead of the bootcovers staying up -_-) and Dogu's costume is all one piece and therefore the bodice and the bootcovers should've been connected anyway. I glued in a bra in the hopes of keeping it up, but I stupidly forgot that that would mean the top hem wouldn't be close enough to my neck and that's why it looks so awful in pictures and there's more teal than there should be. Even though there isn't a gold line at the top of the red section in the actual character, I felt that a little extra detail wouldn't hurt, especially since there were some details I was forced to leave out and it was better than letting the glue marks show. Hair: In the game, none of Dogu's hair is shown, but her Faythe (? I haven't played the game and I only have a hazy memory of what I read) appears to have blonde hair. Instead of attempting to hide my hair up in the headpiece, which I knew would end with ugly bits and pieces of my hair poking out, I tied my hair into three separate pieces at the base of my neck. The point was to keep my hair behind and out of pictures and Legs: The first bootcovers that I'd made. Instead of making a bodysuit, I decided to go with bootcovers that went all the way up to my hips. I made these without a pattern and, as a result, they're not perfectly symmetrical. I'm proud of the fact that I was able to make them with only a seam up the back, instead of having a seam up the front and the back. I painted the gold lines onto the bootcovers the day before the convention, but I'm still not happy with them, since I painted them on the floor and couldn't tell if they'd be symmetrical or not because of how fuxx0red the bootcovers themselves were. They've got elastic at the bottom to keep them secured to my actual footwear. I didn't find a really good reference pic until these were already done and, by then, it was too late to try and incorporate those knobby insect-ish knees. Arm spines: Stiff felt ws used for the actual 'blades'., Acrylic rectangles were glued to the bases for strength and stiffness. Toilet paper tubes were used for the round insect-ish bases of the blades and, after being covered with red and teal fabric, they were attached to straps of fabric which went around my forearms at the wrist and just below my elbows. Because they were attached with velco, I could unattach the velcro at my elbows, so that the blades snapped out in a praying mantis-ish manner. I couldn't sew the velcro to the blade bases, though, and the hotglue proved to be too weak of a bond, so I didn't actually exercise this blade-snapping-ability-of-doom at all during the convention, unfortunately. I re-did the glue for the Halloween UTMAnime showing, but it again was too weak. Gold detailing: For the solid gold details on the bodice and at the bottom and tops of the bootcovers, single-fold gold bias tape, double-fold gold bias tape and extra-wide gold bias tape were used. In some places this was sewn on using the red thread while at others it was sewn using yellow thread (which I think blended better than gold thread would have) and around the top of the bodice it was hot glued. Painted details on the bootcovers was made with a brush meant for model paint and a gold glitter fabric paint. Gold details on the wings are covered in that section. Wings: Four coathangers with some *very* expensive yellow/green shimmery fabric stretched over top. I considered trying to sew it over top of the frame, but that proved to be too time consuming and difficult (plus, I was wary of breaking the sewing machine needle). Around the bottom half or so, the fabric was folded over so that there was a panel of double-layered stuff, the edge of which was gone over with gold sequins. Another large gold sequin (which I'd bought with the intention of gluing behind the materia on my RED XIII armlets, but didn't end up doing) was glued near the bottom end of each wing. The wings were sewn/glued to elastics , which were attached to a pleather harness-ish thing which velcroed around my stomach/waist. Since the wings aren't actually attached directly to the harness, it means that they're actually pretty mobile and I can sit down with relative ease. It also means that I can spread my wings or leave them neatly folded. Hands: I searched for a pair of red formal gloves, but was unable to find any. I did, however, get a very, very good deal at Dixie Outlet Mall (at Ardene's, there was a sale where any 5 items could be purchased for $12 in total...Considering the one pair of earrings alone was priced at $8 on its own, I think I got a good deal ^_^) on some rather ugly looking green gloves. Knowing the bow (the only really ugly part of the gloves) would be hidden away under the sleeves and under my arm spines, I got them and used those. In case anyone's unsure of this...formal gloves + velcro = very very bad idea. Headpiece: This is the part of the costume that people have asked me about. The only other thing I've ever been asked about was my armlets for the Tifa costume. Anyway, I won't go into detail about exactly how I made the headpiece, but I'll give a list of the basic steps and materials: - sketched out each individual piece of the headpiece, including the number of each piece that would be needed and the colours for each piece - constructed each piece separately out of chicken wire by cutting out each piece and then shaping it by hand into the proper size/shape - attached certain pieces to the main shell (the base, which would be actually around my head), while leaving some separate - covered certain pairts with masking tape, sectioning them off from the other sections, since, even though it was all one piece, there were still distinct layers and such to be considered. - put a single layer of paper mach'e (can't get the accent to show up properly -_-) over every part that wasn't covered in masking tape - cut the paper mach'e around the edges of the tape, where there was an overlap - hotglued the first layer of fabric over top of the tape/paper over the larger areas - hotglued the fabric over top of the smaller pieces, gluing it in ridges where called for - hotglued the other layers of fabric over top of what was already done - glued a layer of fabric around the edges of the inside of the base - made small, fabric-covered "packets" of stuffing in certain places on inside - added more stuffing in places so that headpiece would sit properly on my head - added a layer of soft felt over top of everything on the inside - painted on details over top of fabric - made antennae out of bias tape, floral wire and hotglue, then hotglued them to the headpiece - put together hairband-ish contraption on inside of headpiece so I wouldn't have to worry about it falling off at the convention and I managed to avoid using a strap under my chin through this method. Footwear: I wore the same shoes I wore with the Chairman Kaga outfit. Unfortunately, the elastics I put on the bootcovers were white and showed up quite obviously against the black of the heels...>_<; Oh well...It gave me a bit of extra height that was quite needed, considering I was supposed to be tallest of the Magus sisters and all. Make-up: I borrowed two different eyeshadows from my aunt. I don't own very much make-up...just a thing of eyeshadow, a couple colours of lipstick and some nail polish. That's it. I don't even know how to use make-up, so it's obvious why I don't own any. bleh. Anyway, I used said light-blue eyeshadow, plus some silver. I searched high and low for that blue lipstick she has, but, even though I spent quite a bit of money on two different lipsticks that looked like they would work, they didn't show up at all. -_-; So that was a waste of time, effort and money. |
| [Full Pictures Coming Soon] |
 |
 |
 |
| Update: First Place at UTMAnime Hallowe'en Competition. Prize? Nataku Gundam (1/100 scale). ^_^ Thanks guys! |
 |
 |
 |
 |
 |
 |
 |
| Photo Credits: #7 - Limeyaku of CALLAC |
 |
 |