 |  |
 |
 |
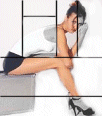 |
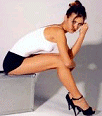
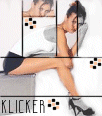
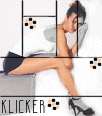
Step6.Go to your text and write your name in the bottom left hand corner. I used the font Sanity and set it to size 14. My color fill was set to black. Go to file, new and open up a new image; dimensions 102x16. Add a raster layer. With the layer 2 highlighted in your layer pallette, select your preset shapes to a square. Set your stroke and fill to the color #FCC49F. Go into view and zoom in by 5. This makes it alot easier to make such tiny boxes of color. You can make your box anywhere in your new image and have it 2x2. I started at 34x45 and ended at 36x47. Once you have one box done, go to copy and then paste it in a diagonal position to the first box. You can use the black and white checker boxes of the new image as a guideline. I pasted my next box at 40x50. Now make a third diagonal box in the same fashion. I pasted mine at 44x53. Now change the color to a black stroke and fill. The first one I made at 38x44 to 40x46. Now copy and paste this in the same fashion. My second black box went to 36x51. My third went to 44x49. And my last one went to 41x54. Now go into your layer pallette and delete all layers, (if any) including the background EXCEPT the layer holding your set of boxes. Once this one is standing alone you are ready to paste it onto the av. Copy and paste the boxes to the areas shown on the av. Now add your own magic touch and viola! Your done!
 |
|
