| Me & My HTML | |||||||||||||||||||||||||
| Lesson 2 | |||||||||||||||||||||||||
 |
Lesson 2 for Classreport.org Administratiors | ||||||||||||||||||||||||
| Lesson 2 Picture | |||||||||||||||||||||||||
| Home | |||||||||||||||||||||||||
 |
|||||||||||||||||||||||||
| Email: | |||||||||||||||||||||||||
| Lesson 2
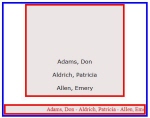
We can make a marquee scroll horizontal or vertical. We will do both and then put each in a box. We need data to be entered in each. I will provide some. We have not talked about it much but the comment line can also help you to find parts of the code as you are learning. A comment line is made up of the comment tag open, your comment and the comment tag close. The comment tag open is <!-- . The comment tag close is --> There has to have a space before the text at the end of the open tag and a space at the end of the text before you enter the close tag. When using HTML-Kit, the comment entries are formatted for you. You enter <!-- {sp} and the end automatically appears. You are also left in the area where you would add the text comment. The entry is: <!-- Vertical Scroll Data --> <!-- YOUR NAMES HERE --> <br>Adams, Don<br><br> Aldrich, Patricia<br><br> Allen, Emery<br><br>Andrews, Carolyn<br><br> Beal, Sam<br><br> Bean, Lucy<br><br> Bevins, Ron<br><br> Bliss, Drucilla<br><br> <!-- ABOVE IS YOUR LAST NAME YOU ENTERED --> <!-- Horizontal Scroll Data --> <!-- YOUR NAMES HERE --> Adams, Don - Aldrich, Patricia - Allen, Emery - Andrews, Carolyn - Beal, Sam - Bean, Lucy - Bevins, Ron - Bliss, Drucilla - <!-- ABOVE IS YOUR LAST NAME YOU ENTERED --> Place each set of data along with the comments on your program (PracticeBoard or Kit) Put some space above and between the data. To make sure that they stay separated enter a line break (<br>) tag between them. We have already done this so it is old hat. We need to define the font, text size and color. We also want to center it on the vertical scroll. <!--Vertical Scroll Font --> <font face="verdana" size="2" color="black"> <center> <!-- horizontal Scroll Font --> <font face="Times New Roman" color="#FF0000" size="2"> I have picked 2 different fonts to see which is which. Notice that the order of the attributes are different. Well that is to show that the order is not predetermined. You can change the order and it will all come out the same. It just must be within the tag terminators. (< & >). Did you forget to close the tags? Next we need to make the marquee itself. Both have a set format although the order of the attributes can be changed within the tag. For the vertical, it is: <!-- Vertical Marquee --> <marquee bgcolor="white" scrollamount="2" scrolldelay="4" direction="up" width="290" height="270"> and for the horizontal, it is: <!-- Horizontal Marquee --> <marquee bgcolor=#ece5e6 width="290" height="20"> Let us divide up the Vertical one first. The tag is <marquee ..>. The background color is not necessary if you want the background to be white. I placed it white so it can be changed without looking into how to get it into the tag. The scrollamount and scrolldelay has to do with the speed. This is one thing that you can play with. I believe that you can use 1 through 9 but I have not found the limits listed anywhere. As a test, try double digits and zero. The direction is either "up" or "down". The width is the space that the longest word can be in pixels and the height is the total area that the scroll has to work in vertically. There is a limit on the Website of 440 in width but no height limit. I believe that you need 12 to get a complete word to display in the height setting. Play with that also. Try a color like #ece5e6 for the background which is the color for the milk carton. Now the horizontal! The tag is <marquee ..>. The background color is not necessary if you want the background to be white. I placed it #ece5e6, which is the Milk carton color. Again the Width and Height are set to the size you wish, keeping in mind the width limits that you must work within. The height can be varied but if too small, the vertical size will be adjusted to fit the font size. Your comments may be different but you now should look similar to: <!-- Vertical Marquee --> <marquee bgcolor=#ece5e6 scrollamount="2" scrolldelay="4" direction="up" width="290" height="270"> <font face="verdana" size="2" color="black"><center> <!-- Vertical Scroll Data --> <!-- YOUR NAMES HERE --> <br>Adams, Don<br><br> Aldrich, Patricia<br><br> Allen, Emery<br><br>Andrews, Carolyn<br><br> Beal, Sam<br><br> Bean, Lucy<br><br> Bevins, Ron<br><br> Bliss, Drucilla<br><br> <!-- ABOVE IS YOUR LAST NAME YOU ENTERED --> </center></font></marquee><br> <!-- Horizontal Marquee --> <marquee bgcolor=#ece5e6 width="290" height="20"> <font face="Times New Roman" color="#FF0000" size="2"> <!-- Horizontal Scroll Data --> <!-- YOUR NAMES HERE --> Adams, Don - Aldrich, Patricia - Allen, Emery - Andrews, Carolyn - Beal, Sam - Bean, Lucy - Bevins, Ron - Bliss, Drucilla - <!-- ABOVE IS YOUR LAST NAME YOU ENTERED --> </font> </marquee> Now to put a box around each. From the previous lesson we found that the box code was: <center> <table border="4" cellspacing="0" bordercolor="red" width="440" bgcolor="white"> <tr> <td> <!-- Data and information goes in here --> </td> </tr> </table> </center> On the vertical scroll, we had set the marquee width to "290" so if we want the box to fit the background, we need to change the table width to match the box or change the marquee width to match the box. Try both. 4. We need to put a box around it all. We should resize the internal boxes to 5% less than the main box. We can either force the width to "418" or less on the red boxes. Using the Box Code again with the change to "blue" for the border: <center> <table border="4" cellspacing="0" bordercolor="blue" width="440" bgcolor="white"> <tr><td> <!-- Data and information goes in here --> </td> </tr> </table> </center> We will place all of the previous data between the two sets of border tags. The final marquee code should look like: <!-- Two Marquee Boxing lesson 2 --> <center> <table border="4" cellspacing="0" bordercolor="blue" width="440" bgcolor="white"> <tr> <td> <!-- Vertical Marquee Start --> <center> <table border="4" cellspacing="0" bordercolor="red" width="270" bgcolor="white"> <tr> <td> <!-- Vertical Marquee --> <center> <marquee bgcolor=#ece5e6 scrollamount="2" scrolldelay="4" direction="up" width="290" height="270"> <font face="verdana" size="2" color="black"> <center> <!-- Vertical Scroll Data --> <!-- YOUR NAMES HERE --> <br>Adams, Don<br><br> Aldrich, Patricia<br><br> Allen, Emery<br><br>Andrews, Carolyn<br><br> Beal, Sam<br><br> Bean, Lucy<br><br> Bevins, Ron<br><br> Bliss, Drucilla<br><br> <!-- ABOVE IS YOUR LAST NAME YOU ENTERED --> </center></font></marquee> </center> </td> </tr> </table> </center> <br> <!--horizontal Marquee start --> <center> <table border="4" cellspacing="0" bordercolor="red" width="418" bgcolor="white"> <tr><td> <!-- Horizontal Marquee --> <center> <marquee bgcolor=#ece5e6 width="418" height="20"> <font face="Times New Roman" color="#FF0000" size="2"> <!-- Horizontal Scroll Data --> <!-- YOUR NAMES HERE --> Adams, Don - Aldrich, Patricia - Allen, Emery - Andrews, Carolyn - Beal, Sam - Bean, Lucy - Bevins, Ron - Bliss, Drucilla - <!-- ABOVE IS YOUR LAST NAME YOU ENTERED --> </font> </marquee> </center> </td> </tr> </table> </center> </td> </tr> </table> </center> <!-- the end --> In lesson 2, we spoke of Data and it was the list of names at first, later it became the font and names and continued to increase in what we called data as we added boxes around boxes. The concept of boxing things is what I want to get you to know. The box border does not have to be there to conceder it a box. Some may call it a module or section amongst other names. It is an operating piece of code that functions by itself. Putting the closing tags makes the division between Boxes, Modules or Sections. There is a line break between the two red boxes. Remove it and the two boxes join as one with a red divider. The other thing about data, it does not have to be text. You could insert one of the any dividers you have on your site in between some of the names on the vertical scroll. It will scroll with the names. You could have small pictures with the name below in the vertical scroll. You could do that with the horizontal scroll also. It would be more complicated as you need a line break or a paragraph tag to put the text below the picture. We have not talked about the paragraph tag (<p> </p>) yet. It functions much like the line break. You might want to take your BIO and copy it to Kit and see the difference. I believe you would have to put 2 line breaks to make the same display as the paragraph tag will show. Try putting part of your BIO between the 2 red boxes without any tags. Then put a center tag at the top of the Bio and close the center at the end of the Bio. I saved the first one as Lesson 1 in HTML-Kit and the second as Lesson 2. We will use Lesson 1 as the basis for Lesson 3. We will then make a Lesson 4 out of Lesson 2 and 3. I have found that Box borders do not work on the Profile page as I tried before. Now that we have removed the division tag, they may work. That is my next test. Have fun and be sure to save your work. |