| Me & My HTML | ||||||||||||||||||||||||||
| Lesson 1 | ||||||||||||||||||||||||||
| Lesson 1 for Classreport.org Administratiors | ||||||||||||||||||||||||||
 |
||||||||||||||||||||||||||
| Lesson 1 Picture | ||||||||||||||||||||||||||
| Home | ||||||||||||||||||||||||||
 |
||||||||||||||||||||||||||
| Email: | ||||||||||||||||||||||||||
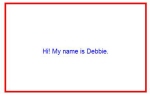
| Lesson 1. Once you have HTML-Kit installed, open it and select Create a new file. The display will have the common parts of a Web page but with our uses in Classreport.org we will not have need for all of that. Also for the lessons, we can delete all that is on that page and start with a clean slate. Let us start out very simple. Enter Hi! My name is Debbie Down at the bottom of the page are 4 tabs, Editor, Preview, Output & Split View. We will use just the first two for a while. Select Preview and you will see the statement. Select Editor to continue. Let us move it down a line and center it. Remember that most tags require that they be closed. Put a <br> and <center> before the text and a <br> and </center> after the text. Select Preview. Then select Editor to continue. Make it look like: <br><center> Hi! My name is Debbie. <br></center> Let us make the text colored and larger. Put <font face="verdana" size="3" color="blue"> just above the text and close the font after the text. Select Preview and you will see the display. Note the changes. Select Editor to continue. Play with the size= number from 1 to 5 and preview each. Play with the color= with "white", "red", 'black" and back to "blue", previewing each. You can change face= to "arial", "courier", "times new roman" and "wingdings" Depending on your font you ended with is should look something like this.: <br><center> <font face="arial" size="3" color="blue"> Hi! My name is Debbie. </font> <br></center> I added spaces at the front to define the tag sections. Not necessary but much easier to read. ----------------------- Now let us look at a box around the present display. Lower the text by pressing enter above the <br> tag. This will give us some room above to work in. It will not affect the display when you preview it. We will first define the table. <table> The table tag is the easiest way to accomplish this. We need to add the attributes of the table, border, cellspacing, border color, the width of the proposed box and background color. It will look like: <table border="4" cellspacing="0" bordercolor="red" width="440" bgcolor="white"> Preview this and you will see a red line below the text. Let us center it with a center above the <table ..> line. Did you remember to close the table and center tags in reverse order at the bottom of the page? We now need to finish the box. We will do this with the table Row and Table Data tags, <tr> and <td>. First enter the <tr> tag and close it at the proper place near the end. The open must be under the <table> tag. The preview of this shows that there is a box but with nothing in it and under the text, all you see is a fine white line in the middle. The text we have in the code will be some the data so let us put the defining parts of the box itself together. We know that it will be the <td> tag. We now have the box with the text centered. Let us make the box bigger. As the box size varies in height as text is added and the width is set at 440 Pixels, we could type more information. Let us instead just put some line breaks in with the <br> tag. Put 5 above and 5 below the text. Now it is time to play. Change the width in the table tag Attributes. Change each of the attributes in the table tag. For the bgcolor, use the chart and select some of the pastel colors. Then find a dark color in the same hue to be the border color. You now have a box that you can enter text in and vary the border and background colors. |