You should know all of the following endings off by heart. This will not only improve your play should you reach any of these endings, but will greatly assist you in deciding when simplification from more complex endings is appropriate.
King and Pawn Vs. King
I.Attacking King to the Side of or Behind the Pawn
These endings are always drawn.
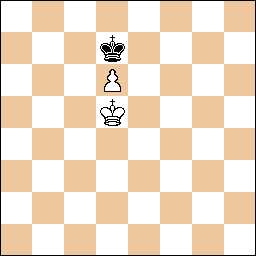 Black to move (1)
1...Kd8
In this situation the king always steps one square straight back so that 2 Kc6 can be met by 2...Kc8 and 2 Ke6 can be met by 2...Ke8 keeping the opposition in both cases.
2 Kc6 Kc8 3 Kd5 Kd7
Another rule in this ending is that if Black can take the square straight in front of the pawn he should do so without exception.
4 Ke5 Kd8 5 Ke6 Ke8 6 d7+ Kd8 7 Kd6
Game drawn by stalemate.
II.Attacking King One square in Front of the Pawn
A.Stronger Side's King on the Sixth Rank
These endings are always won regardless of who is on move. Take the case where the weaker side has the opposition.
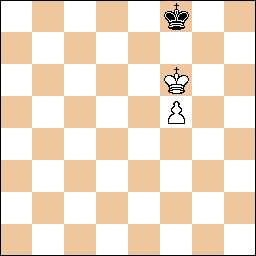 White to move (2)
1 Ke6 Ke8 2 f6 Kf8 3 f7 Kg7 4 Ke7
White wins.
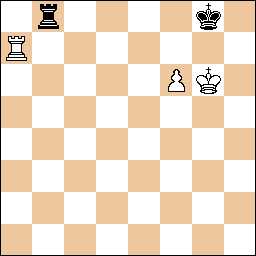
B.Stronger's Side King on the 3rd, 4th, or 5th Rank
In this case the stronger side will win only if he has the opposition. First let us see the case where he has the opposition.
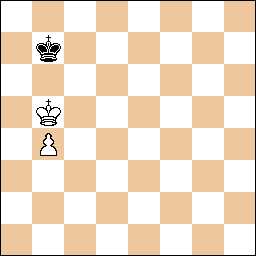 Black to move (3)
1...Kc7 2 Ka6 Kc6 3 b5+ Kc7 4 Ka7
White wins.
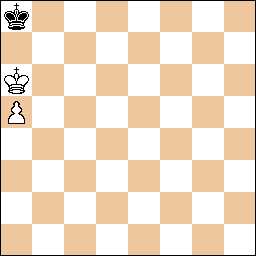
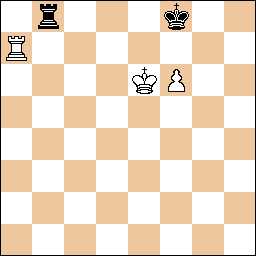
If the weaker side has the opposition the same position is a draw.
White to move (4)
1 Kc5 Kc7 2 b5
Drawn game.
We have reached a position of the type examined in diagram 1.
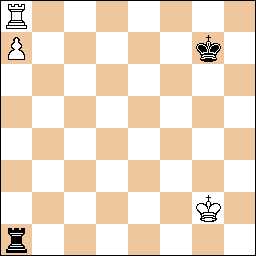
C.Rook Pawns
The exception to these rules is the rook pawns. These have very drawish tendencies since if the weaker side's king gets back in to the corner there is no way to force it out.
 Black to move (5)
1 ...Kb8 2 Kb6 Ka8 3 a6 Kb8 4 a7+ Ka8 5 Ka6
Game drawn by stalemate.
D.Rule of the Square
If your king is far away from an enemy pawn there is a simple rule you can apply to see whether or not you will be able to catch the pawn with your king. Simply draw a square whose diagnol starts at the pawn and finishes on the eighth rank. If your king can move inside that square in its next move you can catch the pawn and if not you cannot (remember however that the square will be different if the pawn can move 2 on its first move!).
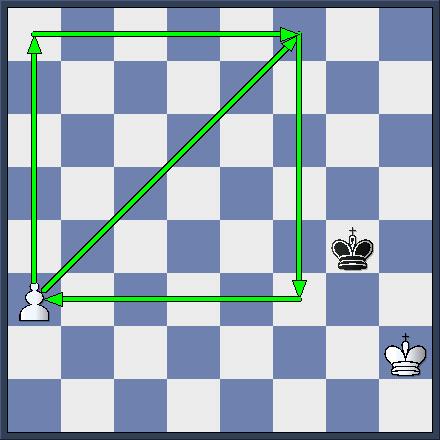 Black to move (6)
Here Black to move plays 1...Kf5, 1...Kf4, or 1...Kf3 moving inside the square of the pawn and draws.
King, Rook, and Pawn versus King and Rook
These endings are particularly important since rook endgames are the most common type of endgame and more complicated rook and pawn endings can eventually simplify down to this endgame.
I.Philidor's Defensive Technique
The weaker side should use this method to draw. Philidor's technique can be used when neither the enemy king nor the enemy pawn has advanced past its own fifth rank. In that case you can defend by stationing your king on the queening square and your rook on its own third rank. All you then have to do is oscillate your rook back and forth on the third rank until he pushes his pawn to the sixth. Then you move your own rook down to the eighth rank and start giving checks from the rear which he will have no defense against. This will be illustrated by the following example:
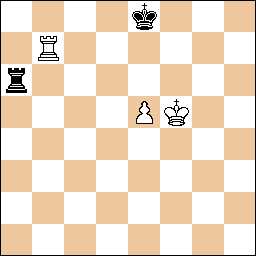 Black to move (7)
1...Rc6 2 Ra7 Rb6 3 e6 Rb1 4 Kf6 Rf1+
Drawn game.
There is no way to escape the checks without losing the pawn.
II.Passive Defense
A.Rook Pawns
Rook pawns offer the weaker side the best drawing chances. The weaker side need not achieve Philidor's position. The game can instead be drawn by placing the king on the queening square and just moving the rook back and forth along the first rank.
 Black to move (8)
1...Kh8
It is plain to see that no progress can be made for White.
B.Knight Pawns
 Black to move (9)
Here the same technique achieves the draw.
1...Rc8 2 Rg7+ Kh8 3 Rh7+ Kg8
Drawn game.
No progress can be made since 4 g7 ?? would actually lose to 4...Rc6+.
C.Bishop and Center Pawns
In this case the win can only happen if the stronger side has his king on the sixth rank on the short side where it is shielded from checks.
 White to move (10)
Here White wins as follows.
1 Rg7+ Kf8 2 Rh7 Kg8 3 f7+ Kf8 4 Rh8+
White wins.
But with the king on the long side where it is vulnerable to checks the stronger side can only draw. For instance:
 White to move (11)
1 Kf5 Rb1
Drawn game.
Black draws as in diagram 7.
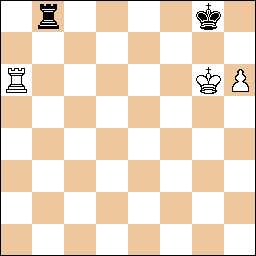
III.Lucena Position
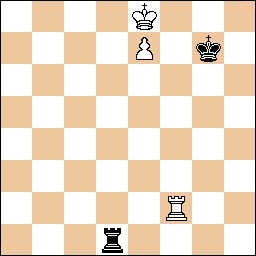 White to move (12)
This is a known won position that White can aim for in these endings. The distinguishing features of this position are:
(1)White's pawn is advanced to the seventh rank
(2)White's king is one square directly in front of the pawn
(3)Black's king is cut off from the queening file by at least one rank
This type of position, known as a Lucena position, is always won for White if White is on move and the pawn in question is not a rook pawn. White wins through a method known as building a bridge:
1 Rg2+ Kh7
After 1...Kf6 the Black king acts as a traitor which shields White from checks after 2 Kf8 so White promotes.
2 Rg4
This rook will be used to block the checks from the rear.
2...Rd2 3 Kf7 Rf2+ 4 Ke6 Re2+ 5 Kf6 Rf2+ 6 Ke5 Re2+ 7 Re4
White wins.
Black can sometimes draw a Lucena position if he is on move, but this is no easy task. For Black to draw on move the following conditions have to be met:
(1)He has to be able to check White from the side.
(2)He has to have a minimum checking distance of three empty files separating his rook and the White king.
(3)His king has to be placed on the second rank opposite White's king.
(4)The White rook must be poorly placed.
Here is an example of a position that can be drawn:
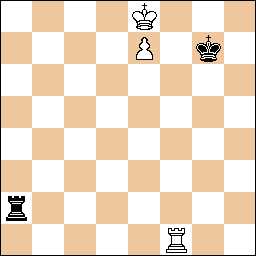 Black to move (13)
Here Black draws by flanking checks.
1...Ra8+ 2 Kd7 Ra7+ 3 Kd6 Ra6+ 4 Kc5 Ra5+ 5 Kc6 Ra6+ 6 Kb7
The king must come over to the b-file to escape the checks.
6...Re6
Drawn game.
Black wins the pawn and draws. Note that if the Black king were on g8 6...Re6?? would lose because of 7 Rf8+ winning. Therefore, Black would have had to play 5...Ra8 but this would also have lost to 6 Ra1!. This is why the Black king must be on the second rank opposite the White king. Also note how the poor placement of the White rook was essential. If the White rook were on c1, d1, or e1 White would have had sufficient means to block the flanking checks or force promotion, and would have won.
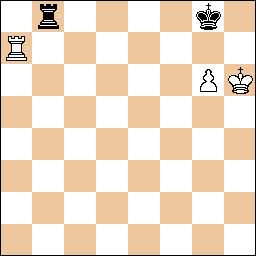
IV.Lasker's X-Ray
There is a common trap that the weaker side can fall into in a rook and pawn ending called Lasker's x-ray. This happens when the stronger side has a pawn on the seventh rank supported by a rook directly in front of it on the eighth rank. Take the following position:
 Black to move (14)
Here Black must not play 1...Kf7 ?? because then 2 Rh8 ! would win on account of 2...RXa7 3 Rh7+. The only safe squares for the Black king are g7 and h7. As long as Black stays on these squares White has no way to make progress. Black simply moves his rook up and down along the a-file. White's only plan is to bring his king over to b6 or b7 to protect the pawn but then Black gives checks from the rear until the White king gives up protection of the pawn. As soon as that happens Black's rook takes up position on the a-file again and the position is a dead draw.
It is very important to note that even if an extra g or h-pawn were added for White the position would still remain drawn because there is no way to dislodge the black king from its two safety squares. But if an f-pawn were added, the position would be easily won for White since the f-pawn would decoy the Black king away from its safety squares.
Elementary Mates
I.Two Bishops
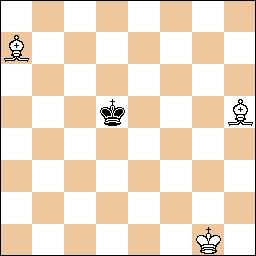 White to move (15)
This mate is relatively simple to master. The idea is to position the two bishops side by so that the enemy king cannot approach them. Gradually the bishops advance in this manner pushing the enemy king into a smaller and smaller part of the board.
1 Kf2 Ke4 2 Be3 Kd3 3 Bg6+ Kc3 4 Ke2 Kc4 5 Kd2 Kd5 6 Kd3 Ke5 7 Be4 Ke6 8 Bf4
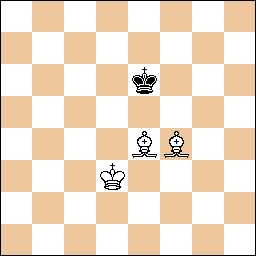 Black to move (16)
Now the bishops are on the fourth rank side by side. The next goal is to get them to the 5th.
8...Kf6 9 Kd4 Ke6 10 Be5 Kf7 11 Bf5
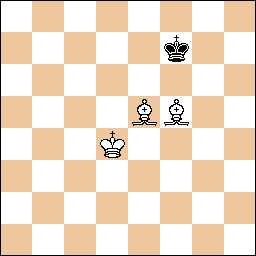 Black to move (17)
Now that the bishops are to the fifth the next step is to advance them side by side to the sixth.
11...Ke7 12 Kd5 Kf7 13 Bd4 Ke7 14 Be6 Kf8 15 Bf6
 Black to move (18)
Now all that remains is for White to decide which corner of the board to mate Black in. Here it makes more sense to mate on the kingside since Black's king is closer to that corner. So White moves his king to g6 to prepare a mating net and then drives the Black king into the corner.
15...Ke8 16 Ke5 Kf8 17 Kf5 Ke8 18 Kg6 Kf8 19 Bd7 Kg8 20 Be7 Kh8 21 Bc6 Kg8 22 Bd5+ Kh8 23 Bf6#
Black Checkmated.
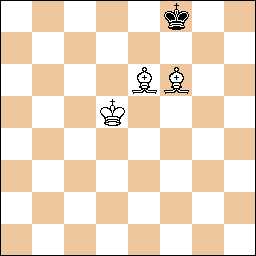
II.Bishop and Knight
 White to move (19)
This ending is more complicated than the one with two bishops, but still not too difficult to master with a little bit of practice. The first thing you should know is that you can only checkmate in a corner of the board of the same color as your bishop. Since here there is a light squared bishop the Black king must be driven to the a8 or h1 corner. The second thing to know is the three locks (which you should have memorized) which will allow you to gradually force the enemy king to the fatal corner.
1 Ke2 Kd4 2 Kd2 Ke5 3 Ke3 Kf5 4 Nd3 Kg5 5 Kf3 Kh5 6 Kf4 Kh4 7 Ne5 Kh5 8 Be4 Kh6 9 Kg4 Kg7 10 Kg5 Kg8 11 Kf6 Kh8 12 Nf7+ Kg8 13 Bf5 Kf8 14 Bh7
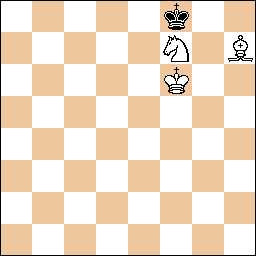 Black to move (20)
This is the first lock you should memorize. Black's king is forced out of the wrong colored corner.
14...Ke8 15 Ne5 Kd8 16 Ke6 Kc7 17 Nd7 Kc6 18 Bd3
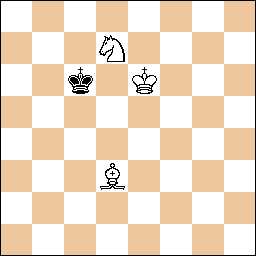 Black to move (21)
This is the second lock which you should memorize. Note how the bishop and knight combine to take away all the squares which would allow the Black king to escape the fatal corner: a6, b6, b5, and c5.
18...Kc7 19 Bb5 Kd8 20 Nf6 Kc7 21 Nd5+
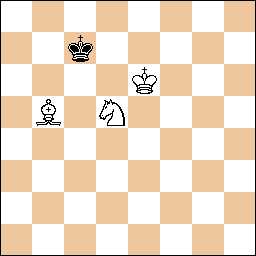 Black to move (22)
This is the third and final lock. The minors confine Black's king to just six squares even without any help from the White king. Now White only need bring the king in for the final mate which is accomplished by transferring the king to c7 and the bishop to c8.
21...Kc8 22 Ke7 Kb7 23 Kd7 Kb8 24 Ba6 Ka7 25 Bc8 Kb8 26 Kd8 Ka7 27 Kc7 Ka8 28 Nb4 Ka7 29 Nc6+ Ka8 30 Bb7#
Black Checkmated.
Miscellaneous Endings
I.King and Queen Vs. King and Pawn on Seventh
This is an elementary win for the queen if the enemy pawn is a knight pawn or a center pawn. But if the pawn on the seventh is a bishop pawn or a rook pawn, then the game is drawn.
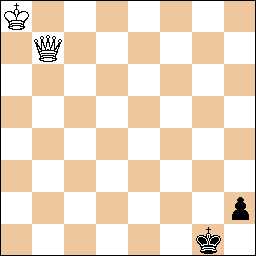 White to move (23)
Here it is easy to see that there is no time to bring the king over to help out because after a series of checks forces the position with a White queen on g3 and Black king on g1 Black simply goes ...Kh1 and the king cannot be brought over because of stalemate. There is also a stalemate trick with a bishop pawn.
 White to move (24)
Now after White maneuvers his queen to g3 Black goes ...Kh1 and White cannot capture the pawn because of stalemate.
II.The Wrong Colored Rook Pawn
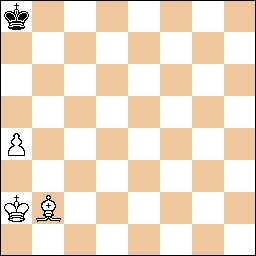 White to move (25)
This is another important position to know. To win with a bishop and rook pawn against a king that has made it to the corner of the queening square, your bishop must be the same color as the promotion square. Here the promotion square is White and the bishop is Black so no win can be forced as long as Black keeps his king in the corner.