First a little about this page. I am an amateur and this is my effort at an informational site about Human Powered vehicles, recumbents for now. If you are looking for info on if recumbents are fast ? ,, or how well can they go up hill I have 2 small sections on those ideas plus one very short history why they are banned. I am looking for dissenting views about recumbents. Most recumbent sites don't give the negative side and I would like to give you an off site dissenting view to give you as much information on both sides as I possibly can. You have to be well informed to make a well informed decision so there are just about 100 links in the links list . So far most of what I have found are comercial sites. Steves comments on recumbents is the most objective response so far with mine being the the only other negative so far. I've found two less than compemntary non-commercial sites linked to each other that give some off site dissenting views, Unfaired Recumbents and Road Bikes by Sandiway Fong.* and with it “ * Is a racing recumbent really faster than an aero time trial bike or a quality road bike? * ” Fairings help at speeds as low as 12mph or aproxamatlly 20KPH so they might help going up hill. But they are heavy and may slow you below those speeds. On the down hill rim brakes can be scarry as to whether they are good enough to stop in a panic and they can wear out very quickly so extra attention to them is a must before the brakes wear to the point of damaging the rim. Remember buyer beware, try to find someone or some store to let you ride a recumbent so you can form your own opinion before you buy. These are very expensive bikes $700 - $1000 for the “cheap” bikes.There are some bike that are less expensive but this is an example of their expense A very good place to look for more info on HPV's is the IHPVA Source Guide in the menu page lists section There is a must see leaning trike from Germany in the Trikes section the“Tripendo”. If you are looking to make a fairing look at the CoolBikes in the Fairings section, It has links to peoples bike fairings and how they made them. Or go to the WISIL page in the Links 2 lists of Links then to the HPV project Page. The more information is meant for web publications on recumbents. The last list is for web design, like were I got the script for the 2 frame pull down menu and other scripts, and My ISP -Main One.Com - unlimited access and web space for $11.50 a month These pictures are gathered half through magazines and books that I have and the other half through the Internet. I am claiming as a means of defense from copyright suits the idea of fair use in that no profit is made from this site and that it is meant to educate the general public through my experiences and knowledge of the subject of Human Powered Vehicles(recumbents bikes for now)on this Planet commonly referred to as Earth.
If sweating totally disagrees with you these bike are not for you. Because the rider is sitting their back is against the seat and therefore does not have air circulating around it to help evaporate the sweat.This leads to a sweaty spot on the back and seat a great deal more so than on a diamond frame bike where a persons back is not pressed against the back of the seat.
In My Humble Opinion when you are on the road with cars you in a dangerous potentially life threating situation I've been riding a bike for many years. I rarely wear a helmet and do not have the highest confidence in thier ability to save my life in the event of an accident. I've been in several car/bike collisions two in which I suffered broken or badly sprained ankle leg injuries. One was on a Diamond Frame bike were the car was at a stop sign and I had no stop sign. As I passed in front of the car it gassed it and nearly ran me over. The car hit the bike at the seat tube and threw me and the bike 15 to 20 feet ( 5 to 7 meters ). I believe it was becasue I was moving at about 18 MPH (30 kph, 8.3 meters per second, 26.4 feet per second) that the diver didn't hit me instead of the bike. This was a hit and run accident so I have no idea of how much or if there was any damage to the automobile at all. I suffered a severly sprained ankle and brused leg. In a similar situation on a recumbent I was at a four way stop sign it was my turn to cross the interestion and the car to the right failed to stop and hit me squarly. The bike took all of the impact and even though the bike and me were pushed through the intersection I had no injuries. In another incident a car pulled in front on me and stopped I hit in at about 33 MPH (55kph 15.2mps 48.4fps) the bike was totaled and my ankle was broken. The pickup truck suffered a large dent in the front fender but no serious damage. Had I been riding a LWB bike it is possible that I would not have had any injuries because my foot pedals hit he car first and with a LWB bike the front wheel and then the bike would have take most if not all of the impact.
These are not the only accidents that I've been in but they and others have given me the experience to say that if you ride on the road enough you are likely to be hit by a car and no matter what you do to make your self visible they will say that they didn't see you . In the many years of riding I've had he misfortune to know two others who were not as fortunate as me and lost their lives while ride thier bikes . Both of them rode DF bikes one religiously wore a helmet. I did not know these people well they just rode along the same route as I and therefore had an opportunity to talk. One rode for envirormental reasons the other for his health. In a collision between a car and a bike the car will win every time. The best defense you have is to ride defensively. To that end the one big advantage of recumbents ,in my opinion, is the natural heads up forward looking riding position .
People have always raced . The bicycle was invented in the mid 1800�s and by the 1880�s it was very close to the shape it is now. The 1890 bike looks alot like a modern bike without derailers. Derailers were invented in the 30s By the 1890�s cyclist had already discovered the advantages of aerodynamics. By 1900 motor paced cyclist were going over 40 mph , The current record is now over 152 mph. In 1913 a Frenchman patented a streamlined enclosure for the bike called the Velo-Torpedo. At this time a rivalry involving at least two individuals in order to claim the fastest unpaced speed and any means possible was use to gain the advantage.By WW1 the Union of Cyclist International ,UCI ,the organization that organizes races, had band the use of anything intended to reduce air resistance.
A bicycle revival in the 30�s saw a lot of recumbents. One maker noticed that his recumbent was significantly faster than conventional bikes and in 1933 asked the UCI if the bike fit their rules. They referred to their earlier ruling of no aerodynamic devices but made no ruling. The bike later that year broke the prestigious 1 hour record and was beating all challengers . It set records that were not matched on conventional Diamond Frame bikes until the 60's. By 1934 the UCI had ruled against recumbents and set the strict dimensions on the bike .Their argument was that it should be a race of people and not machines. As far as the UCI (Union of Cyclist International) and USCF (United States Cycling Federation)- The people that organize most professional races are concerned recumbents are illegal and banned from racing.
In the 70�s interest in how fast a person could move under there own power was reborn. Dupont put up a prize of money for the first person to go over 65mph(93.3 feet per second)(109kph 30.3 meters per second) through a 200 yard? "time trap" on level ground with no wind. Easyracers won this prize in 1985.It is this interest that led to proof that 80% of a persons energy was going to move the air out of the way at speeds over 15 to 20 mph . This developed into the International Human Powered Vehicle Association an organization developed to record and encourage speed records on all types of vehicles . This organization holds annual speed championships around the world and is at least partly repsonsible for the resurgence of recumbents. There is now a prize for the first person to travel 45 miles in 1 hour.
This section will evetually be about fairings. How I have made mine. How I think others have made theirs. Where I think your best effort should be put and lots of pictures of mine and other peoples fairings.
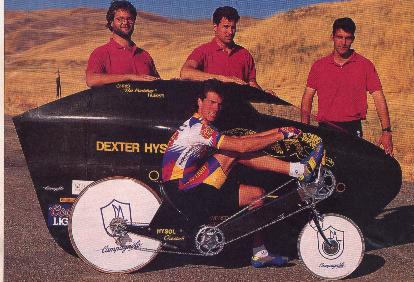
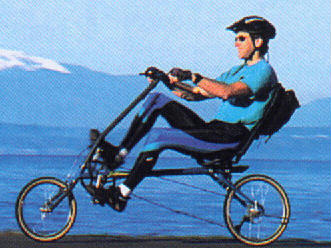
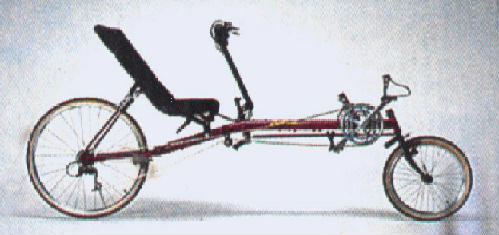
Below are some pictures of fairings that I've gathered. #1-5 are of my past and present bikes. I only have one bike now and that is #5 which is also #4 but the fairing in #5 I've made and those in #4 are Zipper fairings. The one on the front of the bike is comercial the one on top is my own idea. #1-3 are the same bike with different fairings on it, the bike was in an accident its repacement that was made in school shop was stolen! I have learned though reading and personal experience that the rear fairing is more important than the front fairing as far as speed is concerned. The rear is were the drag is created. It is because of this that many commercial recumbents in Europe have rear fairings "tail cones?" that add lockable storage and speed. #6 & 7 are examples of that.
The above are the few pictures I have of my bikes. The #4 & #5 pictures are of the bike I now own and use as primary Transportation a Vision R40 by Alterative TransPortation ATP. The ones before that, 1-3, are from a bike company that has gone out of business. That bike was stolen from me. It was heaver yet faster because it had an intermediate gear cluster that gave it a gear range of 20 gear inches to 252 gear inches American or 1.6 meters to 20.3 meters European. It was with this bike that I really found out how much the rear fairing mattered. It was not until I added the rear aero dynamics that the bike really increased its speed. #5 Mouse over Mouse off is the rear of my bike now. Mouse off shows the rear open. It lost some storage spce compared to the baskets I had but it added a space to place cool looking stickers. It was made with coroplast™ and styrofoam. The coroplast doesn't bend much and was very difficult to bend into a shape I liked at the end so I used styrofoam and carved it to a shape that I could live with. #6 & #7 are the tails of some european bikes. Obviously those look alot better than my bikes ever did and they better they cost more and are production bikes. The next one #8 is the current 200 meter record holded the Cheeta. The mouse over link leads to there site #9 & #10 are typical race bikes
The bike in picture #1 was one of my first attempts and the basis of the way I made the next three fairings and influence in the last one #4. It was made using coroplast as the backbone and what held it away from me and to the bike. In 1-3 the fairing itself was made from styrofoam blocks that were glued together and then sanded to the shape I wanted. After the shaped the styrofoam was covered with model airplane covering like monocoat. The fairing in #4 used the support from the zipper fairing to hold the fairing. The majority of the fairing is made with coroplast with a little styrofoam for shape and then covered with model airplane covering to make it uniform color. The first three cost about $30-50 dollars in materials # 4 because it uses a zipper fairing support cost considerably more but the fairing itself ( what you see in the picture ) cost about $30-$50.
You may be asking yourself if I already had a very nice commercial fairing why did I make one? The reason was because my bike is my primary form of transportation and I wanted to be able to ride in the rain and the commercial one was just not adaptable to that end. Though not pictured here yet #4 has been able to do just that. Below are a few of the many great site discribing various fairings the best in this list is the WISIL site which is a link to other sites on various recumbent type things . If you have not visited it yet it is a must see if these things interest you.
http://www.mcs.net/~gkpsol/fairingseminar.html A coroplast fairing constrution page http://www.wisil.recumbents.com/hpvpfair.htm coroplast fairing w/zipper front from midwest http://www.merit.edu/~rjd/fairing_construction.html M5 w/coroplast lots of detail lots of pictures http://recumbents.com/giles/fairing.htm GreenspeedTrike fiberglass fairing http://www.wisil.recumbents.com/whatsup.htm WISIL recumbent project page a must see http://www.mcs.net/~gkpsol/coolbikes.htmlcool bik pictures and links http://www.mcs.net/~gkpsol/workshop.html Chicago recumbent fairing work shop
The wheel covers that I have experience with are the UNI ? wheel covers that have an aluminum hoop that a cloth cover is stretched and tightened over and the ones that I now have on my bike made from balsa wood hoops and monocoat ,a model airplane covering. With the covers with aluminum hoops the hoops are attached to the wheel with clips after the cover is stretched over them . In my experience the hoop had a tendency to jump off the clips if a big bump in the road was hit . This more than once became a big annoyance. The wheel covers on my bike now are home made using 1/8" balsa wood sections carved in the shape of the rim that they are going on then glued together overlapping the sections to form the hoop .One hoop each side each side glued to the other side with the scapes of balsa left over from caving the shapes needed for the hoops . The hoops are more than one layer of balsa glued together overlaping so that the grain of the wood goes in a diffent direction than the layer its glued to. After the hoops were glued together and dry I glue the two opposing "hoops together through the spokes with scrape pieces of balsa ironed on the monocoat and srank it tight. The picture gives you a little idea of how it is done. I've had less trouble with these than with the ones with the aluminum hoops. Not that I have not had trouble with these but with these the balsa wood has never left the wheel and when the momocoat separated from the balsa I could easly take it completly off.
There are problems with everything and this is no exception . these balsa hoops after they are glued together on the wheel they can not be easily removed and placed on another wheel unlike "UNI" wheel covers with the aluminum hoops and clips. Those wheel covers can easily be removed except at the sprockets were you need to remove the freewheel/ to remove the wheel cover. I have been pleased with the home made covers that I've made. I've heard of others that instead of making balsa wood hoops like I did they just glued the model air plane covering directly to the rim of the wheel. If this is done the brakes must be very carefully adjusted so that they don't come in contact with the cover or they will rip it off when the brakes are applied.
top
I have made a few fairings for my bikes . The best so far was this The Shark It was made out of coropast, a corogated plastic ,styrofoam and monocoat, a model airplane covering. I called it the lead sled everyone else called it the Shark.It was in an accident and its replacement that I made in the college metals shop was stollen! Both were very fast bikes I believe becuse they had an intemediate gear that gave then an extremly wide range of gears. Now I have a Vision R40 with a Zipper fairing That I know is not as fast or even close to as fast as the previous bike.
I plan to make a new fairing for the front but I must emphasize that it is the rear fairing that will gain you the most speed. Wheelcovers are the best advantage for weight / cost / time as far as my experience shows . I gained 2.5 MPH average speed with the addition of the wheel covers . The "fairing" over the front wheel is really a fender/mudguard and does not help with speed IMHO . It was made with aluminum flashing shaped and taped together . Then taped to the front forks and covered with monocote. I've made others that were made out of coroplast, styrofoam and monocoat that carried a light . These add a certain look to the bike like fairings in general but I don't believe that they add any speed advantage. They are neat mudguards though. The rear fairing/fender/mudguard was made out of a commercial bike mudguard with balsa wood strips glued to it to hold the monocoat in place
I have hade marginally good results with Styrofoam blocks that can easily be carved and sanded to the shape that I desired. These blocks were first glued to something ,generally coroplast, then shaped. After I was satisfied with the shape it was covered with model airplane covering ,monocoator or similar. A great deal of care must be taken when applying the monocoat because the styrofoam melts easly . You could instead of monocoat use a fiberglass type covering but again styrofoam melts easly and the right epoxy is nessesary.