| Bivvie Building |
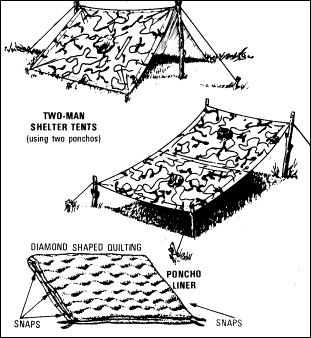
| BIVVIE BUILDING. A Bivvie (Derived from the FRENCH word "Bivouac" which they 'borrowed' from the German phrase "Bei Wache" - which translates as "Near to"-"To watch" - is defined as �a temporary shelter, built using little or no material�. In 'military terms' this often involves rigging up some form of temporary shelter for a few hours, or even overnight. A properly built bivvie can give you a better night's sleep than a proper tent! The standard piece of equipment is the Poncho, and the recently introduced Bivvie Sheet (which comes in DPM and hence can be concealed all the easier) Your Bivvie needs to provide you with a fundamental shelter from 'the elements' - Wind, Rain, and temperature. Protection from these is more important in survival terms than food, and short term even more than water. WIND In order to protect you from the wind, you need to rig up your sheet so that it prevents the wind from hitting you directly. To do this it is customary to peg one side (windward) to the ground, or weight the edge down with stones, or earth. The upwind edge can then be lifted to give you a space under the sheet that you can sit or lie in, out of the direct blast from the weather. PRECIPITATION Most stuff falling from the sky is not good in the short term. It gets you wet, which then begins to conduct heat out of you and you begin to suffer the effects of HYPOTHERMIA. It is possible to have the early stages of hypothermia in Britain in the middle of summer. Hypothermia kills. Solution - get out of the rain and stay as dry as possible. Your Bivvie can do that, but a little forethought can make the staying dry process better again. Rain will pool on large sheets given the opportunity, so by keeping your Bivvie sheeting taut you can prevent water from pooling. Easier again is to arrange for the centre of your sheet to be held up more than the edges, and the water will want to run OFF the sheet in the first instance. All this in conjunction with the wind factor starts to lend itself towards only a few possible shapes . . . . TEMPERATURE The temperature you can sustain inside your Bivvie is set by the volume of air you can 'trap' in it. The smaller the volume, the more heat you can sustain. The larger the volume, the cooler you will be. Dependant upon what time of year it is will determine which end of the scale you opt for. The build We are fighting with a series of options which often contradict each other. HOW you choose to build your bivvie depends upon your own personal interpretation of the rules you have to work within. Lets look at the ideal situation though: You need to fasten your bivvie to a tree or two, in order to gain some height above the ground. Failing that you can improvise using some (slightly) modified glass-fibre shock poles for a dome tent. These can be prepared to be able to act as an artificial tree over your bivvie, or inside the raised edge. Another option is to use a more traditional tent-pole, and rig your mock tent, in a more traditional way, using the poles to give one part of your bivvie some rise above ground. Having selected your two trees giving consideration to Prevailing wind direction and strength Temperature of prevailing wind Liquid content in prevailing wind. Ground condition, slope, and natural foliage Health of your two trees (dead ones will snap more easily or not hold your bivvie up well enough) then you can decide what style, height above the ground, how many people are going to share it with you, how long it has to last, etc.. etc.. etc.. If trees exist where you want them to be, fine. Fasten a line/bungee to the first tree, and attach it to your bivvie sheet. Take the opposite edge of the bivvie and repeat the process with your second tree, again using line or bungee. Now you can worry about pegging down one or both low edges. Two, or ideally three pegs per side will be needed to keep the English wind out fairly well, but that will also depend upon the state of ground you are building on, and how well anchored your pegs are. With your basic structure up, place your kit inside while you move onto phase two - camouflaging it. NOW YOU SEE IT . . . . . One aspect of Building your bivvie is the underlying motivation. Are you simply wanting to get out of the worst of the weather for 30 minutes for a rest and some hot food? or are you on exercise with an "enemy" at large who are hunting you down? A quick and simple bivvie sill suffice for your rest break, and with a little practice you will have your bivvie up in only minutes. The time consuming part comes as part 2 - making it blend seamlessly into the background. Camouflage. We've already addressed camouflaging YOU in terms of Shape, shadow, silhouette, surface, spacing, * movement The same applies to your bivvie. Don't go harvesting all the foliage immediately around your bivvie as you will then have a clump of green in a clearing. . . take your foliage from a wider area of land around your position. That way a few pieces taken from here or there will go unnoticed, and suddenly your bivvie becomes another small cluster of green in a series of clusters of green. You will need to allow access to your bivvie, but be careful not to wear too regular a path to your door. Careful planning about routes in and out can leave the entranceway just as well hidden as the remainder of your construction. |
 |
 |
| Whether you build a lean to, or a fully camouflaged "tent", you should build your Bivvie "fit for the purpose". Take some time to build it. It will be worth a few extra minutes in searching out a site which suits, and not simply "one that will do". If you have to live in it - choose carefully. it is after all YOU that will have to live in it. |