 |
|
|
|
|
|
|
|
|
|
|
|
|
|
|
|
|
|
|
|
|
|
|
|
|
|
|
|
|
|
|
|
|
|
|
|
|
|
HALLOWEEN HALL |
|
|
|
HEARSE CONSTRUCTION |
|
|
|
 |
|
|
|
 |
|
|
|
|
|
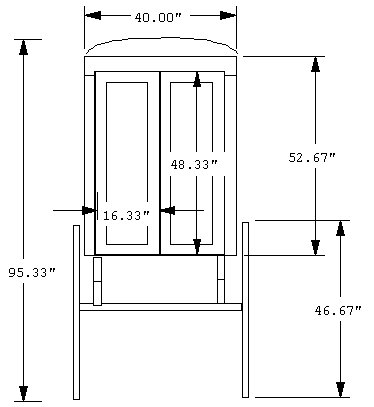
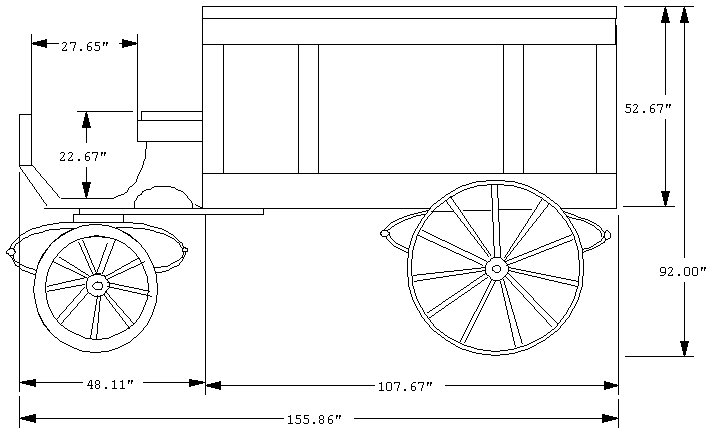
Above are the general dimensions for the hearse size, yes it really is that big. I made it in two parts the back part is for the coffin and the front seat section was added to it after it was made. The wheels I made out of two sheets of 3/4 inch CDX plywood that was glued and screwed together and then cut out as one piece** The axles for the wheels are made of 3/4 inch black pipe that are bolted to pipe flanges in the wheels.
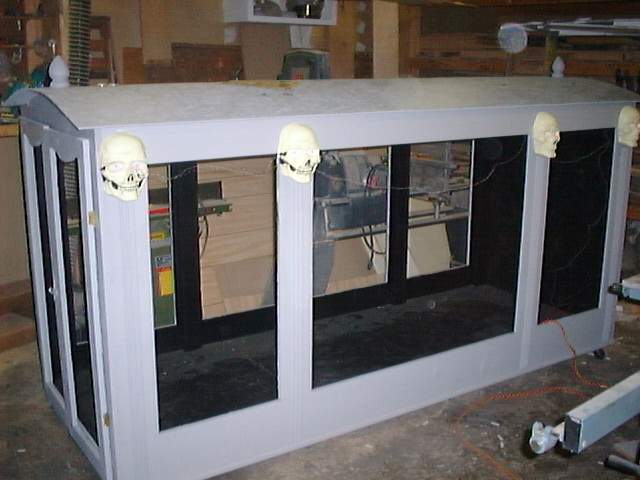
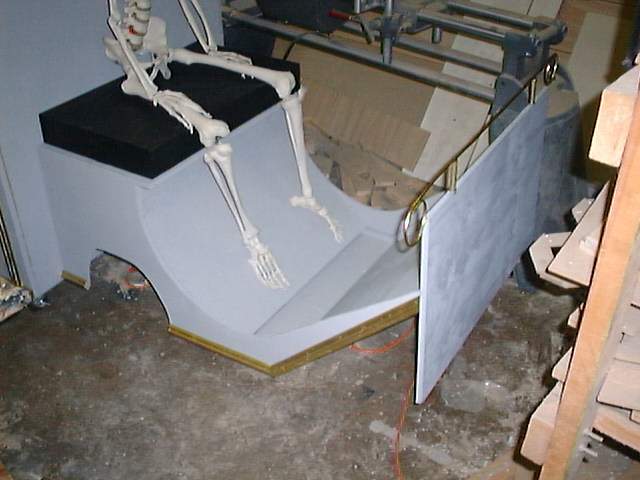
The first thing I did was make a base frame for the back half out of 2 x 4's. I made it like a wall section putting cross pieces 24 inches on center and doubling it up where the back axle was going to attach to the bottom. As you can see from the picture I don't have a lot of room in my shop for something so big so I put casters under the corners of this frame so I could roll it around to work on each side. Now I topped the frame with 3/4 inch chip board to lessen the weight I should have used 1/4 inch. Then I screwed 2 x 4 up rights to the base and then cross pieces on top to make frames for the windows. The front was a piece of the 3/4 inch chip board screwed to the up rights.
Now I nailed on different sizes of 3/4 inch pine boards to finish off the outsides. The bottom strip is a 1 x 10 and the top is a 1 x 6 as are the middle up rights. The moldings are half rounds that run up the middle parts and the one on the bottom was made on the router table out of a 2 x 2 and then cut in half and nailed to the 1 x 10. |
|
|
|
 |
|
|
|
The next part was to make the skulls on the outside
tops. I used the plastic overlay from a create-a-face package as the mold and filled them
with plaster before the plaster got hard I stuck a 3/8 x 6 inch long carriage bolt into the
back of it and let it set up. After I pulled it from the mold and let them dry for 3 days I
painted them yellow and added the black lines and eye sockets then I drilled into the eyes for LED's and hot glued them in. I made two layers of a cloudy acetate plastic to go overthe eye sockets and hot glued those in as well so the light would be defused when they were lit. Now I drilled 3/8 inch holes into the tops of the
partitions and put the skulls on with a washer and nut. I ran the wires for the eyes through separate 1/4 inch holes to the inside. The lanterns on the front were from Meandrous and I put extended posts on them so they stuck out farther to clear the roof. Inside I used a flame bulb. All the wires were run inside of the hearse along the up rights and then were led up to the front then through the front wall where the seat was going. |
|
|
 |
|
|
|
|
|
|
|
|
|
|
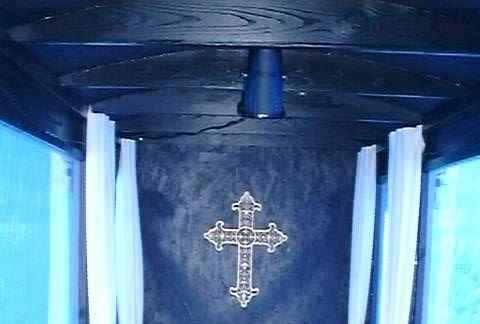
The next thing I did was to put the roof on I made some supports out of 1 x 6 pine and cut them into half moon shapes and notched the ends to fit on to the 2 x 4 top structure. Cut the front wall to shape and use this for the pattern to make the rest of the supports. I spaced them 16 inches on center and glued and nailed them down on the ends to the top frame. Next I used 1/4 inch waffer board on top and nailed this to the cross supports, you will need more that one piece to cover it so make sure that one of the supports will lay where the edges of the two sheets meet. After I had this part done I moved on to the front section. I cut it out of 1/4 inch CDX plywood and used 3/4 X 3/4 inch nailing strips to put it together at all of the joints. For the curved floor I used a piece of 1/4 inch wafer board and saw kurfed the back of it so it would be able to make the bend. Then I nailed it to the same strip material so it would curve. The top of the seat is made of 3/4 inch plywood and is removable, under this is a platform for all of the electrical wires and switches. This would be where you hook up the leads from the back half of the hearse. The driver is mounted to this removable part so it can be brought in the house. The two hand rails were made out of 3/8 inch copper tube and screwed to the top of the seat. The whole thing was then painted with an exterior gray paint from Wal-Mart and the insides were painted black. The trim was painted with a gold enamel and then clear coated. I installed windows made of weather proofing plastic to the inside of the back section (the heat shrink type) by first putting down the double face tape, then the plastic and then a 3/4 x 3/4 inch pine frame on the top that was screwed into the outside pine boards. Then I used a hair dryer to shrink the film tight, worked great and looks like glass at a fraction of the cost! The front half and the back half are joined with screws through the front wall and into 2 x 4 studs on the inside of the seat back, an extra 2 x 6 was installed under the bottom and lag bolted to the back frame for extra support. The whole thing was then wheeled outside and raised up on saw horses so I could get the wheels on. |
|
|
 |
|
|
|
|
|
 |
|
|
|
|
|
|
 |
|
|
|
** Click on the link to get the wheel sizes for the hearse from Restin-petes. |
|
|
|
|
|
 |
|
|
|
 |
|
|
|
BACK TO HEARSE MAIN |
|
|
|
|
|
 |
|