| The At Home Electrolysis information site |
Welcome to the At Home Electrolysis Web Page!
This site is intended to allow information to be shared on performing hair removal electrolysis by home users. This is not to endorse that everyone should embark on such procedures, but for those that choose to, it is useful to have information to help to avoid problems and obtain better results.
This site is not a promotion of any product or services. Any information obtained from this page is provided as assistance only and no implication should be made that this is an endorsement that the help provided will be effective and safe for all persons. Any actions taken using the shared advice is assumed to be at your own risk.
The Situation
As the hair removal market is so big, it is often difficult to get true answers as to what can provide solutions as the various markets spin their own tales of confusion. Professional electrolysis associations will try to portray lasers as only temporary. Laser providers will give the impression that the electrolysis market is now virtually eliminated with their new technology. Professional associations will emphatically state that home electrolysis units are too under powered to be effective. The truth is that all these methods work for some of the people some of the time with varying degrees of efficacy. However, there is also a slew of home devices and potions which are just shams and confuse the consumer and steal their money. Careful research on the web will help to find the experiences of others to find answers that may reveal the truth as one trips over the lies of the hucksters. Ultimately, only Laser and needle electrolysis can produce permanent hair removal. I've provided my experiences here as a further source of what can be achieved.
Personal Background
There are several methods of permanent hair removal. Not all methods work for all people and some methods work for some people in certain areas. I've purchased needleless "permanent" hair removal products only to immediately return them as useless. Dipilitories usually were no more effective than shaving and had to be timed well to avoid burning more sensitive skin. Mechanical epilators (that quickly tweeze large areas) can be effective for a temporary solution in some areas. My wife spent hundreds of dollars at a professional electrolysis which we later determined was poorly trained, as my wife experienced extreme pain, bleeding, large welts, and to top it off had no permanent results. We both had laser work which worked well in some areas and showed no lasting results in others and cost thousands of dollars. Tweezing also would produce problems where sometimes a gaping hole may permanently scar or an ingrown creates unsightly and painful blisters which sometimes could also leave scars. I've also had ingrowns creep along under the skin for over half an inch! For us, home electrolysis was the solution for these areas where the complications of tweezing could permanently be eliminated.
Fundamentals
Electrolysis in it's basic form is Galvanic, which simply means DC (Direct current like on a battery) is applied to the bottom of a follicle to destroy the hair root and it has worked for over a century. While this is a very successful method, it is often very slow. Later, Thermolysis (also known as short wave, diathermy or radio frequency) was developed, which can be used as a burst of energy similar to a microwave. This can be very quick, but also requires more diligence to not over treat and often is not quite as effective as Galvanic in it's success rate per treatment (this was the method of treatment my wife received). Blend combines the two to speed up the process with success rates of Galvanic. The home needle electrolysis units are only Galvanic, thus they are very simple, can be highly effective, require less training to master and are tediously slow. Read more about Galvanic Electrolysis
Self electrolysis can be used for a few hairs or a small area, but professional services from electrolysis or laser technicians will sometimes be a wiser choice. The use of Galvanic electrolysis is slow (15 to 30 seconds or more per hair) and some areas can not reached by oneself (e.g. the back) where a partner would be needed to apply treatment. If one doesn't mind spending the time required or does not have the resources to seek out more expensive methods, than one may want to consider trying it at home.
Electrical theory
Galvanic is the simplest of electric circuits: a single loop DC circuit. Basically a circuit is complete when a path is provided for electricity to flow from one pole of the source (a battery) to the other. Usually there is some resistance included in the circuit, otherwise it is called a short circuit in which the source destroys itself very quickly. In the case of hair electrolysis, the body is part of that resistance and other electrical devices can also be included to add further resistance, thus all elements are included in line with the circuit and not creating any additional loops. Ohms law provides us with the simple math formula of a DC circuit where Voltage equals Amperage times Resistance ( V = I * R ). Voltage is measured in Volts, Amperage in amperes (sometimes referred to simply as amps), and Resistance in ohms. The amperes used for hair electrolysis is in the range of 100 micro amperes to 1 milli amperes (milli meaning 1/1000 of an ampere and micro meaning 1/1000 of that or 1/100000 of an ampere), so we are dealing with some pretty small power levels; the units discussed at this site will deal in micro amperes where 1000 is equivalent to 1 milli ampere (which is higher than I recommend for actual treatment) and use the abbreviation of µa. Since we are usually dealing with a voltage source derived from a battery, the voltage may be about 9 volts, so when we apply ohms law, the resistance ends up being rather high and is usually measured in kilo ohms where we will use the abbreviation K. As an example, if we use 9 volts and 500 µa (0.0005 amps), the resistance in the circuit is 18K. The resistance of the body varies by individual and by moisture content, but for me has been in the neighborhood of 7K, which means that any other devices must provide the additional 11K of resistance. The name for an electrical device that can provide variable resistance is called a rheostat or potentiometer and are often described by the maximum amount of resistance that is provide at the full turn of the device (most are not consistent throughout the full adjustment range as to the increments of resistance provided). The current can be measured by slipping a meter into the circuit (not across the circuit).
 The only product I've found that is available for the home consumer
|
What products work?
The only devices that will give permanent results are ones that actually insert a probe or needle into the hair follicle. I've only found one device that is marketed in the U.S. to the home consumer and searches on the web seem to usually point to one supplier. This unit is only about $30 and can do the job. It is not sturdily made (it will eventually break internally), however, and a few simple modifications can substantially improve it's usability. |
The One Touch Unit
I purchased a One Touch device and it can indeed function in it's provided state. A 9 volt battery provides the power source and a 10K rheostat is included in the circuit. Two wires run up to the stylus where the needle contacts the skin and the other wire is contacted by a finger to complete the circuit where electricity essentially flows through the body from the skin contact point of the finger. The finger is kept moist with salt water to assist in making a good electrical contact with the metal band. My findings were that typically (for me) the resultant current produced was 540 to 1300 µa of output at 0 and maximum settings respectively (this corresponds to about a 7K skin resistance, but skin can vary from 1K to 200K depending on the person and the area of the body). My preference has been to use 300 to 700 µa of current so the 0 setting on the unit (10K resistance) can be used for 99% of treatment and reduces the chance of over treatment. The recommended time of 15 seconds is a good starting point, but hairs that are thin or shallow may go for less, while thick deep hairs may require 30 seconds and/or higher settings. The instructions imply that power in the circuit will not begin until the needle has reached the bottom of the follicle, but in fact any moist part of the body will complete the circuit. Applying a power source to the surface of the skin can often result in burning of that skin. Scaring has greatest potential when inserting a HOT needle (power is on), thus there should be no contact with the metal band while searching for the bottom of the follicle; the completion of the circuit should also be stopped prior to needle extraction. It is also easier to feel the probe as it slides down the follicle if no power is active. After treating, removal of the hair with near zero force with tweezers is the indication of success. For areas that are highly visible, it is best to err on the safe side and use too little amperage or too little time, rather than risk burning the skin, both above and below. If under treated, the hair can always be attacked the next time it regrows, but it is difficult to undo a scar very easily. The process also requires excellent visibility by applying extra lighting, such as from a desk lamp (I like the new fluorescent bulbs that generate less heat) directed at the treatment area and the use of magnification, where I used reading glasses available at the local store for $3 to $15.
To perform treatment, the needle should be inserted into the opening of the hair follicle to a depth that makes contact with the bottom of the follicle. This should be absolutely painless as the needle is being inserted into an already existing hole. The needle is spring loaded and can be retracted completely within the stylus or extended about 4 to 5 mm beyond the tip. With just this much visible, it is sometimes difficult to observe if it actually went into the follicle or if it is just touching the outside of the skin. If the mistake is made of touching the skin, the skin will burn. This is where light and magnification can greatly improve one's ability to make an accurate insertion. The tip of the stylus prevents too deep and insertion, but also has some other problems. Since the end of the tip is also metal, it may be possible to press this against the skin while the tip is in contact with the needle, which can then burn the skin via the tip. Also, some hairs may be down to about 7 mm or more. By removing the tip and working with the raw needle, there is greater visibility, the tip can not burn the skin, deeper hairs can be treated, but extreme care must be taken to avoid inserting the needle to deep. Often the raw needle will bend when the bottom of the follicle is reached and then a simple retraction until it straightens out indicates a good position which must be maintained while treatment is applied. If the needle "pops" in or there is a sudden burst of pain, then the needle is probably too deep and should be retracted to a more proper insertion level.
There are some tricky complications in using the device in it's presented form. The salt water used on the finger may drip down the stylus, creating a mess near the tip that must be cleaned up frequently. The finger tends to dry out, requiring frequent re-introduction of the salt water, slowing down the process of treatment. The dried salt water builds up a residue on the finger and the stylus, so that occasional cleaning of both is needed to establish good contact again. The electrical action of current flowing through the salt water will start to pit the metal band on the stylus, making good contact even more difficult as it begins to wear out. Trying to make the finger behave as a switch (to avoid applying power prior to proper needle insertion) and also as a holding method takes a bit of careful contortion.
The wires are very thin internally and subject to breakage; there are two under the sheath that enters the stylus. If not working with a meter and jolts are felt or surges of pain of extreme intensity are experienced, then chances are there is a broken wire that is momentarily making contact underneath the wire covering. The wire will need to be repaired to continue to use the circuit. Even though I was extremely careful with my unit, both internal wires eventually broke near the junction at the point where the wires enter the stylus, one more than once. By removing the tip, the needle, and the metal band, the two halves of the stylus can be separated by sliding finger nails down the crack simultaneously until the little internal plastic fingers allow the two halves to pop free. When reassembling, care must be taken to align the plastic internals through the metal holes. Do not attempt to disassemble the rheostat from the unit as it is glued in place to the knob and the control knob will be rendered useless after breaking off.
Improving the device
The biggest advance that can be made to the device is to build in a separate switch, preferably one that is momentary and foot operated. Attaching a wire to the touch pad on the unit (and taping over the band on the stylus to insulate it), and attaching the other end of the wire to a section of sponge ($1 for two) soaked in salt water, one can simply step on the sponge with a bare foot to work as a switch after the needle has been placed completely in the follicle (which also removes the salt water problems on the stylus itself). Since the current levels are extremely small, the wires can be rather thin, but if made a more reasonable gauge thickness, they will be more durable. With this new accessible area of the circuit, it is possible to insert an amp meter that can read fractions of a milliampere and monitor the current (e.g. Radio Shack 22-810 for $18 set at it's 2ma level; buy extra batteries for it). It's also easy to insert another 10k to 100k potentiometer ($2 each) to dial down the settings to even more comfortable levels and just treat for a longer period. Most new 9V batteries start out at 9.5 volts. Divide that by a total of 10K (existing unit) + 7K (body resistance) + 10K (additional pot) allows current settings down to about 350 µa. With a 50K pot instead of the 10K, it is possible to dial the current down to about 140 µa. A 100K pot down to about 80 µa. It is nice to have both a 10K and the additional so that finer adjustments can be made at the higher end of the scale with the 10K pot. I prefer 300 micro amperes for more sensitive areas applied for about 20 to 30 seconds and I've read of others using 100 micro amperes for 90 seconds. Another approach would be to include some kind of foot actuated switch to this circuit and strap the sponge to an ankle; I attached a simple alligator clip to the end of the wire that grabs a 1.5 x 3 inch section of sponge.
Once I had the much easier to use foot switch circuit, it was a simple matter to replace the original flimsy wires when they broke with some of a heavier gauge. When soldering a wire to the stylus, I had to solder directly to the internal metal tab as the original wire was too small to survive without breaking again. The wire must be soldered to the tab that eventually comes in contact with the needle (I also had to slightly bend the metal tab at the needle contact point to ensure a stronger contact, which is not easy to do with the stiff metal and delicate plastic). The other internal wire was no longer needed as it was now used externally.
Building a device from scratch
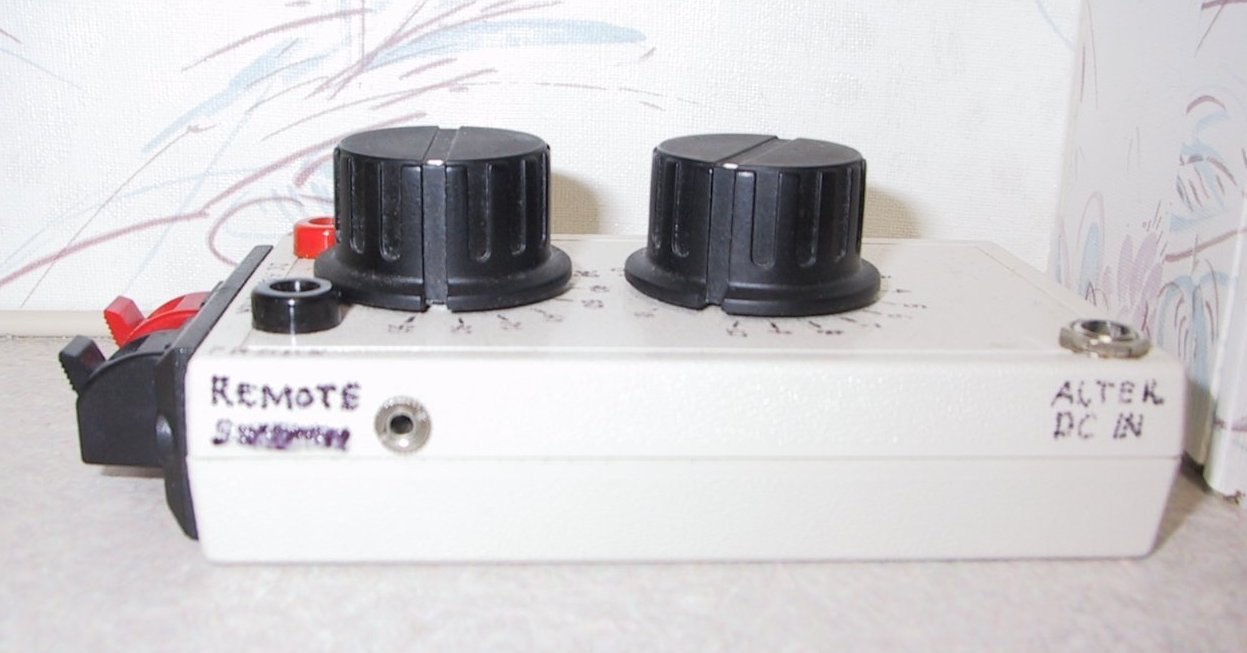
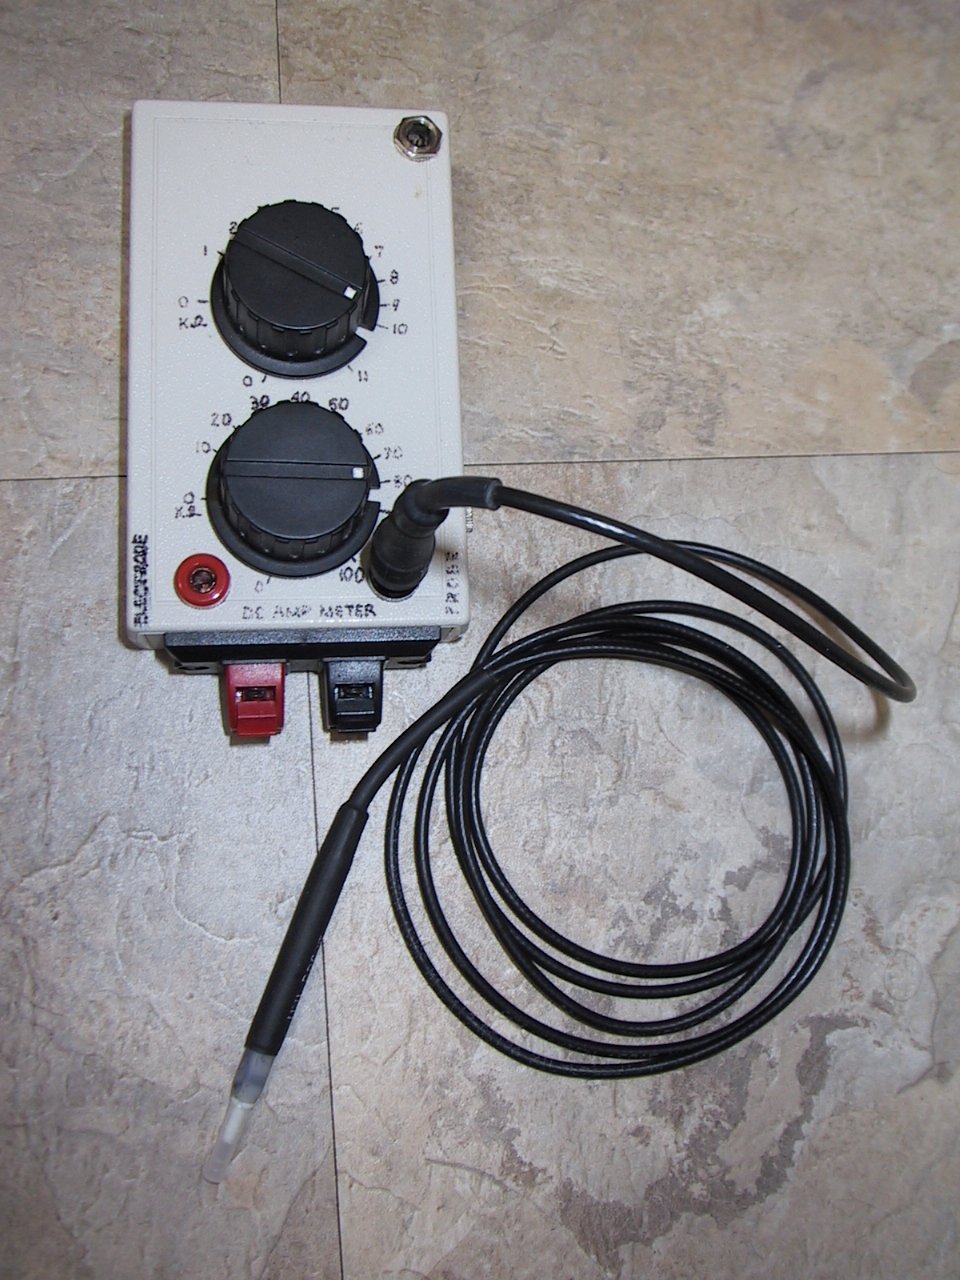
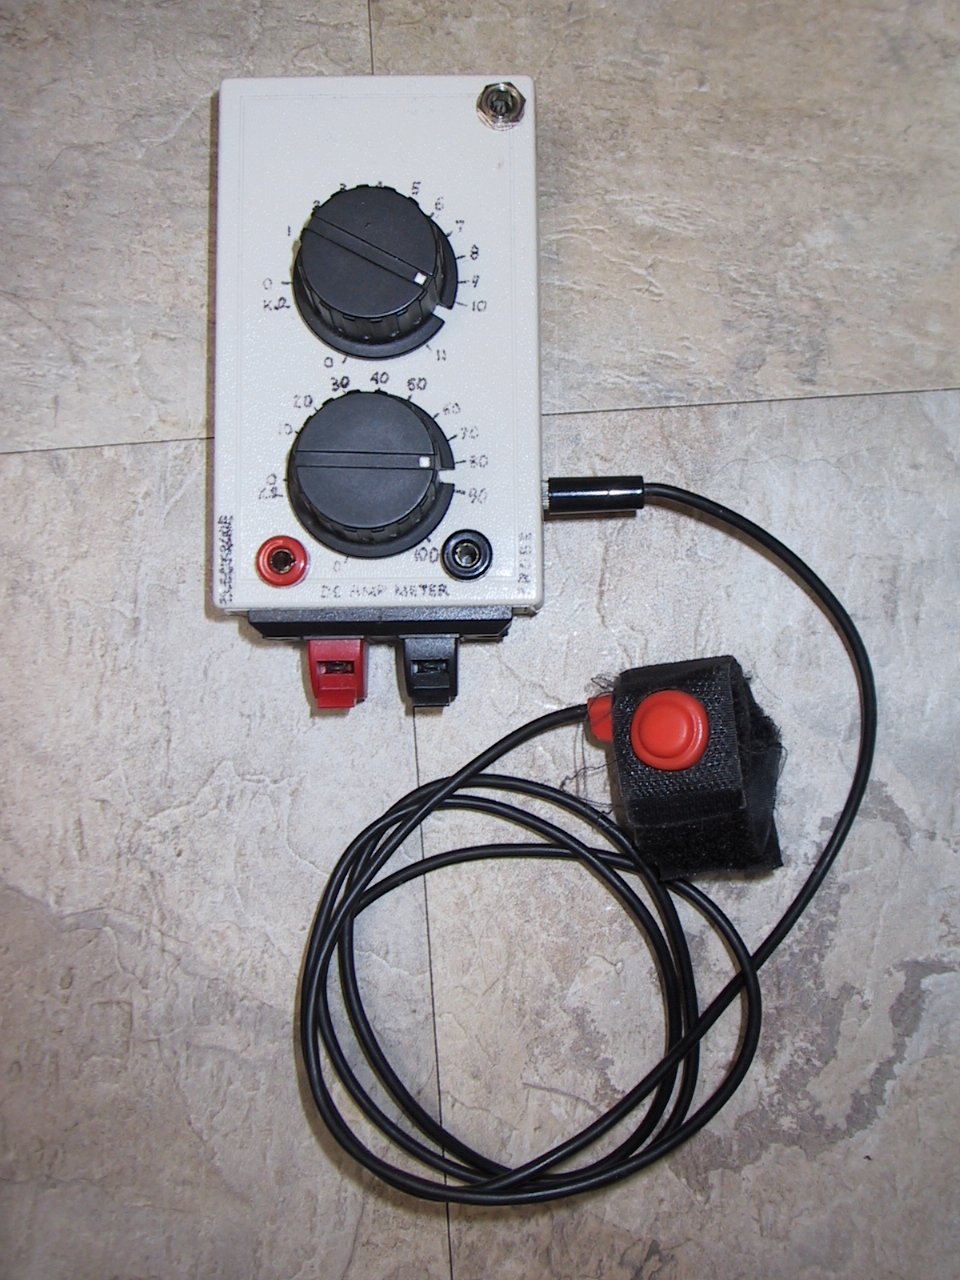
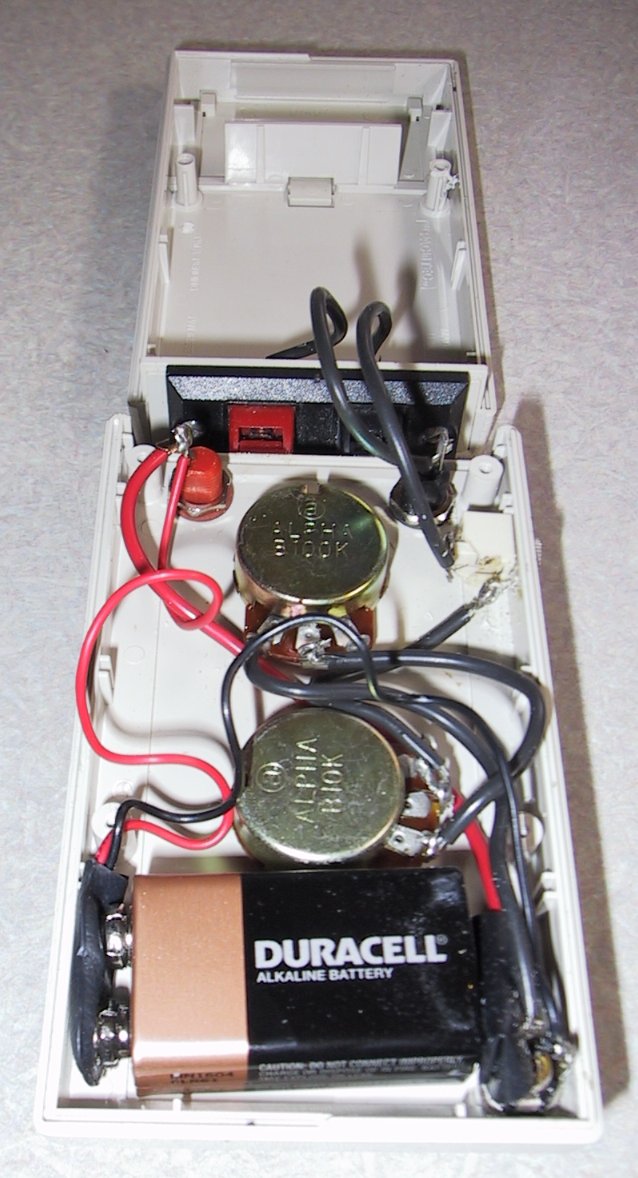
Eventually I ended up replacing everything and used a professional needle holder and needle. I bought a small project box at Radio Shack for $6 that had a place for a 9 volt battery and mounted a 10K and 100K potentiometer, a mini phone jack for an external switch, speaker jacks for holding the meter probes, and two banana plug jacks for the ankle mount and stylus plug. The pots can be wired up to increase or decrease resistance by turning the knob clockwise depending on which of the outside terminals is used in conjunction with the center terminal; I prefer the resistance to decrease as I turn the know clockwise which indicates a higher current relationship. With the pots securely mounted, it is a good idea to mark off the K of resistance on the outside of the project box for reference; mine had about 20% of a turn before any change occurred which would make it tricky to use in practice without accurate external representation. You could also use a higher voltage battery up to 20 volts by using an external battery jack and increase the resistance to bring the current back down to workable levels; this allows a range of battery options that may be rechargeable and last longer than a normal 9 volt battery and provide a more consistent delivery if using a larger battery.
Pictures of my homemade unit (click on image to see larger version):
| ||||||||
| ||||||||
| ||||||||
A simplified version of the unit would include One pot, no meter jacks, and no external battery jack and be perfectly serviceable.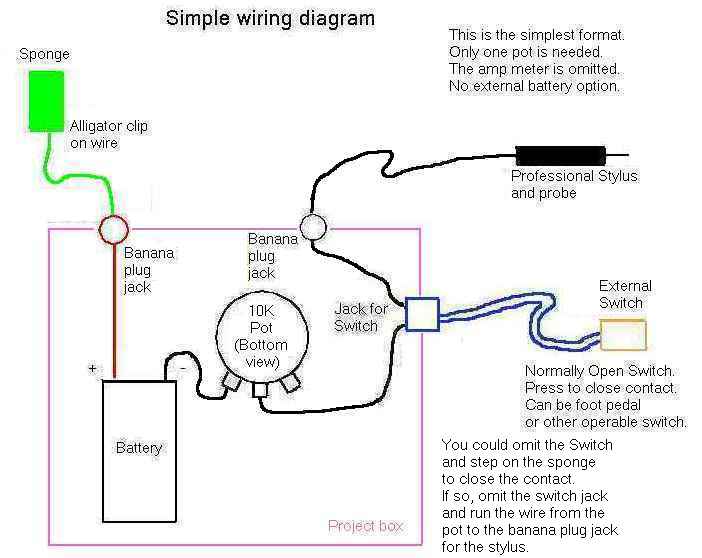 The pots can be designed to increase amperage by turning clockwise from the front (the way I have it configured), by using the center terminal and the one to it's left as you look at the bottom of the mounted pot. If you use the center and right terminal, the amperage will decrease as you turn the knob clockwise. I marked off increments of K ohms on the face of the box for reference as I did treatments; keep in mind that these are actually ordered in reverse of the resistance so that the numbers increase as Amperage increases. You may find that you never use more than 10k total resistance and can suffice with one 10k pot. The meter is optional and I usually use a piece of wire to short between the two meter terminals. The batteries in the meter get used up pretty quickly and are not cheap. After a while you learn what the proper knob settings and feedback of pain are and you don't really need the meter much. If you do use a meter, make sure it can read down to fractions of a mA (the 2 mA scale) as the amperages should be in the less than 1 mA range. Since the banana plug jacks usually come 2/pkg and are red and black, I used the red for the positive side battery which attaches a red wire to the sponge that I strap to my ankle. I used the black jack for the probe (which happens to be black), which is the negative side of the battery and does the actual electrolysis. Similarly, I used speaker jacks for the meter jacks and used the red/black in such a way that I always get a positive number for the amperage. Came out rather neat and the color coding makes it easy to hookup for use. The switch is also optional, as you could simply step on the sponge to close the circuit instead of having it strapped to your ankle. The switch is just a bit cleaner way to go and any on/off switch will do. Parts List: Stylus: Uni-probe with Banana plug cord $20 Probes: Uni-probe .003m $20 for 50 Project box: 3.8x2.4x1 $3.87 Meter (Optional): Radio Shack 22-810 $20 Foot Switch: Momentary or On-Off $10.45 Pots: Radio Shack 271-1715 10k, 271-092 100k $2.89 ea Knobs: Radio Shack 274-415 $2.99 for 4 Banana jacks: Radio Shack 274-725 $2.79 pair Banana plugs: Radio Shack 274-721 $2.79 pair Alligator clips: Radio Shack 270-346 $2.47 for 8 Speaker terminal (for optional meter): Radio Shack 274-632 $4.59 Jack for switch: Radio Shack 1/8: 274-248 $2.79 pair or 1/4: 274-255 $3.99 pair Wire: Radio Shack 278-1220 53.99 for 55 feet (any gauge from 18 to 22 will work, but 18 will be more durable). | ||||||||


Skills to apply
First dial in a setting that will not cause too much pain or cause too fast a reaction; this would be the zero setting on the unit in it's original form. Err on the low side as it's always easier to retreat. Make absolutely sure that the needle enters the opening of the follicle. Sometimes some jiggling of the hair with tweezers first will help identify the exact opening and direction of growth and loosen the skins grip around the hair. Slide the needle into the follicle, which should be totally painless; if not, the skin has probably been punctured, either externally or internally by the needle. When the bottom is thought to be found, switch on the power, monitor the amp meter and count the time in seconds. A noisy analog clock may help for those that can not count off time consistently. Often some lye and gases will escape to the surface which is normally fine. If a meter is not employed, monitor pain and the lye that escapes; if pain suddenly increases or lye ceases production then a stopping point probably has been reached. Stop the power, remove the needle, tug gently on the hair with tweezers and if it almost falls out, then that hair will probably never regrow if it was in it's actively growing stage. If there is LOTS of resistance, then more time is needed or the hair was deeper than where the needle was applied or the angle of growth was missed. Experience will eventually be the guide as to the probable cause. Some hairs have difficulty pulling the contents of the destroyed hair through the follicle opening and there can be resistance due to this rather than the actual root holding it back, so sometimes it is best not to over treat an area just because there appears to be too much resistance; it is a different feeling when the hair is pulled and experience will soon teach the difference. Some hairs do not protrude at the same angle as the underlying follicle and some follicles can have severe curves. In the beginning, do not overwork a single hair as the trauma under the skin may not immediately reveal itself and it may be possible to do irreparable damage to areas other than the hair. Face hairs can often be stubborn and it is best to have to repeat the process in another day or two rather than to risk scaring. Also, it may be prudent to develop skills on a part of the body that has least visibility in case mistakes are made.
DO NOT insert the needle while the power is active at the end of the needle. The needle will burn it's way into whatever direction it is guided and may not hit the hair root. It is possible also to enter the needle in at too shallow an angle where it will very soon create an elongated blister just under the skin; if this happens STOP immediately as it would be easy to develop a scar and the hair root is obviously not going to be affected.
After each hair removal, apply a swab with alcohol to wipe away any excess lye that may burn the top layer of skin and lye that may be trapped in the follicle near the surface of the skin. It is also good hygiene to clean the needle with alcohol after each treatment. Try to avoid treating too many hairs in one local area; each treatment will likely produce a small welt like a mosquito bite and it's best if they are not building on top of each other (these should mostly disappear in a few hours, but may still be slightly visible the next day). If the insertion was too shallow or a HOT needle was applied during insertion, it is possible to burn the top layer of skin and have a red burn mark for several weeks and possible permanent scaring. There should never be any blood from the treatment, although there may be some small scabs the next day if the surface skin was overworked due to zealous aggressive treatment.
Diary
As I do not have enough information to provide settings beyond my own experience, I can only relate what has worked well for me. I suggest that notes are taken as practice continues to help determine what current and time settings work best for different kinds of hairs. Note the thickness of the hair and the final depth of the root, as well as what area of the body was being treated and the pain sensitivity of that area. After a while, trends will develop that will act as a guide as to the minimum power settings needed for almost pain free permanent removal.
| Personal current and time settings (approximate) | ||||||
| Skin area | Very Sensitive | Normal | Pain Tolerant | |||
| Hair type | µa | Sec | µa | Sec | µa | Sec |
| Fine Shallow | 200 | 21 | 350 | 18 | 300 | 16 |
| Fine Normal | 300 | 20 | 400 | 17 | 450 | 14 |
| Medium Shallow | 300 | 21 | 400 | 16 | 450 | 14 |
| Medium Normal | 300 | 28 | 450 | 23 | 650 | 15 |
| Medium Deep | 300 | 32 | 500 | 27 | 700 | 19 |
| Coarse Shallow | 300 | 23 | 400 | 17 | 500 | 14 |
| Coarse Normal | 300 | 35 | 450 | 25 | 700 | 20 |
| Coarse Fine Deep | 300 | 40 | 500 | 28 | 700 | 24 |
Beard hairs seem to take two doses of the above normal treatments. Keep in mind that these are values that have worked for me. Your body moisture, sensitivity, and hair type could alter the usable values, which is why I suggest you keep track of your own success. However, this may give you some basis as to what to look for. If you substitute a smaller diameter professional needle, the amperage may need to be increased by about 50%. There are times when I feel just a bit of extra pain coming and I'll often maintain treatment for about 2 seconds longer and often get a good zero pull rate. Body moisture content can make a big difference where evening treatments after I have been consuming adequate liquids throughout the day will result in good lye production emanating from the treatment follicle; treatments first thing in the morning seem to show very little lye outside the follicle and it seems more difficult to judge treatment times and success rates seem much lower. The longer durations above may not be performed during a single needle insertion where I may remove the needle at 75% of the listed time and test with a tweezer and investigate adequate lye production; if it is completely dry, there is a good chance that I've missed the bottom of the follicle and need to make an adjustment to needle placement. If the hair still has not been successfully treated, either leave it for 48 hours or if you do extract it, carefully examine the angle and depth of the obstinate root and examine the structure of the extracted root for signs that it had some impact from the procedure to indicate if you were close.
Conclusion
For those of us that have a bit of an obsession with removing certain hairs, doing it yourself can be somewhat satisfying. The skills and procedures to do it yourself are not so tricky as being able to see what you are doing without being a contortionist or being an expert in working in reverse via a mirror. It takes a while to achieve a final result, but much less total time than a lifetime of tweezing. A partner allows working on each other, making the task much easier.
Most people probably do not have the patience to avoid the pitfalls avoided only by applying proper procedures. If one can not be absolutely sure that the needle is in the follicle, develop a good feel for the needle tracking the follicle and approaching bottom, develop a good sense for durations and power settings for each individual hair through practice, and make sure not to insert a HOT needle, then trouble can arise whereby permanent damage can result! It is necessary to have excellent eye sight, a steady hand, and lots of patience.