 |
| More Crafts |
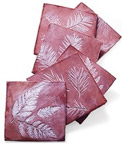
| Leaf-Imprinted Coasters Create lasting impressions with coasters made from clay and materials supplied by Mother Nature. Materials: Self-hardening pottery clay, waxed paper, cardboard, scissors, nature objects(leaves, twigs, pinecones, stones, acorns, etc.), butter knife, matte acrylic varnish. Optional ideas: Paintbrush, white tempera paint, sponge Create a template by cutting a 4-inch square out of cardboard. Cover the work area with a piece of waxed paper and use a rolling pin to flatten a 2 1/2-inch ball of clay to 1/4-inch thickness for each coaster Arrange a pattern of leaves or pine needles atop the clay and gently press them into the clay with the rolling pin, leaving distinct but fairly shallow impressions. Make pinecone images by gently pressing in the cones by hand. Remove the foliage and place the cardboard template on top of the clay. Use a butter knife to cut around the cardboard, then lift away the excess clay. Place the coasters on a clean piece of waxed paper and set aside to dry according to the package directions; this can take a day or so. Optional: Once the coasters have dried completely, cover with a thin layer of matte acrylic varnish. Let dry for 45 minutes, then accent the designs using a damp sponge to apply a light layer of white paint to the raised area of the coaster and dab a little more into the impressions to highlight them. Let the paint dry thoroughly before adding a last coat of varnish. |
| Ghost Necklace Clear Film Container, White Yarn, Wiggle Eyes, Glue, Cottonballs Instructions: Glue the wiggle eyes onto the side of a clear film container (you can also draw a mouth with a permanent marker if you want. Pop a hole in the lid and add white yarn for necklace. To make the film container look whiter, stuff the container with a few cotton balls. |
| Pumpkin Necklace Materials needed: Green Pony Bead, Green Felt or Construction Paper, Orange Pom-pom (1-2 inches), Glue, Yarn or String Instructions: The orange pom-pom will be your pumpkin, the green bead will be the stem, and you will use the green felt or paper to make leaves. Cut out small leaf shapes from the green paper or felt. You want it to look like 2 leaves attached in the middle. Once your leaves are cut, put some glue in the middle of one side of the leaf shape as shown in the picture above, and stick the leaf shape on the pom-pom. Now, put a dab of glue on the side of the green bead (Do not cover or block the holes!) and stick it to the center of the leaf shape to make the pumpkin's stem. Once all the glue has dried, you can string the bead onto a piece of yarn or string and you have your very own pumpkin necklace! If you like, you can glue seed beads on the pom-pom to make a jack-o-lantern face! |
 |