Graphical DFA Editor - User's Manual |
|
|
|
Using the Graphical DFA Editor
Click on the “Create a New DFA” icon or select the “New File” option under the File menu.
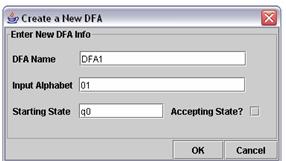
Figure 4 . Create New DFA icon Enter the information regarding the DFA. The information required are the name of the DFA, the input alphabet, the name of the starting state, and whether the starting state is an accepting state or not. Default values are provided. Click OK.
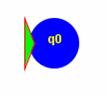
Figure 5. Create New DFA dialog box Click somewhere on the white screen. The starting state will appear, centered on the chosen point.
Figure 6. DFA State q0 Click on the “Open DFA File” icon or select the “Open File” option under the File menu.
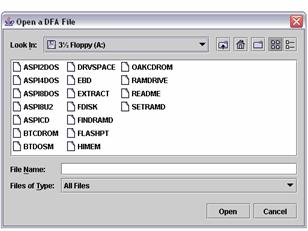
Figure 7 . Open DFA File icon Choose the DFA file. Only files with the correct format are accepted. Note: A DFA file is different from an FA file. While an FA file follows the prescribed format exactly, a DFA file also includes the data regarding the coordinates of the states and the transitions.
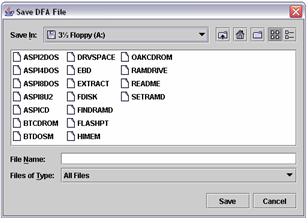
Figure 8 . Open DFA File dialog box Click on the “Save DFA File” icon or select the “Save File” option under the File menu to save the current DFA under its current name. If this is the first time to save the file, a dialog box will appear where the filename and its location can be entered.
Figure 9 . Save DFA File Click on the “Save DFA File As” icon or select the “Save File As…” option under the File menu to save the current DFA under another name. A dialog box will appear where the filename and its location can be entered.
Figure 10 . Save DFA File as icon
Figure 11 . Save File dialog box Click on the “Import FA File” icon or select the “Import DFA” option under the File menu. Navigate to the FA file and select it. Figure 12 . Import FA File icon
Figure 13 . Sample imported file Click on the “Export to FA File” icon or select the “Export DFA” option under the File menu. Navigate to the chosen location and save the file under a filename.
Figure 14 . Export to FA File icon Click on the “ Add State ” icon. A dialog box will appear, where the name of the state can be entered and whether the new state will be an accepting state or not. Default values are provided. Click OK once the correct information is entered or Cancel to stop adding a new state.
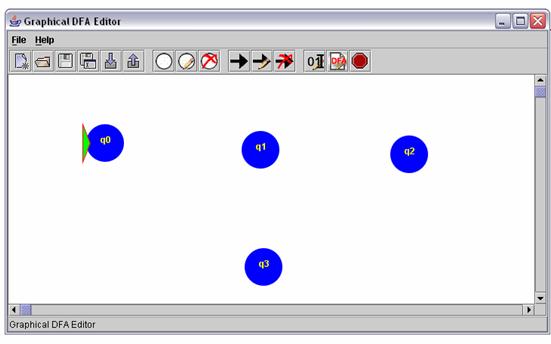
Figure 15 . Add State icon Click somewhere in the workspace to place the new state at that location.
Figure 16 . Sample workspace Select a state by clicking on it. It will turn red.
Figure 17 . Example for selecting a state Click on the “ Edit State ” icon. A dialog box will appear where the name of the state and its status as an accepting state and starting state can be set. Click OK once the new information is entered or Cancel to stop editing the state.
Figure 18 . Edit State icon Select a state by clicking on it. It will turn red. Click on the “ Delete State ” icon. Click OK to delete the state and all transitions to and from the state or Cancel to stop deleting the selected state.
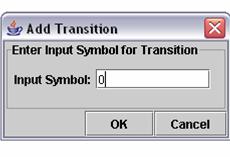
Figure 19 . Delete State icon Click and hold the left mouse button on a state. Drag the state to its new location. Release the left mouse button to place the state in its new location. Click on the “Add Transition” icon. A dialog box will appear asking for the input symbol for the new transition. Click OK once the symbol has been entered. Note: When entering the escape sequences, a backslash is not required (e.g. a space is not entered as “\s” but as “ “).
Figure 20 . Add Transition icon
Figure 21 . Add Transition dialog box Click the source state and then click on the destination state. A line starting from the source state to the destination state will appear, with the corresponding input symbol. Select a transition by clicking on the input symbol for the line corresponding to the transition. Click on the “Edit Transition” icon. A dialog box will appear asking for the new input symbol for the selected transition. Click OK to change the input symbol or Cancel to stop editing the selected transition.
Figure 22 . Edit Transition icon Select a transition by clicking on the input symbol for the line corresponding to the transition. Click on the “Delete Transition” icon. Click OK to delete the selected transition or Cancel to stop deleting the transition.
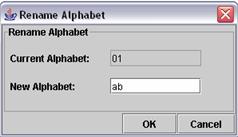
Figure 23 . Delete Transition icon Click on the “Edit Input Alphabet” icon. Enter the new input alphabet. Forward ranges are supported (e.g. “a-e” is interpreted as “abcde”). Click OK to change the alphabet or Cancel to stop editing the input alphabet.
Figure 24 . Edit Input Alphabet icon
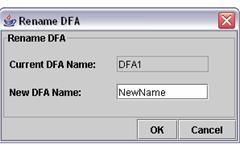
Figure 25 . Edit Input Alphabet dialog box Click on the “Rename DFA” icon. Enter the new name of the DFA. Click OK to rename the DFA or Cancel to stop renaming the DFA.
Figure 26 . Rename DFA icon
Figure 27 . Rename DFA dialog box Click on the “Simulate DFA” icon. Enter the string to simulate and click on Begin Simulation.
Figure 28 . Simulate DFA icon
Figure 29 . Sample simulation Click on the left button to go back one state at a time. Click on the middle button to go forward one state at a time. Click on the right button to go directly to the end of the simulation to get the result. Click on the Cancel Simulation button to stop the simulation and/or choose a new string to simulate. Click on the Exit Simulation button to exit simulation mode and go back to editing the DFA. Select the “Exit” option under the File menu to exit the program. If Method 2 was used in running the program, press any key afterwards to completely exit the program.
|
| Copyright © CE160 2004. All rights reserved. | |