 |
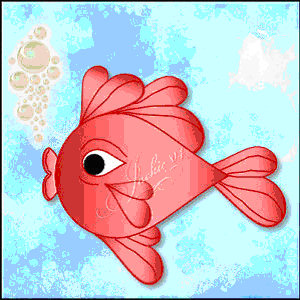 |
SUPPLIES NEEDED:
Paint Shop Pro - I used version
9.0 but I'm certain this can be done in any version with minor changes.
My jmr-fish.PspGradient which you can get here
.
I have also included a zipfile of my selections file if you do
not wish to use vectors. Get it here. |
 |
| INSTRUCTIONS: |
| 1. Open a new transparent image 400 x 400. |
| 2. Set foreground color to #c00000. Set background color
to #ff8080, then change to gradient and choose my jmr_fish gradient, angle 0,
repeats 0. Choose preset shapes, teardrop and set up as below. |
 |
| Add a new raster layer named body, draw the fish's body as in the picture
above. Free rotate the image 90 degrees right and move into your chosen
position. |
| 3. Standing on the background layer, create a new raster
layer named tail. Using the same foreground and background settings, choose
the heart 2 preset shape and draw the tail for your fish. Click on the raster
deform tool and, while holding down the control key, reshape your heart as you
desire. Free rotate this layer to the right and move into position. |
| 4. Standing on the tail layer, duplicate it and name the new layer top
fin large. Free rotate and move into position on the top of the fish's body. |
| 5. Duplicate this new top fin large layer and resize the layer by 75%.
Rename it top fin small and move it into position in front of the large top
fin. |
| 6. Duplicate the top fin small layer, rename it bottom fin, rotate it and
move it into position. |
| 7. Duplicate the bottom fin layer, rename it side fin, resize this new
layer by 75%, arrange the layer so it is on top of the body layer, rotate it
and move it into position. |
| 8. On a new raster layer named mouth, using the same color and shape
settings, draw a short but wide heart for the mouth. Rotate this layer 90
degrees and move it into position below the body layer. |
| 9. Change your background color to solid using #ffffff (foreground color
remains the same), switch back to the preset teardrop shape. Add a new layer
named eye and draw a small teardrop. Rotate 90 degrees right and move into
position on top of body layer. |
| 10. Change your foreground color to nil and your background color to
#000000. Add a new raster layer named pupil and draw a circle to fit inside
the eye. Move it into position on top of the eye. |
| 11. Standing on the topmost layer, add a new raster layer named details.
Change your foreground color back to #c00000. Select your pen tool, line width
2.00, line style freehand, draw in detail lines on the body, tail, and fins to
make your fish look a bit more realistic. |
 |
| 12. If you want to add a background, put it on the background layer, then
merge all visible layers, resize as desired, and save. (I flood-filled the
background with color #c0ffff, then effects>texture effects>sculpture>pastel
blue splatters, size 100, smoothness 20, depth 1, ambience 50, shininess 35,
color #c0ffff, angle 315, intensity 30, elevation 60 and added a bubble tube.) |
| 13. That's it! You're finished. Hope you've enjoyed my tutorial. |
