| Title - $10.99 | |
  |
Want a Match? Do a Sprayout!By Bob YearickReprinted from Automotive Body Repair News 10/01/2004It’s the key step but certainly not the only step in a process that has been complicated by such developments as tricoats and abetted by colorimeters and OEM information. Twenty-five years ago, matching the color on a repaired vehicle was fairly simple because there were relatively few variables. Original finishes were solvent-based acrylic lacquer or acrylic enamel, and vehicles were made entirely of sheet metal. Then things got complicated. Auto manufacturers introduced clearcoats, followed by pearls and tricoats. They’re now using some powder coatings, super high-solids finishes and scratch-and-mar resistant clearcoats. In Europe, waterborne finishes are now also in the refinish mix. What’s more, several types of plastics are now integral to many vehicles, further complicating the refinishing process. “Dialing in a color” to create a perfect match has become a challenge. Fortunately, as color matching became more demanding, the tools available to painters improved. Paint manufacturers leveled the playing field by supplying better, more up-to-date color information, including alternates or variants to factory matches, plus training classes, and, in a development that has earned the gratitude of many shop owners, they introduced colorimeters, or spectrophotometers. These hand-held computers have become indispensable in many shops. They read a color and select a color match from the paint manufacturer’s list of formulas. If the scan doesn’t match anything in the database, the system adjusts an existing formula or creates a new formula to match the scanned color. “I do 40 cars a week, and I couldn’t live without a colorimeter,” says Earl Menefee Jr., the head painter at Royal Auto Works in Front Royal, Va. “I’ve been using it for eight or nine years and it saves a whole lot of time.” While spectrophotometers are a tremendous boon to body shops, the painter still faces a challenge. Generally speaking, color-matching is a five-step process, which is as follows:
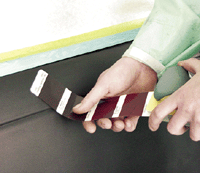
Alternates, Variants Mix It, Match It Agitation —Most paint manufacturers recommend agitating paint on the mixing machine first thing in the morning and one or two more times per day. This ensures proper mix strength. Note: Be careful not to overmix. Mixing toners too often can cause them to “gas”—lose solvent—which makes the toners stronger. Heat —Heat can also affect tints. High temperatures can increase toner strength, so make sure your mixing machine is in a temperature-controlled room. Shaking —Shake unopened tints before installing a mixing lid. Next comes the scale. Once the formula is selected, it is very important to weigh the material accurately. Once you’ve done this, mix to specifications and pour carefully. With newer, higher solids and higher-pigmented refinish bases, what seems to be a minor overpour can have disastrous results. After mixing, thoroughly shake the resulting color immediately; five minutes is recommended. Lastly, calibrate the scale once a day and keep it in a pristine area. If your results vary, check for outside influences, such as wind or vibrations from equipment. The Sprayout What they don’t realize is that properly prepared sprayouts may save a shop thousands of dollars in labor hours and materials every year. Properly prepared means both color and clear coats should be applied with the same spray technique and spraygun settings that will be used in the booth. Once a sprayout is created, it should be kept in the shop’s library. On the back of each panel the painter should note the formula, along with other pertinent information, such as color code, color name, lightness, saturation, hue, air pressure at the gun, solvent used, viscosity reading, tints used, as well as amounts. Take the sprayout to the vehicle and compare it to the existing finish in the best possible light—preferably natural daylight, which reflects all of the available visible wavelengths of light. Ideally, the shop will have a skylight where matches can be checked. If this isn’t possible, color corrected lights should be used. These should be installed throughout the shop, not just in the paint booth. “I like to look at the match in all types of light,” says Jonathan Shores, the painter at Pat Bowles Paint and Body Shop in Hendersonville, Tenn. “My favorite, though, is outside with the sun popping in and out of clouds. It gives you all the different conditions.” It’s also important to view the color from all angles. “The side tone is often really different from the head-on appearance,” says John Gonet, co-owner of Langonet Auto Body in Agawam, Mass. “So you should look at the whole car.” If you do color match indoors, keep in mind that incandescent light contains more yellows, oranges and reds, and fluorescent more violets and reds, according to I-CAR. Tint If You Must
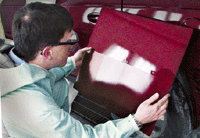
All painters should stay abreast of the latest finishes by taking the appropriate training courses. The major paint suppliers offer courses in locations that are convenient to much of the country. Don’t hesitate to take advantage of your suppliers’ knowledge. Call your paint manufacturer, spraygun manufacturer, your jobber and even your paint booth supplier, and get the help your shop needs to turn out perfect color matches—every time. m SPRAY IT RIGHT The paint has been mixed and adjusted, and according to the sprayout, it matches. Now comes the crucial final step: application. Here’s where you need a painter, not a sprayer. A lousy paint job can negate all of the careful, precise work that preceded it. Clean the repair area thoroughly. Dirt is a major enemy of all refinish repairs. Set up equipment properly. Most shops use high-volume, low-pressure (HVLP) sprayguns, but industry experts have found that many of those are using improper air fittings (the fitting between the hose and the gun). Air fittings are larger for HVLP guns, allowing more air through the gun. For HVLP equipment, most gun manufacturers recommend a 3R8 in. I.D. hose or larger, plus the use of high-flow air couplings and fittings. If the fitting is too small, there will be insufficient airflow and transfer of material to the surface, resulting in dry spray or wet spots. Do a blend repair. Most shops blend on a regular basis, but it bears repeating. Panel repairs just don’t get the job done, especially when you’re dealing with today’s knowledgeable car owners. On tough blends, use a narrow fan, reduced fluid flow and reduced atomizing air pressure, just high enough to give sufficient breakup. For optimum results, use small fluid tips (1.5 mm or smaller) set to the lowest air pressure that still gives good atomization. Be sure to spray immediately after loading the gun. Do not allow paint to settle in the spraygun cup. Stir paint again between coats, if necessary. Apply the basecoat to full hiding, extending each coat slightly beyond the previous one. Allow adequate flash time between coats. If you are applying a midcoat, apply the number indicated by the sprayout panel. Apply thin, light coats like those used when performing the sprayout. Make sure to fully cover the base color before tapering the blend edge of each coat of midcoat. Blend each coat beyond the next, and allow sufficient flash time between coats. Finally, apply the clearcoat, once again allowing sufficient flash time between coats. Apply the first coat approximately 3 in. to 4 in. beyond the midcoat. Apply the second coat over the entire repair area.
|