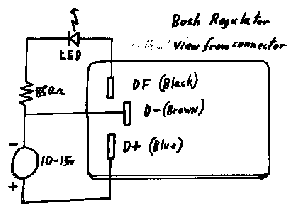
Older Bosh Regulator viewed from the connector.
As used on BMW Airheads, Motor Guzzies
and older cars.
Test circuit shown on the left of the regulator.
�
�
�
Please read the entire procedure before starting. Thanks.
All the regulator does is connect the brushes to the supply until
some voltage (between 13 and 14 volts) is reached. That is ALL!
Simple eh? That is all this procedure checks. Before starting
remove the regulator from the vehicle.
Test procedure: The output from the regulator is monitored while
the input voltage is varied from 10 volts upwards.
Test Result: The output should be close to the input voltage
until the input voltage reaches some set voltage (should be
between 13 and 14 volts) where the output voltage drops to near
zero.
You need knowledge of electronics or electricity.
A dc variable voltage power supply, 10 to 15 volts. About
0.2 Amps max required.
A dc volt meter (if the above power supply does not have
one)
A LED with a series 850 ohm resistor as a load with
indicator. [You could also use a resistor between 180 and 1k
ohm as the load and a dc voltmeter across the resistor as the
indicator.]{The load is required to eliminate leakage currents
from the regulator giving faulse readings.}
Test leads - 4 off minimum.
If you don't uderstand the above items and descriptions, give up now. You could try to get someone else to help.
Modern regulators have three connections.
One connection is ground/earth/chassis this should be the easiest
one to identify. It will be the same wire colour throughout the
bike/car/truck. It may be connected by a bolt/screw hole to the
body of the alternator or vehicle.
Another connection goes to both the battery warning lamp on the
vehicle dash board and the smaller diodes in the rectifier.
The last connection goes to one of the brushes.
Where does the other brush go? Well it will go to one of the
other regulator's connectors. Which one does not matter for this
test, the results are the same!
YOU must correctly identify all the connections on the regulator.
If you don't then you can damage the regulator. The following
diagram is for BMW R airheads and other older bosh type external
regulators (Motor Guzzies, pre 1975? vehicles).
Older Bosh Regulator viewed from the connector.
As used on BMW Airheads, Motor Guzzies
and older cars.
Test circuit shown on the left of the regulator.
For an airhead or older bosh type external regulators see the
diagram above. Others follow the detailed instructions below.
Connecting a test load.
The load with indicator is connected across the brushes. One
brush is connected to one side of the load with indicator, the
other brush goes to the other side of the load with indicator.
Simple?
Connecting the power supply
Connect the power supply negative to the earth connection of the
regulator. Connect the power supply positive to the battery
warning lamp connection of the regulator.
Make certain you have these connections right!
Switch on the power supply and increase the voltage to say 10
volts, the indicator on the load should show an output ie LED lit
(or voltmeter indicating).
If no indication switch off the supply and recheck. Check the
indicator load by disconnecting the regulator totally, then
connect the load indicator directly across the supply (no
connection to the regulator), turn on the supply and confirm the
indication of 'output'.
If no indication and the load indicator is working, your
regulator is faulty. Congratulations. See the complications
section if you want to hit the thing.
If you do have output then increase the supply voltage until the
output stops (drops to zero, or near zero). Slightly reduce the
voltage so the output just comes back. This should occur when the
supply voltage is between 13 and 14 volts. A lower or higher
voltage means the regulator is faulty.
OK, the regulator might test OK, but you should make
certain.
Vibration test. Set the supply voltage so the output indicator is
on (say 13 volts). Hit the regulator with the plastic end of a
screw driver. Be careful not to dislodge any of the electrical
connections! Check the that output remains constant, no
flickering permitted.
Temperature test. Warm the regulator up (use a hot air gun (hair
drier)) but not too hot (you must be able to hold the regulator).
Then retest.
Why is the voltage not more precise?
Well when the actual battery is hot it cannot be charged to as
higher voltage as when the battery is cold. So the regulator may
sense the temperature and adjust its output voltage to suit.
And how correct is your voltmeter?
Some regulators are called 'high output' and are set to a higher
voltage than is usual. These are for vehicles that have a very
marginal electrical system for the duty to which they are put.
The British police airheads were fitted with these when the bikes
were used in the cities.
Does it really matter what voltage the battery is charged to?
Yes and No. If the battery is left at a high voltage for long
periods of time then it may 'boil' dry unless the battery fluid
is replenished. If the battery is only brought to a low voltage
for a short period then it will not reach full charge.
So the ideal voltage depends on temperature and the use of the
vehicle.
�
You can e-mail me at Yahoo.