


 |
|
| Plumbing: Bathrooms | |
|
That's the
hard part of plumbing a bathroom and it's different for each project.
Take some extra time to draw out your plans to make sure you'll be running
lines the best way possible. Once you've
run the waste and water lines, the rest of the job involves getting
all the fixtures in place and hooking them up. Setting Toilets
The fitting
that connects the toilet to the waste pipe is the closet flange.
In new construction, this piece is probably already roughed-in. To install a closet flange, dry fit it into the waste pipe so it sets level on the floor. Glue it into place so the slots will line up with the toilet bolt holes.
Position
the closet bolts in their slots. Turn the toilet upside down and fit
a wax ring gasket onto the toilet's outlet (horn). Then put
a level on the rim of the bowl and shim the base if needed. Snug, but
don't overtighten, the nuts and washers onto the closet bolts and again
check the bowl for level. Attach the
tank bolts/nuts to the bowl (with the nuts outside so they don't rust).
Hook up the water line, fill the tank, and adjust the float as needed.
Finally, caulk around the base. Installing Pedestal Sinks
Consider
using white PVC pipe (not black ABS) if you're installing a light-colored
sink. It will likely blend better although that area of the sink is
hardly seen. A pedestal
sink is usually a two-piece unit: a stand (base) and a sink.
The sink mounts to a bracket on the wall and also sets on the stand.
Let's assume
the water supply lines, shut-off valves, and drain pipe are roughed-in.
Mount the wall bracket for the sink and check that it's level.
Position
the stand and test fit the sink on both the bracket and stand, adjusting
the stand if necessary. Remove the
sink and mark where the floor bolt goes that fastens to the stand.
Drill a hole and fasten the bolt with a nut under the sublfoor or mortar
it in, then secure the stand. Connect the
sink's water valves, handles, supply lines, stopper, and drain piece.
Set the sink on the bracket and stand. Glue an adaptor coupling with
threads to the drain stub pipe. Fit the plastic trap piece to the sink drain and adapter. If needed, add a short piece of PVC pipe to extend through the adapter. Finally, tighten the trap's compression nuts to the adapter and drain threads. Installing Vanity Sinks
Keep in mind
your storage needs, size requirements/limitations, and personal tastes
when selecting a vanity. The roughed-in
stub may already have a threaded adapter glued on and the line should
be plugged with a rag to stop sewer gases. The water lines should have caps soldered or glued and you'll need to cut them off once the vanity is set. Measure the
water and drain line locations on the wall. Transpose them to the back
of the vanity and cut holes out for them. Cut the vanity's sink opening if it isn't already. Set the vanity over the lines and against the wall. Check that the cabinet is setting level/square and secure it in place. Connecting Vanity Sink
Our sink
had braided steel lines that we looped to the valves and fastened them
with coupling nuts. Attach the
water supply lines to the valves if possible, to avoid reaching up under
the sink later. Apply plumber's
putty around the drain fitting to form a seal and seat the fitting
in the drain hole. Add a washer and slip nut on the bottom and tighten
the fitting. Screw on
the drain stopper coupling and its gasket so it lines up with
the back of the sink. Feed the stopper's slip arm through the faucet
and connect it to the stopper coupling. Push the stopper fully open
and tighten the arm down. Flip the
sink upright and set it in the cabinet. Remove any rag or cap plugging
the drain stub. Glue a threaded adapter coupling onto the drain
stub. Fit the trap and screw it to the adapter and sink drain. Tighten the
sink water lines to their shut-off valves. Slowly open a shut-off, check
for leaks, then check the other line. Fill the
sink, check for leaks around the drain, then drain the water and check
the waste line joints. This will also put water in the trap to stop
sewer gases. Caulk around the rim of the sink to seal out water and to finish off the sink installation. Hooking Up A Tub/Shower
The following
section describes the basics of plumbing in a tub & shower unit,
but free-standing bathtubs are plumbed the same way.
Measure and
mark the tub outline on the floor to estimate where the drain will be.
A tub unit may already have its drain and overflow drain installed.
Otherwise, connect them before setting the tub. If possible,
lay out the drain pipe to run with joists, instead of across them. If
not, you'll have to notch or drill holes in the joists
for proper flow. You may also need to double the notched joists to strengthen
the floor. Run a drain line to the soil stack. Dry fit, then glue a tee in the waste line to connect the tub drain and overflow. Add a trap below the tee and try to locate it between joists to avoid notching. "Dry fit"
the tub and double-check that the drain connections will line up. Set
the tub and check that it's level. Shim between the tub and support boards if necessary. Nail the tub flange to the supports, secure it in place and connect the drains to the tee. Connecting Tub & Shower Water Lines
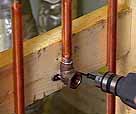
Shut off
the water supply, cut off the water line caps and solder the riser to
the water lines. Nail a support
block about 6' off the floor between two wall studs and secure the
riser to it. Set the tub so the riser fittings extend through their
holes. Check the
tub for level and secure it in place. Wrap Teflon® tape (clockwise)
on the riser threads (unless instructions say otherwise). Screw on the valves with an adjustable wrench and put on the knobs. Hand-tighten the faucet and shower head. Then tighten them a bit more with a belt-like tool called a strap wrench. |
|
 Plumbing an entire bathroom may seem
like a big project and in some cases it is. Running all the waste and
water lines through floor joists and walls can take some planning and
trial and error.
Plumbing an entire bathroom may seem
like a big project and in some cases it is. Running all the waste and
water lines through floor joists and walls can take some planning and
trial and error. 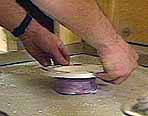 Most toilets are assembled in two
pieces: a bowl and a tank. Setting both pieces as one unit can be awkward
and heavy. If possible, install the bowl first, then the tank.
Most toilets are assembled in two
pieces: a bowl and a tank. Setting both pieces as one unit can be awkward
and heavy. If possible, install the bowl first, then the tank. 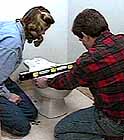
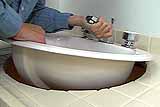
 A pedestal sink can provide "openess"
to a bathroom -- even a small one. It doesn't provide any storage or
counter surface like a vanity, but uses less floor space. And they look
nice, too.
A pedestal sink can provide "openess"
to a bathroom -- even a small one. It doesn't provide any storage or
counter surface like a vanity, but uses less floor space. And they look
nice, too. 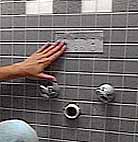
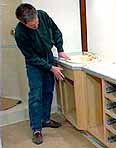
 Installing a vanity cabinet and sink
is an excellent way to get more storage and countertop space out of
your bathroom.
Installing a vanity cabinet and sink
is an excellent way to get more storage and countertop space out of
your bathroom. 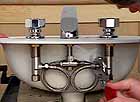 Following manufacturer instructions,
connect the spout, water valves and handles to
the sink. Link the supply tee and hose assembly to the spout.
Following manufacturer instructions,
connect the spout, water valves and handles to
the sink. Link the supply tee and hose assembly to the spout.
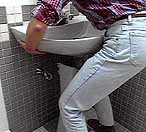
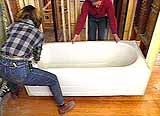 A combination tub/shower unit is
an affordable, practical way to save bathroom space.
A combination tub/shower unit is
an affordable, practical way to save bathroom space. 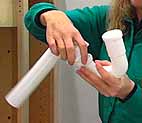
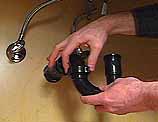
 Measure the distance across the tub
riser's hot and cold inlet fittings. Check that the incoming water lines
are that same distance apart as the riser fittings.
Measure the distance across the tub
riser's hot and cold inlet fittings. Check that the incoming water lines
are that same distance apart as the riser fittings.