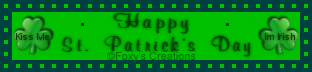
St. Patrick's Day Blinkie
This
tutorial was written by me on February 28, 2004,
any resemblance to another is purely coincidental.
This tutorial was made in PSP 7.04
Disclaimer: This tutorial is not
to be duplicated, copied or mirrored to another site, you may download
the eBook
or print it out for doing the tutorial. The tutorial is mine what you
make from this tutorial is yours to keep..
Unzip to a folder on your computer, if you do not want to use my image open another one in psp.
Open the blinkie_blank and shamrock images in paint shop pro,
minimize the shamrock for now.
Click on your paint can, on the styles set your foreground color to #004000 and
flood fill the Base layer.
Layers/Add New Raster Layer and name it inside then click ok, next
Selections/Load from Alpha Channel
the inside will be highlighted already so click ok...see below.
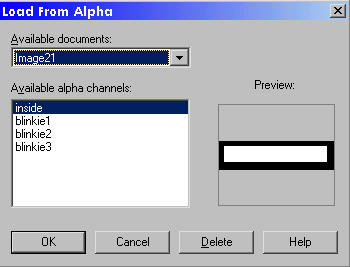
This is what the alpha channel looks likes.
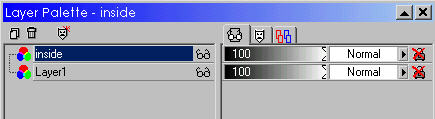
This is what your layer palette should look like to this point.
While the ants are still around the inside on the styles
change your foreground color to #00C000
and flood fill inside the ants, then choose Selections/Select None your ants
will be gone. Maximize the
shamrock image right click on it and choose copy then close the image, on the
blinkie image right click
and paste as a new layer, it should be in place. On the layer palette
right click on layer 1 and
merge/merge visible all 3 layers then right click again and rename it base.
Layers/Add a New Raster Layer and name it blinkie 1 then click
ok, Selections/Load from Alpha Channel
and choose Blinkie 1 then click ok. Using the same color #00C000 flood
fill inside the first blinkie, you can zoom it up
once to make it look larger to see, once you flood fill choose Selections/Select
None. Layers/Add a New Raster Layer
rename it blinkie 2 then click ok, next Selections/Load from Alpha Channel and
choose Blinkie 2 and click ok.
Flood fill with the same color #00C000 then choose Selections/Select None.
Do the 3rd one as you did the first two
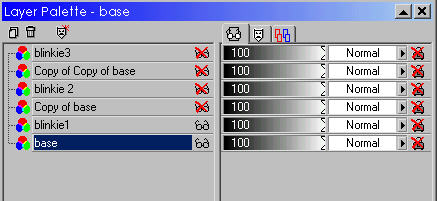
then on the layer palette right click on the base layer and duplicate it 2 times
then move the 2 base layers under each
blinkie layer, see my image below this is what you should have...
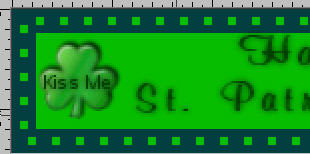
This is what you should have after you flood fill
blinkie 1
Put a red X on all layers but the bottom base layer and
blinkie 1 layer as in my example (click on the glasses)
then right click and choose Merge/Merge visible.
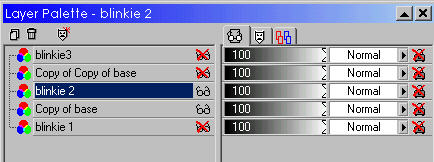
Uncheck your copy of base and blinkie 2 layers (click on the
glasses) then put a red X on the merged layer
(I renamed my layers but its not necessary) this is what yours should look
like..
Right click on blinkie 2 layer and choose Merge/Merge Visible.
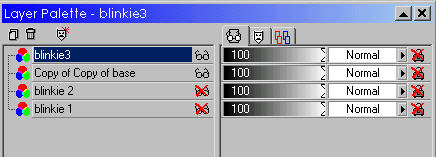
Uncheck your copy of copy of base and blinkie 3 layers (click
on the glasses) then put a red X on the 2nd merged layer
and while the blinkie 3 layer is highlighted right click and choose Merge/Merge
Visible, this is what yours should look like..
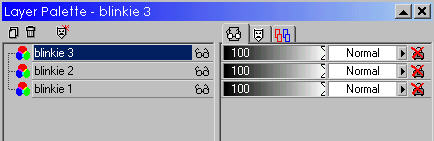
Your final palette should look like this....
Save the image as st.pats.psp or whatever you want to name it and open animation shop.
Click on the folder icon and locate your blinkie then click
open and view your blinkie
if you do not want to add the twinks then just save it as a gif and your done.
Adding the twinks
Open the twinks that was in the zip
folder then minimize, we need to get 9 frames on the blinkie image
hold down the
shift key and hit the A to highlight all 3 frames then right click and copy.
click once on
frame 3 and right click and paste after selected frame. Repeat this
process once more, click once once
on frame 6 and right click and paste after selected frame, you now have 9
frames. Next click on frame 1
then hold the shift key down and press the A key to highlight all 9 frames,
maximize the twinks hold the
shift key and press the A to highlight all 9 frames then right click and copy
then close the twinks. Right
click on the blinkie and choose paste into selected frame and place to the left
of happy, right click again
and paste into selected frame and place on the right side of happy by clicking
the right mouse button
once, view your animation then name it and save it as a gif and your done. If you need help with the
twinks, open mine in AS and you can see where I placed mine or you can place them anywhere.
©Foxy's Creations 2004
All Rights Reserved