| North Shore Antique Tractor & Engine Club Home |
 |
 |
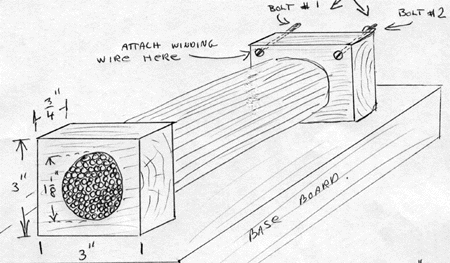
| Figure 1 |
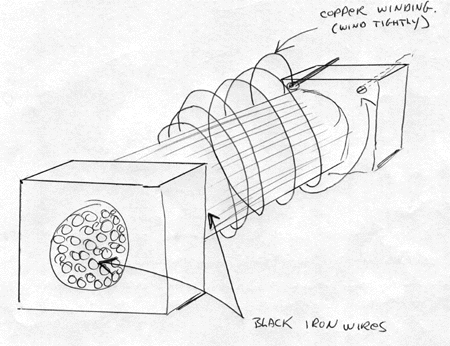
| Figure 2 |
| Home made Low Tension Coil for use on a make & break engine Materials needed: 3/4" base board about 5" x 8" 2 pieces of board (hardwood or plywood) 3" x 3" x 3/4" Black iron wire (example: coat hanger wire) 6" long. Enough to fill 1 1/8" hole 2 - 3/16" x 1 1/2" bolts 200 ft of 14 or 16 GA copper wire (varnish insulation used to wind electric motors) Vinyl electric tape. Procedure: Take the two pieces of board 3" x 3" x 3/4". Bore a hole in the center of each one 1 1/8" diameter. Cut pieces of black iron wire 6" long, enough to fill hole tightly, as shown in (figure 1). When this is assembled, (figure 1) wrap exposed wire between ends one thickness of vinyl electrical tape. You will need to go to a dealer in electrical construction supplies and get approximately 200 ft. of 14 or 16 GA. copper wire.(The kind with the varnish insulation used to wind electric motors.) Attach one end to one of the 3/16" bolts. Bolt #1 (figure 1) through end board and wind all the wire evenly along the length of the coil between the boards, finishing up on the other bolt #2. These bolts will be your terminals to connect to your ignitor.(figure 2) This assembly should be then wrapped with tape to make it waterproof and protect it from rough handling. The coil should then be mounted on a base board to hold it together. |
| Construction of a Low Tension Coil for an ignitor equipped make & break engine. |