 |
"Building
Your Own Bamboo Rod, Part One"
By D. W. Hildebrand
October 8, 2003
| Bamboo Fly Fishing
You may have heard all the hoopla about cane rods. They
are floppy. They are soft. They are great. I imagine it all depends on
your perspective.
I am one of the folks that happen to think they are
great! In my opinion, nothing equals the feel of fishing a bamboo fly
rod. It is an entire experience, from the look of the rod to the feel
of a hooked fish. I have found no other form of fly fishing that equals
the experience of fishing these fine rods. The only thing I can think
of that equals it is fishing a bamboo fly rod that you made.
You have probably looked at the prices of Payne’s, Dickerson’s,
Young’s, Gillum’s, and even some of the more notable “production”
rods by companies such as Granger, Heddon, or South Bend. Perhaps you
are a bit hesitant to spend that kind of money on a rod you may not even
like. Don’t sweat it, that is a common feeling.
I may have an alternative for you.
Have you wondered if perhaps you could build one? Amazingly,
the answer is probably yes!
Now for the caveats! (For you non-legal types, that means warnings.)
First, the methods I am going to describe are not truly
the “traditional” method of building a bamboo fly rod. Many
of the methods I will describe would be called heresy by traditionalists,
and in a way they are. If you are a staunch traditionalist, please save
yourself the heartache and read no further! OK. You have been warned.
This first rod is not a “for sale” rod. It is not meant to
be. It is to acquaint you with the main steps required in making a bamboo
fly rod and to give you an excellent tool to fish with. Don’t worry
if it is not a work of art. It is your first rod and a work of art in
your eyes. That is all that matters. You will need substantially more
rods, equipment, and practice before you can even consider selling a bamboo
fly rod. If that is your purpose, please read no further. That is not
the purpose of this article. This is to make a fly fishing rod for yourself.
More caveats! Power tools are dangerous. Basically, all tools used in
making a bamboo rod are dangerous. Be careful! They can hurt you in a
number of different ways and careless behavior is frequently punished.
Next, bamboo has splinters. Extremely irritating, nasty splinters. Bamboo
also has very sharp edges. It will and does cut like a knife. Next, anything
involved with tools and bamboo rods can be hazardous and sometimes expensive.
Last, this is not a speedy process. It will take a pretty hefty time commitment.
It will also not be finished in one weekend. Probably not in one week.
Maybe even not in one month. If you are an immediate gratification type,
this is definitely not for you.
Now we have covered the major disclaimers, what do we really need? (Please
note the word is need, not want!)
1. A lockback pocket knife, blade of 3” or longer (buy a cheap one,
you will abuse it!)
2. A propane torch (the blue tanks are fine for the first attempt.)
3. Some type of roughing form or beveller(Nice to have, but if you have
to we can use final forms.)
4. Final planing forms.
5. Glue (for this project, ProBond or Gorilla Glue will work, Titebond
II Extend works OK also)
6. Binding thread ( Go to the local sewing or hobby shop, get some poly
coated cotton or all cotton thread.
7. Wrapping thread (for ferrules and guides, If you must you can use nylon,
I feel silk looks better.)
8. Varnish (for this one, we are going to use two varnishes, Waterlox
Sealer/Finish and General Finishes Gloss Arm-R-Seal .)
9. A couple heavy thick phone books.
10. A vise (preferable something of a woodworking vise, flat faces would
be great, i.e. Record, Pony.)
11. Sandpaper ( I would have 120, 220, and 400, and also a couple sheets
of 1000-2000 grit.)
12. Pencil.
13. Marks A Lot Marker.
14. Good block plane (don’t scrimp here, this is key! Record 9 ½,
Stanley 9 ½, Lie-Nielsen 9 ½.)
15. Spare plane blade (otherwise you will be sharpening frequently right
when you are doing well.)
16. Sanding block (pick up a 3M rubber block at any big hardware store,
around $7.)
17. Nitrile gloves (for working with glue, they don’t react with
the ingredients, Harbor Freight is cheap!)
18. Latex or some form of rubber gloves (varnish work.)
19. Box of paper towels (Lowe’s, Home Depot, etc., varnish and such,
buy the box of 300 heavy ones.)
20. Fly line backing (10-20” will do fine.)
21. Masking tape (don’t go with the cheap stuff here either.)
22. A bamboo oven (we’ll discuss this later.)
23. Heat gun.
24. Band Aids (seriously!)
25. Bamboo.
26. Saw (a dozuki is nice, but any fine toothed saw will work for now.)
27. A file (Really, a belt sander is easier, a 3 X 18 or 3 X 21 handheld
will be great if you can.)
Did I scare you away yet? No? Just wait.
Here we go.
The absolute best way I can think of to get started in making bamboo rods
is to find a maker in your area and do whatever is necessary to encourage
them to show you the ropes. This may involve becoming cheap labor (read
unpaid), bribes of beverages (usually beer), and a very understanding
wife or spousal equivalent. This will take time.
If the maker will not give you some tips or allow you to “help”,
then ask if you may purchase a culm or two of bamboo from them. While
makers are generally mentioned as being a bit grumpy and particular, they
are almost all wonderful people glad to help an aspiring maker. There
are exceptions to the rule, but thankfully, not too many. Please do not
be offended if the maker does not want you around when they are performing
various parts of their craft, it is not personal. Many of these individuals
have countless hours, years, blood, and such in learning their craft.
You cannot expect them to be totally free with that knowledge in all circumstances.
If that has not allowed you to get the bamboo you need, consider either
Golden Witch (www.goldenwitch.com) or Demarest (www.tonkincane.com). Both
of these firms sell in less than bale lots and are both very nice people
to deal with. Andy Royer, (www.bamboobroker.com) sells from the west coast
in bale lots.
I am going to go against tradition and recommend that you flame your first
rod. Here is my rationale. Many makers believe that a flamed rod is a
bit crisper. Other makers do not heat treat further than a good flaming
will do on their flamed rods. My main reason for telling you this is that
it avoids the need for an oven on this first effort.
Next, is your cane check split? A check split allows the cane to dry without
having too many drying splits. The easy way to do this is to use the lockback
knife we bought. Put the cane at an angle that allows it to rest comfortably
without too much support from you. Take the knife and some type of mallet
or hammer. Placde the blade of the knife against the cane so that if you
were to hammer it into the culm, it would split it in half. Only have
the knife on the lower half of the culm. We are only splitting one side
here. Tap the knife with the mallet of hammer until it has gone in about
3-5 inches. Now take a 2 flathead screwdrivers (the longer handle the
better) and insert one where the knife blade is. Take the knife out. Turn
the screwdriver until you hear a crack and the split lengthens. Insert
the next screwdriver where the split has lengthened to and continue this
on down the culm until the split goes the entire length of it. There’s
your check split.
I am also going to recommend you measure the culm and cut it into six
foot lengths. (NOTE: If you ordered via UPS from Golden Witch or Demarest,
disregard, your cane is already in six foot lengths) I feel six foot lengths
are easier to deal with and we should only need 42 to 45” of cane
for the first rod. That should leave around two feet left over.
Now take the culms outside and prop them up on something non-flammable
at about waist height. You need to support the ends only. Don’t
have anything in the middle of the culm.
Now take the propane torch and light it. Warning! This will take some
trial and error. Once the torch has been lit, turn the gas as low as you
can get it and still keep a flame. It will go out a few times, but the
lower flame, the better for what we are going to do.
Start in the middle of the culm with the torch. The objective is to give
the cane a nice dark caramel or coffee color without burning a hole in
it. Start at a node and work your way out, finishing one section at a
time. Work right or left, whichever is more comfortable to you. Move the
torch slowly but do not linger in one place. A dark color is fine, burned
is not! You can always come back and touch up light areas later. If in
doubt, move the torch. Work your way to the end. Once you have reached
the end, you may hear some sizzling or see some liquid at the very edge.
Don’t worry, this means you are probably doing a good job. Now go
back to the middle of the culm and go the other direction until you finish
that culm. Didn’t burn it up? Excellent! Congratulations, you have
now flamed your first culm! Now go do the other half. We will probably
need it.
We need to determine at this point whether you have a belt sander or not.
(I am not saying which is better here, merely commenting on which I feel
is easier. Neither is right or wrong, just different. Both will work.)
If not, take the file and file each outer nodal area until flush with
the surrounding cane. Don’t file off to much, but you want the entire
outer nodal ridge flat. If you have the belt sander, we will accomplish
this in another way later. This will take some time. Remember this is
not a speedy process.
Now for the part that haunts most new and many older rodmakers. We are
now going to split our individual strips. Arrrrrrrgh! Don’t worry,
you will definitely ruin some bamboo here, but that is normal.
To make this easier, we are going to divide the bamboo into fourths. Look
at the end of the culm and picture a pie. That is what we want to do.
Here’s how.
Set the knife at the end of the bamboo again opposite the check split.
Take the mallet or knife and tap it into the bamboo. Insert the screwdriver
again and do the same as you did with the check split. Walk the split
down the culm until the culm is split into two equal halves. Now split
the halves into halves again and you have the culm in quarters.
Now we will take either a wood chisel or old screwdriver and knock out
the internodal dams on each quarter. These are the white or caramel colored
areas extending from one side to another that supported the cane while
it grew thicker. Lay the chisel or screwdriver as flat to the inside of
the culm as you can and tap it until the nodal area comes out. This does
not have to be perfect, just remove as much as you can without gouging
the cane.
Now for the splitting.
Take the knife, open it and anchor it firmly, blade up, in your vise.
Now take the culm, hold it so that each quarter will make four or five
strips.(Don’t try to get so many that you waste a bunch of cane
by trying to get too small with them. That is for after you have done
a few and feel more comfortable with this process.) Take the bamboo, determine
where half the quarter is and gently tap that spot into the knife in the
vise. Once about a foot of the bamboo has passed through the knife, stop
and go to the other end of the bamboo. Hold the end of the bamboo while
gently pulling the bamboo against the knife in the vise. You may have
to wiggle just a little. Don’t wiggle it much as this will come
back to haunt you on future splits. Walk the bamboo back until completely
split. Now do the same with each quarter. Now you should have the culm
in eighths. Guess what? We are going to split it in half again.
This is where a few difficulties may occur. If the split appears to wander
in one direction, apply more force to the opposite side of the cane to
get it back on track. Once again, don’t sweat it. Some of these
are going to be ugly! You are going to ruin some so don’t beat yourself
up over it. We still have more cane, right? If we need to we will flame
up another culm. Now you should have between 12 and sixteen usable strips.
Remember the other half culm we flamed? Now go split it the same way and
let’s see how many strips you wind up with. Please keep the strips
from each half separate. If they happen to get mixed up, arrange them
by nodal placement. The strips from the butt of the cane will have nodes
that are closer together than the tip strips.
Now you have your strips. Node time!
If you have a belt sander, here is where we get to play with it.
If a hand held belt sander, do not plug it in yet. Squeeze the trigger
and hit the lock to hold the trigger down. Now mount the sander upside
down in your vise. Make certain it is secure. My personal preference for
this is 120 or finer grit belts. Now place your strips where you can get
to them without reaching for them or anything else across the sander.
Now put on a pair of leather work gloves. If you are not wearing gloves,
do not do this! Now plug in the sander. (It will be on) Hold one strip
inner section down over the sander. Use one hand to hold it even with
the sanding surface. Place a nodal area over the belt. Gently press on
it with your other hand. The sandpaper will remove the inner nodal area.
Do not allow it to cut into the actual cane. You want to remove just the
inner nodal area. Do this to every inner nodal area on each strip. Then
turn them over and do the same with the outer nodal area. Try not to let
too much of the cane contact the sanding belt at a time. Small sanded
areas are desirable. Do this also on each strip.
Now you should have strips with no nodal areas sticking up on either side.
Each side should have the nodal areas flush with the rest of the strip
around it.
Now we will use the heat gun. (an alcohol lamp will work very well also
if you have one available, onlu use denatured alcohol in the lamps, anything
else can and will explode!)
Open your vise about enough to accommodate one strip.
Sight down each strip for bends or twists or kinks at nodal areas. These
are what we are trying to correct with this step.
Turn on the heat gun on a medium setting. Too hot is worse than too cool.
Too cool just takes longer. Too hot ruins the bamboo.
Hold the bamboo about an inch or so over the heat gun. Hold you hands
about three or four inches at most from the center of the area being heated.
The rule for this is if the cane is too hot to hold or touch, it is too
hot. Do not overheat. Turn the bamboo strip slowly in the heat. Apply
light pressure to determine if the bamboo has softened. It is very easy
to tell when this happens. It will soften all at once very dramatically.
Remove it from the heat, place the nodal areas in the flat jaws of the
vise (smooth jaws are essential here!) and gradually tighten the vise
until it is firm on the nodal area. Allow the section to cool a bit and
remove. Look at it top determine how straight it is. If it is straight,
move on to the next bent piece. Do this for every strip. This is another
crucial step. If you do not do this now, you will be “chasing”
a straight strip through the remainder of the rod.
This completes the first part of this article. You should now have straight
strips with the nodal areas smooth and ready to move into rough planning.
Congratulations! You have taken some major steps forward and are well
on the way to making your rod.
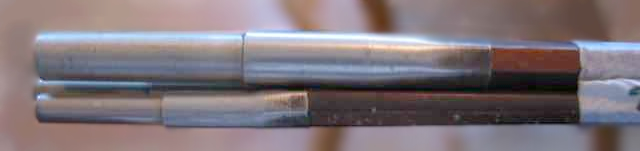
Some looks at things to come. Pictures
courtesy of board member Mike Brooks.
|