Hephaestus' Guide To Custom Items
Table of Contents:
Server Side Setup (item_db.txt)
Client Side Setup (replacing existing sprites)
Adding New Sprites (not replacing)
Current setup: kRO and SAK 0328 (patched to 05/16); Client mmclient 2006-04-17a (translation included). eAthena Stable TXT 6635.
For starter servers, I highly recommend mrmagoo’s mmclient.
Ok First, we'll do item_db.txt (eAthena)
Your standard item looks like this:
501,Red_Potion,Red Potion,0,50,,70,,,,,127918079,7,2,,,,,,{ itemheal rand(45,64),0; }
The structure of the item is as follows:
ID,Name,Name,Type,Price,Sell,Weight,ATK,DEF,Range,Slot,Job,Upper,Gender,Loc,wLV,eLV,Refineable,View,{Script}
You’ll notice that the entries are separated by a comma. Just something to keep in mind ;-)
Shall we break this into a table?
| ID | 501 |
This is the ID number of the item. It’s basically the main reference number. |
| Name | Red_Potion |
This is the name used to reference the item (creating, scripts, etc). It’s usually easier to just use the ID. |
| Name 2 | Red Potion |
This is the name everyone actually sees for the item. |
| Type | 0 |
This is the Type of Item. Types can between 0 and 11. See below for more details. |
| Price | 50 |
This is the default buying price when buying the item from an npc (unless specified differently in the npc, but that’s a whole other guide) |
| Sell | This is the price you can sell the item for. If nothing is listed, one half of the Price (above) will be used. | |
| Weight | 70 |
This is how heavy an item is. Pretty basic :-) |
| ATK | This is the ATK value for a weapon. Again, relatively straightforward. | |
| DEF | Ditto for Defense. | |
| Range | This is the Range for an item. Most melee weapons have a range of 1 (spears and such being the exception) | |
| Slot | How many slots the item has. See also itemslotcount.txt | |
| Job | 127918079 |
Which jobs can equip the item. See below for a list of values. |
| Upper | 7 |
This is what says what type of job can use an item...That is, Normal(pre-rebirth), Upper, or Baby classes. |
| Gender | 2 |
What gender can use the item. 0 For female only, 1 for male only, 2 for both. |
| Location | Where the item equips. See below for the list of options. | |
| wLV | This is the weapon level (used for refining and such). It’s 1,2,3, or 4. This only applies to weapons | |
| eLV | The minimum base level required to equip (or, I suppose, use) this item. | |
| Refinable | Whether or not the item can be refined. Use either a 1 (if yes) or a 0 (if no), like other switches ;-) | |
| View | The view id number. This is what tells the client where to look for the sprite to display (for headgears, etc). | |
| Script | { itemheal rand(45,64),0; } |
This is where you can enter scripts to be run when an item is either used or equipped. Check doc\script_commands.txt and db\const.txt for more info. |
Now that we have a basic idea of what we’re looking at, let’s
get into detail!
**ID
This, again, is the number used by the client to reference the item. It’s
used in commands such as @create (GM’s hopefully >.< ), as
well as in scripts, queries, and all sorts of other goodness. Think of
it as the Social Security number of your item xD
**Name
This is the reference name used by the client. It’s pretty similar
to the ID number, except it’s letters. This must be the same as
the item entry in your resnametables.
**Name 2
This is the name normal users see (inventory, equipped, title of info,
etc). This can also usually be used in queries such as @whodrop (again,
if enabled on your server). This should (must?) correspond to the item
entry in idnum2itemdisplaynametable.txt and num2itemdisplaytable.txt.
**Type
This tells the server what type of item this is. There are eleven different
(10, technically) numbers that are in use for this. As Shown in the handy
table below. :-)
| Type | What it Means |
| 0 | Potion / Food |
| 1 | This apparently is unused. Any details would be appreciated. :-) |
| 2 | Usable item (boxes, OCA’s, flywings, smith items, etc) |
| 3 | Etc. Items that go in the ETC tab |
| 4 | Weapon |
| 5 | Equipment |
| 6 | Card |
| 7 | Pet Egg |
| 8 | Pet's Accessory |
| 9 | Two Handed Weapons (Not used/implemented?) |
| 10 | Arrows |
| 11 | Scrolls / Tames |
**Price
This is the price npc merchants will normally charge if the item is in
their shop. Please note, that when setting up an NPC merchant, unless
you assign an alternative value (see scripting NPC’s) this will
be used.
**Sell
This is how much you want players to get for selling the item back to
an NPC merchant. If no Sell price is listed, it will default to half of
the Price option (e.g. Red Potion’s Price is 50, so it will sell
for 25 by default).
**Weight
This is how much the item counts towards a character (or cart’s!)
weight limit.
**ATK
This is the ATK value of the weapon. I hope this is self-explanatory.
o.0
**DEF
See ATK, merely for DEF.
**Range
This is how many squares away one can attack with this weapon. Most weapons
are 1, spears are around 3, bows are usually 5, etc.
**Slot
This is how many card slots the item will have available. The maximum
you can set this to is 4. Also note that you will need to edit data\itemslotcounttable.txt
for this to work. Now, a quick tutorial on editing itemslotcounttable.txt:
Get your ID number (Remember that? Try to, it’s important). If you’re
modifying an existing item, just search for that item number in the txt
file. You should see something like “5013#0#” The first number
is your ID (Lord Kaho Horns here), the second number is the number of
slots. So if you wanted 4 slotted Kaho Horns, you would modify it to “5013#4#”
If you’re adding a new item (and have a new, much higher ID number),
just add that ID number to the end of the file. Again, the format is “<ID
number>#<number of slots>#” minus the quotes.
**Job
This is what says who can use what. Each job has a certain number associated
with it. To allow multiple jobs (remember 2nd and Adv classes count as
separate jobs), you simply add the numbers together.
| Novice | 1 | Super Novice | 8388608 | ||
| Swordsman | 2 | Knight | 128 | Crusader | 16384 |
| Mage | 4 | Wizard | 512 | Sage | 65536 |
| Archer | 8 | Hunter | 2048 | Bard / Dancer | 524288 / 1048576 |
| Acolyte | 16 | Priest | 256 | Monk | 32768 |
| Merchant | 32 | Blacksmith | 1024 | Alchemist | 262144 |
| Thief | 64 | Assassin | 4096 | Rogue | 131072 |
| Taekwon | 16777216 | Star Gladiator | 33554432 | Star Linker | 67108864 |
| Gunslinger* | 134217728 | Ninja* | 268435456 |
Here’s an example: Let’s say I want my item to be equippable by only thief classes (but all of them, including rogue and assassin). I would add 64 (thief) + 4096 (Sin) + 131072 (Rogue) = 135232 (all thief classes)
For another example: This one will be equipable by Rogues and Hunters (uber-bow anyone?). 131072 (Rogue) + 2048 (Hunter) = 133120
*gunslingers and Ninja’s are currently implemented in the most recent eAthena Trunk version (not the Stable version). However, please make sure your sakray is fully updated, and use an up to date client (like mmclient2006-03-26).
**Upper
This is what says what type of job can use an item...That is, Normal(pre-rebirth), Upper, or Baby classes. This is (like so many other things) a bitmask, each type represented as follows:
Normal Classes : 1
Advanced (High) classes : 2
Baby Classes : 3
**Gender
Like I said up there, this sets which gender can equip a certain item.
Use 0 for females only, 1 for males only, and 2 for both.
**Location
This determines which body slot is taken when you equip the item.
| Lower | 1 | Body | 16 |
| Mid | 512 | Robe | 4 |
| Upper | 256 | Shoes | 64 |
| Left Hand | 32 | Accessory L | 8 |
| Right Hand | 2 | Accessory R | 128 |
Now, there is a bit of weirdness concerning accessories, headgears, and two handed weapons. Specifically, if you add the accessories together (136 total), it will allow you to equip on either accessory. If you add headgear or hand numbers together, it will equip one item on all the slots (e.g. Two handed Swords are 34, Goggles (Upper, Mid) are 768).
**Weapon Level
This is what level you want the weapon to be. It’s used to determine
things like refine rate, bonus from +’s, which ores are required
to upgrade, etc.
**Equippable Level
This is the minimum base level required to equip (or, I suppose, use)
an item.
**Refinable
Whether or not an item can be refined normally (other than by gm with
@ command). Use 0 for no, 1 for yes.
**View
This is your View ID number. It’s rather important for custom equipment
(you *want* to be able to see those neat wings, right?). Check out a spriting
guide for how to use this.
**Script
This is what you want the item to do when you use/equip it. A good example
is the Lord Kaho Horns, which adds 10 Magic Defense, 5 Str, 10 Agi, 10
Vit, 5 Int, and 20 Luk.
This is what the script looks like.
{ bonus bMdef,10; bonus bStr,5; bonus bAgi,10; bonus bVit,10; bonus bInt,5; bonus bLuk,20; }
It will always start with a curly bracket, and it will always end with
a curly bracket. All the good stuff goes inside :-)
For more information on what you can do with item scripts, check out the
script reference included with eAthena (\doc\script_commands.txt) and
script constants (\db\const.txt).
2nd is Client Side configuration.
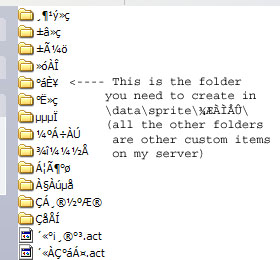
Before we get started, here's a reference for what each folder (or at
least, the important ones) in the \data\sprite\ folder is:
![]()
Please note, due to the immense number of conflicts due to hexed client,
OS version, and gods only know what else, this guide will only cover replacing
existing sprites (and, thus exisitng items in item_db.txt). The following
files will be needed to continue:
data\idnum2itemdesctable.txt –
Identified item descriptions.
data\idnum2itemdisplaynametable.txt
– Identified item names.
data\idnum2itemresnametable.txt
– Identified item sprites.
data\num2itemdesctable.txt - Unidentified
item descriptions.
data\num2itemdisplaynametable.txt
– Unidentified item names.
data\num2itemresnametable.txt - Unidentified
item sprites.
itemslotcounttable.txt - How many
slots the item displays (note: you must set the number of slots in item_db.txt
for this to be useful)
Make sure these are available in your data folder. Also, I’ll go
ahead and note that these files use a “#” (pound) symbol to
separate components. This is basically identical to the use the “,”
(comma) gets in item_db.txt.
We’ll start this section with the item name’s
first, because it’s easy xD
Open up the files data\idnum2itemdisplaynametable.txt (identified item
names). For replacement items, search for the ID number of the item you’re
replacing (and hence, your new item’s ID number as well). You should
see something like this:
5013#Lord_Kaho's_Horn#
The first part is, again, the ID number, the second part is the Name (remember
that from item_db.txt?). All you do is replace the Name there (in this
example Lord_Kaho’s_Horn) with your new Name.
The process is the same with data\num2itemdisplaynametable.txt
(uidentified item names).
5013#Accessory#
Just replace “Accessory” with whatever you are adding.
As an example, let’s say we’re adding Dragon Wings to our server. In data\idnum2itemdisplaynametable.txt you would change the line to:
5013#Dragon_Wings#
And in data\num2itemdisplaynametable.txt you would change the line to:
5013#Wings#
So, when you pick up the item unidentified, it will display the name “Wings” and when you identify it, it will display the name “Dragon Wings”.
Next, we’ll tackle data\idnum2itemdesctable.txt
and data\num2itemdesctable.txt.
Open up idnum2itemdesctable.txt, and once more, search for your ID number (we’ll continue using the Lord Kaho Horn’s for continuity’s sake). You should see something that looks like this:
5013#
A special headgear created specifically for Lord Kaho... Whoever he is.
STR + 5 , INT + 5
VIT + 10 , AGI + 10
LUK + 20 , MDEF + 10
Class : ^777777Headgear^000000
Defense : ^7777775^000000
Equipped On : ^777777Upper^000000
Weight : ^77777710^000000
Applicable Job : ^777777Every Job^000000
#
Ok, let’s break this down into component parts. First is:
5013#
This is (hopefully obvious by now) the item ID number.
Next is:
A special headgear created specifically for Lord Kaho... Whoever he is.
STR + 5 , INT + 5
VIT + 10 , AGI + 10
LUK + 20 , MDEF + 10
Class : ^777777Headgear^000000
Defense : ^7777775^000000
Equipped On : ^777777Upper^000000
Weight : ^77777710^000000
Applicable Job : ^777777Every Job^000000
#
This is the actual text of the item description. The only thing that’s kind of weird about this is the part that looks like:
^777777Headgear^000000
What this is doing is changing the color of the text. Here’s a quick tutorial on scripting text colors. The “^” (carat, Shift-6) is the symbol used to tell the client you want to change the color of the text. The following 6 digits are in hexadecimal meaning they can be the numbers 0-9 and also A-F. This number is the RGB color code, (similar to HTML). In this instance, 777777 is a light grey color. Red would be ^FF0000, green is ^00FF00, and blue is ^0000FF. Basically, you are saying how much of each color you want, 0 being none, and FF is the maximum amount of the color. Note that each color (Red, Green, Blue) gets two digits each.If one digit is a zero, you must still include it. Other colors of note are FFFF00 (yellow), 00FFFF (cyan), and FF00FF (magenta, which is also the client’s default transparent color). Oh, and 000000 is black, FFFFFF is white.
So, if you wanted to change the above description to match what your item’s effects are (from the script you wrote in item_db.txt), you would type something such as :
5013#
Immense Dragon Wings.
STR + 10 , INT + 10
VIT + 10 , AGI + 10
LUK + 20 , DEX + 10
Class : ^777777Headgear^000000
Defense : ^7777775^000000
Equipped On : ^777777Mid^000000
Weight : ^777777100^000000
Applicable Job : ^777777Every Job^000000
#
For convenience/clarity, here is the item entry from item_db.txt:
5013,Dragon_Wings,Dragon Wings,5,,10,100,,5,,4, 532676607,7,2,512,,,0,158,{ bonus bStr,10; bonus bAgi,10; bonus bLuk,10; bonus bDex,10; bonus bInt,10; bonus bVit,10; }
Note that our new item equips on the Mid slot, and can be equipped by all jobs (even Ninja and Gunslinger xD)
Now that we have the identified description out of the way, let’s go on to the unidentified description. Open up num2itemdesctable.txt, and find your ID number. You should see something like:
5013#
Unknown Item. Can be identified by using a Magnifier.
Weight : ^77777710^000000
#
Basically, it’s the same as above, just with a different description. Make sure to change the weight to what your new item’s weight actually is! This won’t crash the client or anything, but it’ll throw some of your players for a loop when they can’t figure out *why* their weight doesn’t add up right…And yes, I know people like that 0.o
Now, we’ll go on to the slots! Open up data\itemslotcounttable.txt. Find your ID number (do I really have to say this everytime? Probably xD ). You’ll see something like:
5013#0#
This is easy!! The first number is your ID number, the second parameter is the number of slots. As far as I know, there aren’t any clients (or servers, for that matter) that support more than 4 slots. So don’t put anything higher than 4!! I’m not sure what would happen, but I don’t want to find out >_<
And, last but not least (for this part, anyway) is data\idnum2resnametable.txt and data\num2resnametable.txt. Let’s search for our Kaho’s in idnum2resnametable.txt first… We find:
5013#•ÎµåÄ«È£ÀÇ»Ô#
Holy crap! A bunch of gobbledy-gook! Actually, this just tells the client what the sprite and act filenames are. This is useful, because it tell’s you what sprite the client will look for to display your item. Just copy it, search for files with that in the name, and you have your sprite and act files. If you want to replace the item with your new custom sprite, just rename your sprite and act to the gobbledy-gook in idnum2resnametable.txt.
Adding a new Sprite
(not replacing an old one)First things first…Get your custom sprite, and make sure you have the following files for it:
custom.spr
custom.act
customdrop.spr
customdrop.act
customitem.bmp
customcollection.bmp
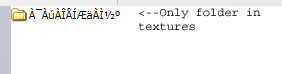
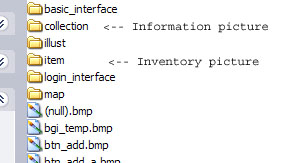
The custom.spr and custom.act are going to go into the sprite folder (in the appropriate subfolder). The customdrop.spr and customdrop.act are going to go into the \sprites\¾ÆÀÌÅÛ folder. The customitem.bmp is the small picture that will show up in your inventory, on your character’s equipped screen (Ctrl-Q), etc. This is placed in the \texture\À¯ÀúÀÎÅÍÆäÀ̽º\item folder. The customcollection.bmp is the picture of the item that will show up in the item description (when you right-click the item). This is placed in the \texture\À¯ÀúÀÎÅÍÆäÀ̽º\collection folder.
If you don’t have all of these files (many custom sprites only have the actual equipped sprite files >.<), then you need to find a tutorial on making sprites, and make the rest of these. (Maybe I’ll release one of these if I ever finish this)
Next, you need to find a free view ID (one that is not being used by your
client). A View ID is what the server uses to tell the client what sprite
to use. To do this, use the command @changelook while running your test
client (you do have a test server and client set up, right?). So, you
can type
@changelook 1 244
The first number is for the sprite type (in this case, 1 for upper). The second number is the View ID. If you get an error that says something like:
Cannot find File : sprite\¾Ç¼¼»ç¸®\³²\³²°áÈ¥\°áÈ¥.act![]()
Then you know you can use that as a free view ID. Just copy the message (usually Ctrl-C) and paste it into a text editor (notepad, etc) so that you can name your custom sprite appropriately for that view ID.
Please note that I was using a male character, so the error message gives me the location of the male headgear sprite. One thing you’ll (hopefully) notice is that the client is looking for a sprite in a subfolder of the headgear folders. In this instance, you’ll need to create the subfolder \³²°áÈ¥\ in the sprite\¾Ç¼¼»ç¸®\³²\ folder, and then put your sprites in that folder.
SO…
Rename your sprite file (custom.spr) and ACT file (custom.act) to your view ID sprite, in this case you would change them to
°áÈ¥.spr
°áÈ¥.act
And place them in the
sprite\¾Ç¼¼»ç¸®\³²\³²°áÈ¥
and place another copy (under the same name) in
sprite\¾Ç¼¼»ç¸®\¿©\¿©°áÈ¥
for the female sprite. Note that for this particular View ID, you have to create a subfolder with the sprite name (minus the .spr). Check the error message above if you're having problems understanding this.
Now, if you reload your client, and use @changelook 1 244, you should see the custom sprite on your character.
Ok, so you have the actual cool looking sprite on your character (or at least, ready to be used on a character xD ). Next we need to make it so you can see the item when you drop it on the ground. Grab your customdrop.spr and customdrop.act and rename them accordin to your view ID. To continue the above example, you would name them:
°áÈ¥.spr
°áÈ¥.act
Yes, this is the same as the big sprite names. However, you’ll place these two files into the folder
\sprites\¾ÆÀÌÅÛ\°áÈ¥\
You’ll need to create this subfolder, and note that it does not have the ³² (or the ¿© for female sprites). Then place your files into this folder, so you’ll end up with:
\sprites\¾ÆÀÌÅÛ\°áÈ¥\°áÈ¥.spr
\sprites\¾ÆÀÌÅÛ\°áÈ¥\°áÈ¥.act
Ok, now you can see the item when it’s dropped on the ground. Next,
we’re going to need to make the item viewable in your inventory.
Take the file customitem.bmp and rename it to (again) the sprite filename,
e.g.
°áÈ¥.bmp
Make sure to place this file in the folder
\texture\À¯ÀúÀÎÅÍÆäÀ̽º\item
Note, that we’re not creating a subfolder for this file. Nor will you create a subfolder for the collections image. You should now have the following file:
\texture\À¯ÀúÀÎÅÍÆäÀ̽º\item\°áÈ¥.bmp
The last file you need to modify is the customcollection.bmp. This will be placed in :
\texture\À¯ÀúÀÎÅÍÆäÀ̽º\collection\
And again, you’ll rename the file, so you’ll end up with :
\texture\À¯ÀúÀÎÅÍÆäÀ̽º\collection\°áÈ¥.bmp
Here's a screenshot of the folders...
Ok, you now should have all 6 files placed in the appropriate place. If you haven’t already, go ahead and create the custom item on your server (in item_db.txt). Make sure to use the view ID that you replaced (or added) the sprite for. You should now be able to create the item, and wear it, drop it, see it in collections, etc. Keep in mind you’ll also need to edit all of your client files as if you were replacing an item. Instead of actually replacing it, though, you’ll create a new line in each file. Make sure to pick an item ID that’s not in use (I recommend starting at 19000 or so). For the files idnum2resnametable.txt and num2resnametable.txt you’ll add a new line, and put the sprite name as the option. This is a bit confusing, so here’s an example continuing from the previous ones :
19001#°áÈ¥#
Note, that in these files, you do not need to include an extension (like .spr, .act, or .bmp). This is just telling the client where to look for the inventory and collections pictures.
Now that you have all of your sprites and pictures ready go ahead and add the custom items to your server and client. Note, adding an item is basically the same as replacing an item (see the previous guide), except instead of writing over the old data (or the item you’re replacing), you’ll just tack on all of the information at the end of the file.
There you go! You should now have a fully usable new custom item, and
you didn’t have to replace something!
Be warned, though. If you change the client you’re using (rehex
it, etc.) you may need to recheck all of your view ID’s and make
sure they haven’t changed.