Fantasy World Builderä
Copyright ã 1995-1996 Perry Horner
Cover Art ã 1982 Mari Ishibashi
Software Agreement:
Thank you for your interest in a
Perry Horner (PERware) product.
This software is provided
"as-is" without warranty of any kind.
PERware and the author of the
program(s) expressly disclaims liability
for any direct,
indirect,consequential or incedental damages arising out
of the use or inability to use such
software. You may copy the software
for backup purposes only; all other
copying of the software or any
written materials is expressly
forbidden.
DISCLAIMER:
"This
software is provided as-is. There are
no warranties, expressed or implied.”"
PERRY HORNER DISCLAIMS ALL
WARRANTIES RELATING TO THIS
SOFTWARE, WHETHER EXPRESSED OR IMPLIED,
INCLUDING BUT NOT
LIMITED TO ANY IMPLIED WARRANTIES
OF MERCHANTABILITY AND
FITNESS FOR A PARTICULAR PURPOSE,
AND ALL SUCH WARRANTIES ARE
EXPRESSLY AND SPECIFICALLY
DISCLAIMED. NEITHER PERRY HORNER NOR
ANYONE ELSE WHO HAS BEEN INVOLVED
IN THE CREATION, PRODUCTION,
OR DELIVERY OF THIS SOFTWARE SHALL
BE LIABLE FOR ANY INDIRECT,
CONSEQUENTIAL, OR INCIDENTAL
DAMAGES ARISING OUT OF THE USE OR
INABILITY TO USE SUCH SOFTWARE EVEN
IF PERRY HORNER HAS BEEN
ADVISED OF THE POSSIBILITY OF SUCH
DAMAGES OR CLAIMS. IN NO EVENT
SHALL PERRY HORNER'S LIABILITY FOR
ANY DAMAGES EVER EXCEED THE
PRICE PAID FOR THE LICENSE TO USE
THE SOFTWARE, REGARDLESS OF THE
FORM OF CLAIM. THE PERSON USING THE SOFTWARE BEARS ALL RISK
AS
TO THE QUALITY AND PERFORMANCE OF THE
SOFTWARE.
Some states do not allow the
exclusion of the limit of liability for consequential or incidental damages, so
the above limitation may not apply to you.
This agreement shall be governed by the laws of the State of Arizona and
shall inure to the benefit of Perry Horner and any successors, administrators,
heirs, and assigns. Any action or
proceeding brought by either party against the other arising out of or related
to this agreement shall be brought only in a STATE or FEDERAL COURT of competent
jurisdiction located in Maricopa County, Arizona. The parties hereby consent to in personam jurisdiction of said
courts.
This software and the disks on
which it is contained is licensed to you, for your own use. This is copyrighted software. You are not obtaining title to the software
or any copyrights. You may not sub
license, rent, lease, convey, modify, translate, convert to another programming
language or platform, decompile, or disassemble the software for any
purpose.You may make as many copies of this software as you need for back-up
purposes. You may use this software on
more than one computer, provided there is no chance it will be used
simultaneously on more than one computer.
If you need to use the software on more than one computer simultaneously,
please contact the author for information about site licenses.
The Fantasy World Builderä is
a SHAREWARE product. Shareware is a "try before you buy" means of marketing software. Many shareware products are created by
individuals who use their spare time to creatively produce unique products that
are generally not available through the normal market. These one-of-a-kind programs are usually
created to fill a hole in a need that others have failed to identify. By registering a shareware product you help
the programmer in many ways. you are
saying "thank you", "good job", etc. for the efforts put
into the project. You have an open door
to suggestions and comments for future releases and projects. Your registration fee goes towards hardware,
software, compiler, utility, and reference material upgrades for the programmer
to produce future products. Shareware
products usually are well below any off-the-shelf program cost for a similar
product. The Fantasy World Builderä has many long hours, sleepless nights, verbal
abuses, etc. expended in its creation (not to mention my wife telling me I am
ignoring her). This program is fully
functional. Only a delayed screen at
the end of the program is added. This
is just a reminder to you that if you
find this program of use to you, please take the time to register
it.
Thank you for your interest in
the Fantasy World Builderä.
Registration cost: $20.00 US dollars
Shipping/Packaging: $03.50
Total cost: $23.50
Registration
includes the Fantasy World Builder without
"nag"
screens on two 3 1/2" high density disks, a printed
instruction
manual, and the latest version of the Fantasy
War Simulator- a
DOS program to simulate both sides of a
large scale fantasy
battle.
Please send US Check, Money
Order, or International Bank Money Order to:
Perry Horner
Allow 2-3
weeks for delivery (based on shipping location)
If you have any questions or
comments, please mail to the address above or e-mail at:
[email protected].
Hardware
Requirements:
Minimum Recommended
386
MS-DOS based PC
486/66 or faster processor
MS-DOS
6.xx MS-DOS
6.22
570K
conventional RAM 580K
conventional RAM
2
meg Expanded Memory (EMS) 4
meg Expanded Memory (EMS)
256
color VGA 1
meg SVGA
Microsoft
compatible mouse Microsoft compatible mouse
Dot-matrix
printer Laser
Printer
MPU-401 compatible wavetable
sound card
History
Many of us would love to win the lottery and play
role-playing games for the rest of our lives.
Most of us can not find the time to create adventures, campaign, maps,
dungeon-hacks, etc. What this program
does is help you by creating the "skeleton" with which you can add to
with your own creativity. The Fantasy World Builder was designed to
aid a gamemaster in the outline. This
allows the gamemaster to then use creativity to expand the outline into a
playable scenerio. It can also be used
for those situations where friends come over and decide at the spur of the
moment to play a role-playing game. Not
much time needs to be invested into creating a playable adventure. Cutting creation from days to hours/minutes
takes much of the burden off being a gamemaster. The Fantasy World Builder
is not a paint program. There are many
programs on the market that help you design maps using a library of objects and
some custom drawing tools. These can be
used as supplements to the Fantasy World
Builder to refine the maps generated.
For the past 5 years the focus that built up to the creation of the
Fantasy World Builder was on "random" generation. A fantasy setting is just that...
fantasy. Real-world logic is sometimes
thrown out the door. This is what makes
fantasy settings such a thrill to develop.
Making a program that could be customized to fit many fantasy RPG
mechanics was a must. Standard text
files are used as resources for the Fantasy World Builder. These files can be modified to meet the
needs of the gamemaster. The world
generation component of the program was created for those who want to create a
new campaign setting. By creating many
dungeons and cities, you can then have the program place them on a randomly
created map. For only a couple days invested,
you have created an entire campaign setting with cities and dungeons ready for
the next two years of game playing!
Please take the time and read the documentation before using the
program.
INSTALLATION
STEPS
1. Read
this documentation first
2. Run
the file INSTALL.EXE
3. After
installation is complete, run the file SETUP.EXE
4.
Select the options that you wish to use
5.
Select MENU
RUNNING THE
PROGRAM
Intro Screen
The introduction screen can be
bypassed by pressing the left mouse button.
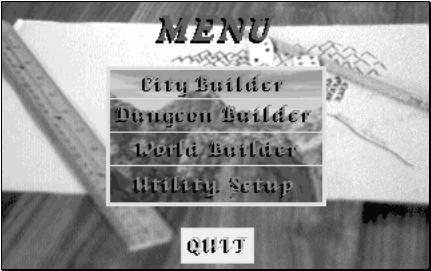
Main Menu
The MAIN MENU screen gives a selection of builders and utilities.
CITY BUILDER creates maps of hamlets, villages, towns, and cities.
DUNGEON BUILDER creates playable dungeons in either "natural
rock"
or "cut: man-made" style
format.
WORLD BUILDER creates terrain maps that can utilize previously
generated
cities and dungeons to
"populate" the world map.
UTILITY/SETUP lets you modify, print, and configure various program
aspects.
QUIT will end the Fantasy World Builder program.
Use the mouse to select the function you wish to use
and press the left mouse button.
CITY BUILDER UTILITY
CITY SELECTION
MENU 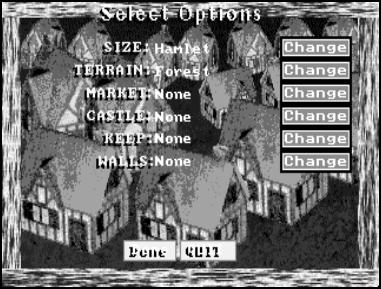
The city selection menu offers many options for city
attributes.
SIZE POPULATION
MARKET CASTLE KEEP
WALLS
Hamlet no no no
no
Village no no
no no
Town yes
no yes no
Small City yes yes
yes yes
Medium City yes yes yes yes
Large City yes yes
yes yes
TERRAIN DESCRIPTION WORLDMAP COLOR
Forest Light & Thick Light Green & Dark Green
Mountains Hills & Mountains Light Grey & Dark Grey
Desert Dry/Arrid Regions Brown
Plains Flat, Grassy Yellow
Coastal Near Water Next to Blue Areas
Use the left mouse button to select the CHANGE button next to each option you
wish to change.
Select the DONE
button when all desired options are set. A mini map is created.
Select the QUIT
button to exit back to the MAIN MENU.
MINI MAP 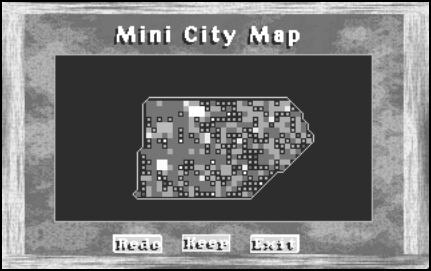
This screen shows a minature map of a random city
created based on the options set in the CITY
SELECTION MENU. Colors represent
different types of buildings. If you
wish to keep the current randomly created city, press the KEEP button. If you would
like to randomly generate a different city map, press the REDO button. If you want to
exit the CITY BUILDER and return to the MAIN MENU, press the EXIT button.
NAMING THE
CITY
You can name your city using up to 40 characters in
length.
SAVE CITY TO
ARCHIVE DATA FILE
City information can be saved to a datafile that
keeps track of what and how many cities you have generated. This information is used by the WORLD BUILDER utility to "populate" a world with the
previously generated cities. By
selecting the YES button, the
current city information will be appended to this archive data file. If you select the NO button, the current city information will not be saved for use
by the WORLD BUILDER utility.
WRITING CITY
INFORMATION
The CITY
BUILDER utility will create a text file that shows the location,
description, and business name of each building in the city. This process uses the files located in the
\TABLES\CITY subdirectory on your hard drive.
(See TABLES section)
CITY MAPS 
City maps are saved as 256 color .PCX graphics
files. They are located in the \CITYMAP
subdirectory on your hard drive.
DUNGEON BUILDER UTILITY
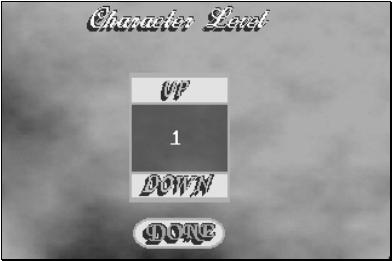
CHARACTER
LEVEL
By using the mouse, you can select on the up and
down menu bars to change the number of character levels. Character level is important for the
program. The level of monsters that are
generated use the character level as a base.
The amount of treasure and magic generated is also based on the
character level.
Character Level
Monster Level = -------------------
3
Magic Item
Generation
Monster Level # of Items File Used (.TBL)
1 1
MAGIC1.TBL
2 2
MAGIC1.TBL
3 2
MAGIC1.TBL
1
MAGIC2.TBL
4 2
MAGIC1.TBL
2
MAGIC2.TBL
5 3
MAGIC1.TBL
2
MAGIC2.TBL
1
MAGIC3.TBL
6 3
MAGIC1.TBL
3
MAGIC2.TBL
1
MAGIC3.TBL
7 3 MAGIC1.TBL
2
MAGIC2.TBL
3
MAGIC3.TBL
1
MAGIC4.TBL
8 3
MAGIC1.TBL
2
MAGIC2.TBL
2
MAGIC3.TBL
1 MAGIC4.TBL
9 3
MAGIC1.TBL
3
MAGIC2.TBL
2
MAGIC3.TBL
2
MAGIC4.TBL
10 4
MAGIC1.TBL
3 MAGIC2.TBL
3
MAGIC3.TBL
2
MAGIC4.TBL
Attack Die
The ATTACK DIE is the type of
dice you use in your game to roll for how many life/attack points the monster
has.
EXAMPLE:
Lets say a GOOBER (type of
monster) has an ATTACK DIE of
3. And the gaming system it is in uses a 10 sided die
to roll for ATTACK POINTS. We would then roll the 10
sided die 3 times and add each
result for the total
amount of ATTACK POINTS.
AD 3
DIE USED 10 sided
roll 1 = 4
roll 2 = 8
roll 3 = 2
+___
ATTACK POINTS = 14
You will want to move the mouse
pointer over the type of dice used for this means of determining ATTACK POINTS
and press the LEFT mouse button. A
window will show what your current die selection is. Press DONE when you have completed your selection.
Monster
Selection 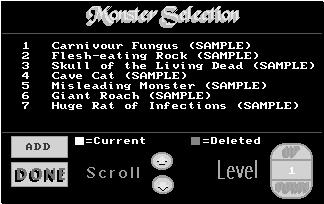
After the Attack Die Menu, you
will be presented with a menu screen for MONSTER SELECTION. A list of available monsters for the
character level you had previously selected will appear on the screen. This list of monsters is read from the files called LEVELx.TBL in the TABLES sub
directory. The monster menu has these
options:
LEVEL The level
buttons (UP/DOWN) allow you to
increase
or decrease the monster level that you
wish to
view
[UP ARROW] Moves the list of
currently displayed monsters
back
one
[DOWN ARROW] Moves the list of currently
displayed monsters
forward
one
ALL The ALL
button will select/deselect all of the
monsters
for the current monster level
DONE This will exit you from
the Monster Selection
menu
By moving the mouse pointer
over the name of a monster and pressing the LEFT mouse button, you can select
or deselect the monsters you wish to populate randomly throughout your
dungeon. This gives you the ability to
"seed" your dungeon with appropriate monsters for your game or
scenario.
DONE
By selecting the DONE button,
you are stating that you wish to build the dungeon and all parameters have been
set.
Mini Map 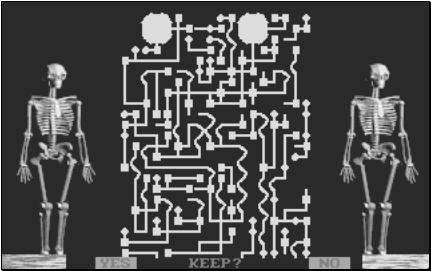
The program will randomly
generate a level to your dungeon and display it on the screen in the form of a
small map. You have the option to
accept or reject this random map by moving the mouse to the YES or NO
buttons. You then press the LEFT mouse
button to make your selection. After
selecting YES, the program will save a copy of this small "mini" map
to the MAPS sub directory with a filename called MINIMAP.PCX The program will then start saving maps of
the current dungeon to the sub directory DUNMAP in the form of files called
DMAPx.PCX where x is the map number (A,B,C...)
NOTE: MINIMAP.PCX
file does not print while using the normal print
utility.
You can use the PRINT FILE option to select this
file in the print utility menu.
Saving Dungeon
The Saving Dungeon screen will
display while a text file called DUNGEON.TXT is being created. This file is located in the TEXT sub
directory and contains the text and descriptions to the maps generated. The files used by this stage of the program
are all of the.TBL resource files for room descriptions, traps, containers,
container traps,magic items, and miscellaneous items. The dungeon maps will
include a room number on them. This
will correspond to the room numbers in the DUNGEON.TXT file. The text file will also create a
"roaming monster" table that will list 6 monsters that could be encountered
anywhere in the dungeon.
Naming The
Dungeon
------------------
This screen will ask for a name
for your dungeon. It can be up to 40
characters long (including spaces).
This will create a data file in the
WORLD BUILDER UTILITY
The WORLD BUILDER utility
generates a random terrain map. The map
is divided into 4 sections. Each
section is generated separately.
Each terrain type is
represented by a color:
ICE White
DESERT Brown
PLAINS Yellow
WATER Blue
HILLS Light Grey
MOUNTAINS Dark Grey
LIGHT FOREST Light Green
HEAVY FOREST Dark Green
Generation time may vary
depending on your computer system. If
you have an MPU-401 compatible sound card and have selected music in the SETUP
menu, music will play while generation takes place. If you have not selected music in the SETUP menu, generation will
take place without giving you any
notification on status. each of the 4
sections will appear on the screen after generation of the section.
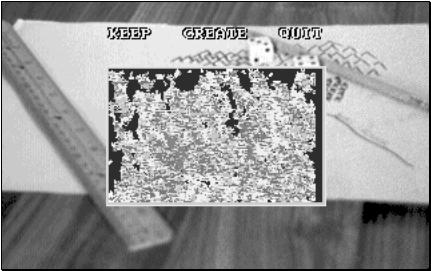
After all 4 sections are
generated you can select:
KEEP Use the currently displayed
map as the world
CREATE Create a different random map as the
world
QUIT Exit back to the MAIN MENU
screen
Populate World
Option
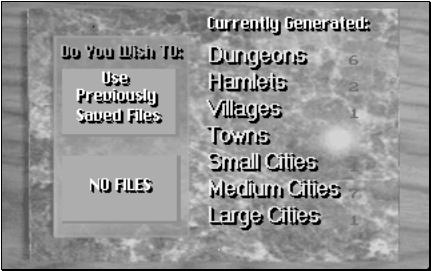
You can use any previously
"saved to archive file" cities and dungeons to populate your
world. Each type of city and all
dungeons will be totalled and listed.
You can select the option USE PREVIOUSLY SAVED FILES or NO FILES to
create your world maps. If you select
USE PREVIOUSLY SAVED FILES, city and dungeon icons will be placed on your world
maps.
Hex Grid
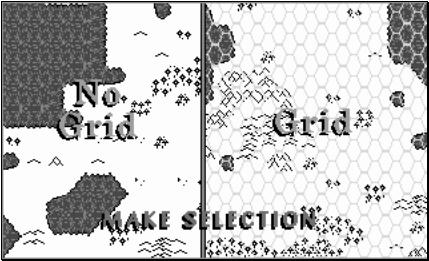
You can select to have your
world maps generated with a hex grid or without.
NOTE: Hex
grid generation may overlay some map detail.
World Maps
World maps are created with a
LEGEND and COORDINATE system. They are
saved as 256 color .PCX files in the \WORLDMAP subdirectory on your hard drive.
A text file is created showing map locations of any cities and dungeons that
have been saved to data files (Only if USED PREVIOUSLY SAVED FILES option had
been selected.) This text file shows
coordinates and descriptions of cities and dungeons in the newly created
world. The text output file is named
MLEGEND.TXT and is located in the \TEXT subdirectory on you hard drive.
UTILITY/SETUP
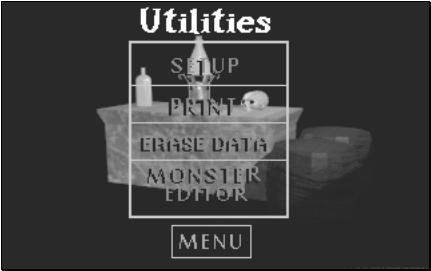
The Utility/Setup screen allows
you these options:
SETUP Set printer
and sound options
PRINT Print maps
and/or text files
ERASE DATA Delete
previously saved archive files
MONSTER EDITOR Create/edit monsters used by DUNGEON
BUILDER
MENU Exit to MAIN
MENU screen
Setup
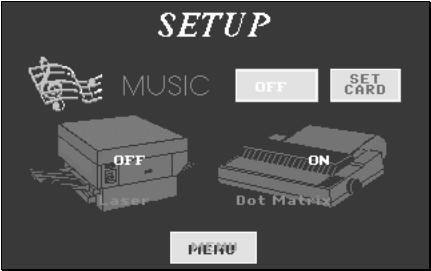
The SETUP screen allows you to
change printer and sound options.
PRINTERS SUPPORTED:
LASER Any
Hewlett Packard LaserJet II+ level 4 compatible laser printer.
DOT-MATRIX Any
Epson FX-80 compatible dot-matrix printer.
(NOTE: Some inkjet printers will accept this mode)
SOUND OPTIONS:
The Fantasy World Builder
allows background music during generation times. This sound support only works
with MPU-401 capable sound cards. These
are usually what are known as WAVETABLE sound cards. The music uses the extended sounds available through General MIDI
specification.
AdLib May be
selected for non-MPU401 soundcards
that
support the AdLib emulation
Gravis
UltraSound
MPU-401
General MIDI
Soundblaster
MIDI
No
Sound No
sound or soundcard
Exit Exit
to SETUP screen
Print
Printer output can be up to 80
pages. It would be advisable to make
sure that your printer has
sufficient paper before printing.
PRINT ENTIRE MAP All
sections of the map
PRINT INDIVIDUAL MAP Prints
a single map file
CITY TEXT Prints
the text to a newly generated city
DUNGEOON TEXT Prints
the text to a newly generated dungeon
WORLD TEXT Prints
the text to a newly generated world
EXIT Exit
back to MAIN MENU screen
The maps printed out may need
to be taped or pasted together to form the complete map. This may mean adding the coordinates or
legends to a single map. This may also
mean placing many map sections together.
The maximum size of the maps may be:
CITY 2'
x 2'
DUNGEON 2'
x 3'
WORLD 6'
x 4.5'
Each map is named and numbered
and can be placed together following the legend in the MAPS section of this
document.
You can select to print ALL
MAPS to print the entire city, dungeon, or world. Or you can select an INDIVIDUAL MAP which will present you with a
file selector. The file selector allows
you to move to the map directory of your choice and select an individual file
to print.
Text output can be selected for
printing. This will print a formatted
text output that includes page numbering.
NOTE:
If you have a SVGA Vesa compatible graphics card, you can exit the
Fantasy World Builder program and run the optional included file named HIRESPR.EXE. This program will switch to hi-res mode and load 4 map files at a
time and place them all on one sheet of paper at a time.
Erase Data
This utility will erase any
previously saved cities and/or dungeons that you have selected to be placed in
the archive data file. The archive data
file is used by the WORLD BUILDER utility to place cities and dungeons on a
newly created world. Erasing this data
will allow you to start with a clean world.
MONSTER EDITOR 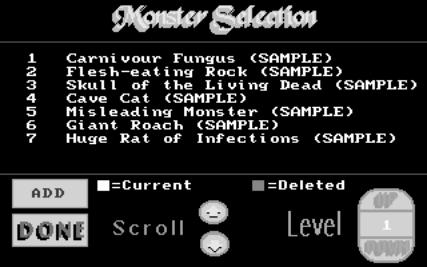
The DUNGEON BUILDER utility
uses monster resource data files to "stock" a dungeon. These files are located in the
\TABLES\DUNGEON subdirectory on your hard drive. The Monster Editor allows you to modify,delete, or create
monsters. There are 10 levels of
monsters. Each level can contain a
maximum of 60 monsters. The lower the
level of monster, the weaker the monster is.
The higher the level of monster, the stronger the monster is. Generally, fantasy role-playing games have
certain similar monster characteristics:
a form of life-force points, an armor rating, and a frequency of numbers
appearing. This information can be
placed into the Monster Editor to allow customization to your own fantasy
world.
Editor Screen
LEVEL UP/DOWN Increases
or decreases current monster level
SCROLL UP/DOWN Scroll
through monsters at current level
ADD Add
new monster
DONE Exit
Monster Editor
You can move the mouse and left
button click on a monster to turn it dark grey. This means that you have selected to permanently remove this
monster from the monster database. If
you select a dark grey monster, it will turn white again. This means that you have selected to keep
the monster in the monster database.
After the program ends...
After the program exits back to
DOS, you can go into the TEXT sub directory and use a text editor to
examine/print/modify the output text files.
These files contain all the necessary information (skeleton modules) to
start your adventure or campaign. You
might want to rename the file and place it elsewhere on another disk or another
directory on your hard drive. The
associated map files will have the extension.PCX after them. These files can be
printed out or modified by using a paint or graphics display program or the
utility built into the Fantasy World Builder.
Some other common ways of doing this are:
Function Program Operating System
text editing EDIT.EXE (DOS)
WRITE.EXE (Windows)
paint/printing PBRUSH.EXE (Windows)
This way you can modify the
files to your liking before printing them out.
Editing/Printing City Maps
The maps are arranged in the
following format:
|
CMAPA.PCX | CMAPB.PCX
|
|
|
CMAPC.PCX | CMAPD.PCX
|
Each map will connect with the
other. You might want to use a paint
program to draw in landmarks or items.
After you are finished
modifying the maps, you can print them out.
The maps are in 256 colors and have been "textured" to
different shades of gray for those who only have dot-matrix printers. This conserves on ribbon/ink and extends the
life of the print-head.
Using tape or glue, and
possibly some scissors or blade, you can put together your finished map and get
to work on the text file output. The text file is just a skeleton outline and
should be modified and
added to.
Editing/Printing Dungeon
Maps
The maps are arranged in the
following format:
|
DMAPA.PCX | DMAPB.PCX
|
|
DMAPC.PCX | DMAPD.PCX
|
|
DMAPE.PCX | DMAPF.PCX
|
|
DMAPG.PCX | DMAPH.PCX
|
Each map will connect with the
other. You might want to use a paint
program to draw in landmarks or items.
You can even remove walls or make corridors connecting rooms or areas
together (This may be wise since the program may generate "non-obtainable"
rooms or hallways").
After you are finished
modifying the maps, you can print them out.
The maps are in 256 colors and have been "textured" to
different shades of gray for those who only have dot-matrix printers. This conserves on ribbon/ink and extends the
life of the print-head.
Using tape or glue, and
possibly some scissors or blade, you can put together your finished map and get
to work on the text file output. The
text file is just a skeleton outline and should be modified and added to. This will make a well-rounded playable
adventure for your players.
Editing/Printing World Maps
The maps are arranged in the
following format:
| | |
| | |
MAPxA.PCX | MAPxB.PCX | MAPxC.PCX | MAPxD.PCX
| | |
| | |
MAPxE.PCX | MAPxF.PCX | MAPxG.PCX | MAPxH.PCX
| | |
| | |
MAPxI.PCX | MAPxJ.PCX | MAPxK.PCX | MAPxL.PCX
| | |
| | |
MAPxM.PCX | MAPxN.PCX | MAPxO.PCX | MAPxP.PCX
| | |
x = Map Section Number
Map Section Layout
|
1 | 2
|
------------------------------------
|
3 | 4
|
Each map will connect with the
other. You might want to use a paint
program or colored pencils to draw in landmarks, rivers, etc.
After you are finished
modifying the maps, you can print them out.
The maps are in 256 colors and have been "textured" to
different shades of gray for those who only have dot-matrix printers. This conserves on ribbon/ink and extends the
life of the print-head.
Using tape or glue, and
possibly some scissors or blade, you can put together your finished map and get
to work on the text file output. The text file is just a skeleton outline and
should be modified and added to.
Modifying the Resource Files
The versatility of this program
is shown by it's ability to let you tailor the monsters, treasure, traps, etc.
to your own world or gaming system.
This is done through the use of .TBL files. These files are located in the TABLES subdirectory.
DUNGEON TABLE
FILES: \TABLES\DUNGEON
Filename Function
CONTAINR.TBL containers
CONTRAP.TBL container traps
NATDESC.TBL room descriptions for natural dungeon
CUTDESC.TBL room descriptions for cut dungeon
TRAP.TBL traps
CONTENTS.TBL misc. items in room
LEVEL1.TBL monsters level 1
LEVEL2.TBL monsters level 2
LEVEL3.TBL monsters level 3
LEVEL4.TBL monsters level 4
LEVEL5.TBL monsters level 5
LEVEL6.TBL monsters level 6
LEVEL7.TBL monsters level 7
LEVEL8.TBL monsters level 8
LEVEL9.TBL monsters level 9
LEVEL10.TBL monsters level 10
MAGIC1.TBL magic items level
1
MAGIC2.TBL magic items level 2
MAGIC3.TBL magic items level 3
MAGIC4.TBL magic items level 4
These files are used by the DUNGEON BUILDER utility.
All of these files are standard
ASCII text files and should remain that way!
DO NOT USE WORD-WRAPPING!!! Each file must have a [carriage return] at
the end of each line of text. It is
illegal to use the \ in any .TBL file.
NOTE:
All dungeon related .TBL files
have an "@" symbol at beginning of the last line of the file. THIS IS NECESSARY! Please do not create a dungeon related .TBL file without placing
an @ symbol at the end of the file. The
program may not work correctly without it.
The program uses the @ symbol as a file terminator]
CONTAINR.TBL
------------------------------------------------------------------------------
This file is where you can list
different types of containers for treasure.
This file starts with an
asterisk and ends with an asterisk and @ symbol. If you examine the sample file, you will see that each item is
separated by an asterisk. This allows
you to use multiple line descriptions of containers.
EXAMPLE:
*
Green
colored bottles
*
A very
strange looking chest that if examined closely will
reveal
small etchings on the sides.
*
Jars
*
@
CONTRAP.TBL
------------------------------------------------------------------------------
This file is where you can list
different types of traps that are placed on
containers.
This file starts with an
asterisk and ends with an asterisk and @ symbol. If you examine the sample file, you will see that each item is
separated by an asterisk. This allows
you to use multiple line descriptions for each container trap.
EXAMPLE:
*
When the
lid is opened, a poisonous gas is release.
All
persons
within 10 feet of the container must make a save
against
the gas.
*
When the
container is moved, darts fire from the walls.
*
Contact
poison
*
@
Notice the @ symbol at the end of the file?
This is a must.
NATDESC.TBL
& CUTDESC.TBL
------------------------------------------------------------------------------
This file is where you can list
different room descriptions for natural made dungeons and cut
"man-made" dungeons.
These files starts with an
asterisk and ends with an asterisk and @ symbol. If you examine the sample file, you will see that each room
description is separated by an asterisk.
This allows you to use multiple lines for each room description.
EXAMPLE:
*
This room
looks very unkept. There are broken
boxes strewn
everywhere
and dust covers the floor. The ceiling
has a
single
chain link placed in the center. The
floor below the
chain
link has a duplicate set into it. There
is also a
strange
smell here.
*
This room
has wooden walls and is dark.
*
When the
party enters this room, they find pictures of their
friends
on all of the walls. These pictures
actually speak
to the
party as if they were the real characters.
*
@
Notice the @ symbol at the end of the file?
This is a must.
TRAP.TBL
------------------------------------------------------------------------------
This file is where you can list
different types of traps.
This file starts with an
asterisk and ends with an asterisk and @ symbol.
If you examine the sample file,
you will see that each trap is separated
by an asterisk. This allows you to use multiple lines for
each trap
description.
EXAMPLE:
*
6 Arrows
shoot forth from the walls when a person comes
within 2
feet of a wall. These arrows do 1-6
points of
damage
each.
*
Poison
drips from the ceiling. All characters
must save
against
it or die!
*
@
Notice the @ symbol at the end of the file?
This is a must.
CONTENTS.TBL
------------------------------------------------------------------------------
This file is where you can list
different types of miscellaneous items.
This file DOES NOT start with
an asterisk. It is just a list of ONE-LINE worth of words listing
different items. These can range from a
broom to a chair to a feather. Whatever
miscellaneous items you want. Just be
sure to have an @ symbol at the end of the file.
EXAMPLE:
brush
comb
table
chair
nail
hammer
@
Notice the @ symbol at the end of the file?
This is a must.
MAGICx.TBL
------------------------------------------------------------------------------
This file contain a list of
magic items.
This file DOES NOT start with an asterisk.
It is just a list of ONE-LINE
worth of words listing names of magic items.
Since there are 4 different MAGIC text files in the REGISTERED VERSION
of this software, this allows you to choose which one would be best for your
items. A magic item that would go in
file MAGIC1.TBL would be lesser in power and value than one going into file
MAGIC4.TBL where power magic would go.
Just be sure to have an @
symbol at the end of the file.
EXAMPLE:
Witch's
flying broom
Wand of
rabbit changing
Sword of
good omens
Blanket
of warming the body
@
LEVELx.TBL
------------------------------------------------------------------------------
These files range in numbers
from 1 to 3.
The x in the filename
corresponds to the monster level. Each
file is arranged in the following order (one entry per line):
MONSTER NAME
ARMOR RATING
ATTACK DICE
FREQUENCY
Monster Name is one line up to
80 characters naming the monster.
Armor Rating is the number
associated with the type of armor. This
is a value given to different types of armor and can go into negative
numbers i.e.. -5
Attack Dice is the number of
times the attack die is rolled to calculate the number of Attack Points the
monster has, i.e.. a value of 3 for Attack Dice means rolling 3 times on the
attack die for a total number of attack points.
Frequency is the maximum number
of monsters of this type to appear together
i.e..a value of 5 would mean there could be anywhere from 1 to 5
monsters of this type in this room or area.
Each monster should follow the
other. Again, an @ symbol should be the
last line of the file.
:
Tiny
Men name
of monster
7 armor
rating
2 attack
die
10 frequency
1-10
Poison
Frogs name of
monster
9 armor
rating
2 attack
die
12
frequency 1-12
Tiger name of monster
3 armor
rating
2 attack
die
1
frequency 1
@
End-of-File terminator
It would be wise to keep
monsters of similar attack dice or strength grouped in the same LEVELx.TBL
file. Weak monsters should go into the
lower numbered files, where as stronger more powerful monsters should go into
the higher numbered files.
NOTE:
You cannot use any values other
than whole integers. This is illegal: 5+6
You may want to round any values
of this nature to: 6.
CITY TABLE
FILES: \TABLES\CITY
Filename Function
ADJ.TBL adjectives
NOUN.TBL nouns
These files are used by the
CITY BUILDER utility to generate random names of businesses. You can add nouns and adjectives to these
files to expand the word lists to suit your own campaign world.
All of these files are standard
ASCII text files and should remain that way! DO NOT USE WORD-WRAPPING!!! Each file must have a [carriage return] at
the end of each line of text. It is
illegal to use the \ in any .TBL file.
NOTE:
All city related .TBL files
have a "*" asterisk symbol
at the beginning of the last line of
the file. This should be the only item on the last line. THIS IS NECESSARY! Please do not create a .TBL file without placing a * symbol at
the end of the file. The program may
not work correctly without it.
[The program uses the * symbol as a file terminator]
Troubleshooting & Tips
for DOS
*MY MOUSE DOESN'T WORK:
You may need to load a DOS
mouse driver that is Microsoft compatible.
This driver comes with your mouse hardware on disk. It usually is called through your CONFIG.SYS
or AUTOEXEC.BAT startup files. Make
sure you have it loaded before running the Fantasy
World Builder. Also, all mouse
selections and operations use the LEFT mouse button.
*I HAVE SELECTED SOUND YET NO SOUND COMES OUT:
Your sound card may be set to a
non-standard IRQ and/or DMA setting.
The Fantasy World Builder
assumes your card is set to the standard IRQ:7 DMA:1 for Sound Blaster
compatibility and IRQ:5 for MPU-401 General Midi Wavetable compatibility. Check your soundcard settings and use the
SETUP.EXE program to set the Fantasy World Builder to match those settings.
Check your cables and speakers.
Make sure they are in working order.
If sound still fails, there may be a conflict memory. It would be advisable to NOT use sound
(select NO SOUND in SETUP) if this is the case. This will ensure the program runs correctly.
*THE PROGRAM LOCKS UP ON ME!!!:
This is a tough one to
diagnose. Thorough testing has been
done to ensure compatibility with a wide range of CPUs and configurations. But not every computer behaves and/or is set
up the same. The main problem with any program usually has to
do with memory conflicts. Many TSRs
(Terminate and Stay Ready) programs that are loaded up during bootup from the
CONFIG.SYS and AUTOEXEC.BAT files use upper memory space. Some may conflict with the program. You may also not have enough conventional
RAM for the program to execute correctly.
Try running DOS's MEMMAKER.EXE and select CUSTOM SETUP. Be sure to select yes to EMS memory. Also do NOT optimize for WINDOWS by using
the monochrome region of memory.
You may want to create a special "boot disk" for this
program. Format a disk using FORMAT /S
command option to create a bootable system disk. Copy your AUTOEXEC.BAT and CONFIG.SYS files to the new disk. Edit these two files and only keep necessary
statements in them.
Here is an example:
CONFIG.SYS
DEVICE=C:\DOS\SMARTDRV.EXE /Q
DEVICE=C:\DOS\HIMEM.SYS /TESTMEM:OFF
DEVICE=C:\DOS\EMM386.EXE RAM
BUFFERS=25,0
FILES=30
DOS=UMB
LASTDRIVE=G
FCBS=16,0
BREAK = ON
SHELL=C:\DOS\COMMAND.COM C:\DOS\ /E:512 /p
STACKS=9,128
AUTOEXEC.BAT
VERIFY ON
PROMPT $P$G
SET Path=C:\DOS;
c:\mouse\mouse
You will need to enter in any
optional statements allowing for sound, etc.
Be sure to use the DOS command MEM to confirm you have at least 570K of
conventional memory free.
Other Conflicts:
Some CD-ROM device
calls/drivers may not allow the program to work.
If your MSCDEX.EXE call in AUTOEXEC.BAT has a /E in it,
it is
using EMS memory for buffer storage. Remove the /E in the statement.
Some systems may have a problem
using SMARTDRV.EXE or similar drive cache
utility. Remove
calls to any caching program.
If you are using a third party
memory manager other than that which came with DOS, you may run into some
conflicts. EMS memory handling by third
party memory managers use their own methods of allocation and may not be
compatible with this program. A
possible solution would be to create a "boot disk" using the standard
DOS EMM386.EXE memory manager.
*MY PROGRAM LOCKED UP AND I HAD TO RESTART MY MACHINE:
Some files may still have been
left open when the lock-up took place.
Run DOS's SCANDISK to correct any damage that may have took place.
*I CAN'T USE THE EXTRA HI-RES PRINT PROGRAM
The program HIRESPR.EXE is
designed to work with VESA compliant video cards. Your video card or video driver may not understand the command
set the program is using to access video.
You may also not have enough video RAM to display a higher resolution
image. An upgrade to the video
driver or a newer video card
may fix the problem.
Troubleshooting & Tips
for Windows
The Fantasy World Builder was written for DOS. This does not mean it cannot run under a
version of Windows. Included in the
distribution is a PIF file (Shortcut) to the executable file (START.EXE) This shortcut contains options in memory
handling, screen, and I/O control. By
right clicking overtop the start.exe shortcut, you can change these
environmental settings. 90% of the
tests I have done on Windows NT 4.0 and Win95/98 have worked with the default
shortcut settings. It has not been
tested under Windows 2000.
Audio settings probably will not work and therefore
should be set to NONE in the setup.exe program.