: | Definition | Special feature - TURTLE | Its two types |
2. Windows
: | Knowledge of running LOGO | Tips in LOGO |
3. Commands
: | Basic LOGO Commands | More LOGO Commands |
4. Procedures
: | Some procedures in LOGO |
5. Examples
: | Some Examples |
6. Messages
: | Print Command in LOGO |
1. INTRODUCTION > Definition
1.1.1. Computer Graphics
We can instruct a computer to draw a graph or a picture or patterns or graphs. The pictures drawn by a computer are called as Computer Graphics.
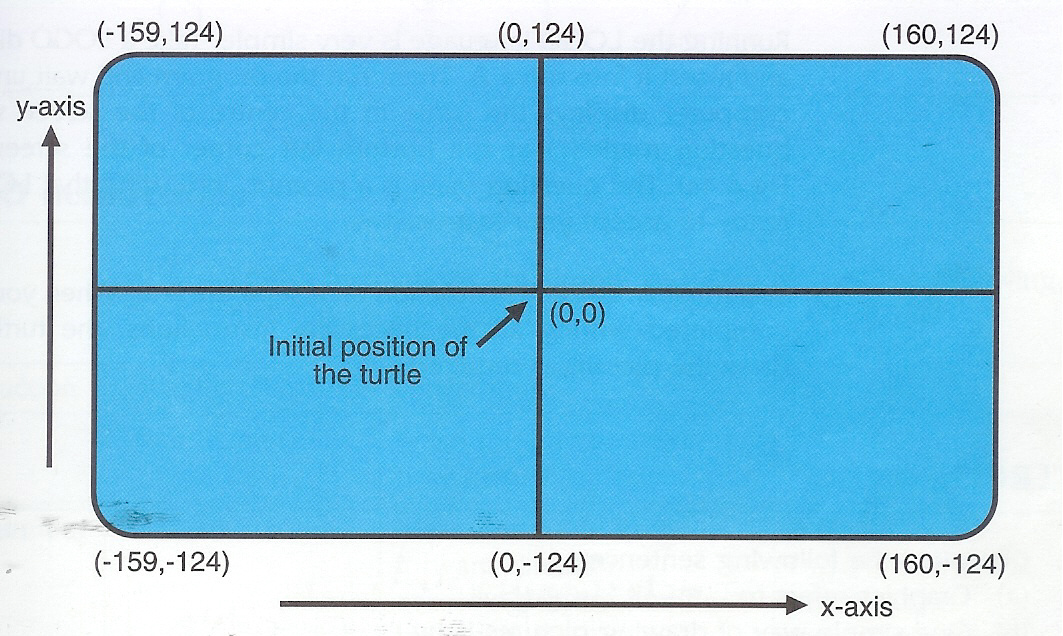
How does a computer draw a picture? The computer screen consists of a number of dots called Pixels. Several pixels can be joined to form a line. Each pixel is identified by the screen co-ordinates (x, y) where x is in the horizontal axis (row) and y is the vertical axis (column) as shown in Fig. 1.1.1.
1.1.2. What is LOGO?
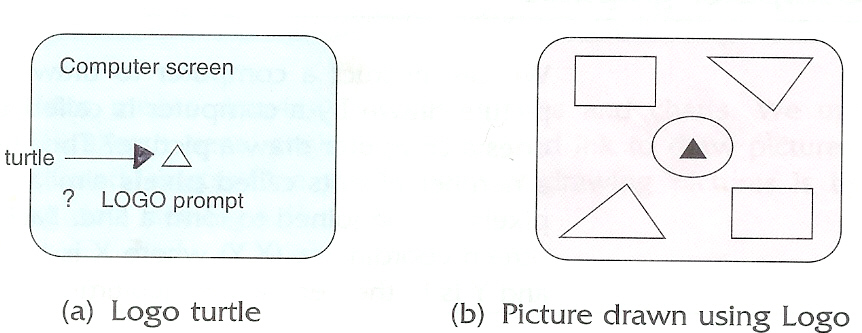
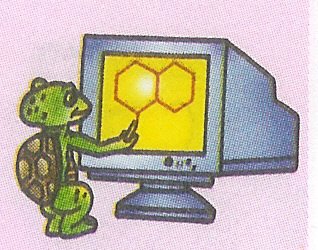
LOGO is a programming language used for drawing pictures. You need to know and learn the LOGO Commands to draw simple pictures. LOGO stands for Logic-Oriented Graphic-Oriented.
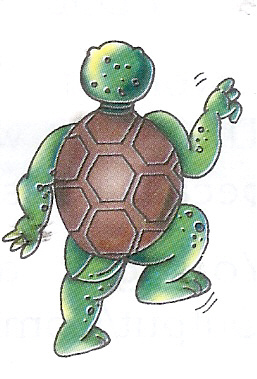
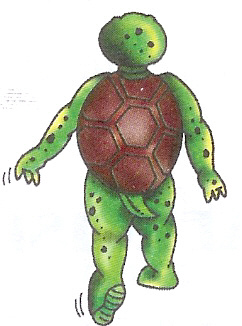
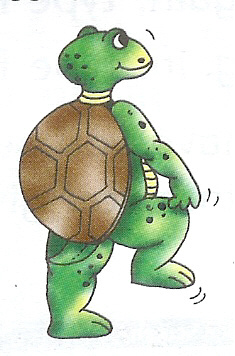
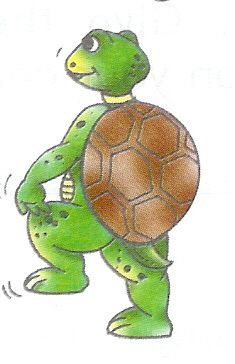
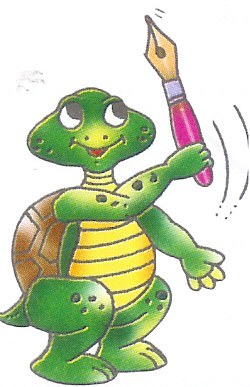
LOGO has a pen called a TURTLE which can be instructed to draw pictures. Turtle in LOGO is called as a turtle because the first version of LOGO used an electronic robot which resembled a turtle. The turtle and a sample of pictures drawn using LOGO instructions can be shown in Fig. 1.1.2.
1. INTRODUCTION > Special Features
1.2.1. Turtle
The turtle carries a pen and when it moves according to the instructions given by you, it draw a line on the window screen. The turtle represents a cursor in LOGO. It show the position on the screen where your instructions will be carried out.
The turtle moves on the screen according to the instructions given to it and these instructions are called as commands or primitives.
| The shape of TURTLE in MSW LOGO | The shape of TURTLE in PC LOGO |
 The pointed end of the turtle is called its head and the wide end is called as its tail. The turtle is like a shape of a triangle. |
 The head of the turtle and its tail are just exactly like a shape of a real turtle. |
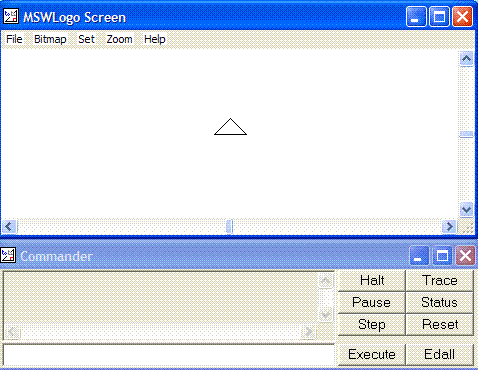
1.2.2. LOGO Screen
LOGO Screen is split into two parts:
![]() Main Screen
Main Screen
![]() Commander Window
Commander Window
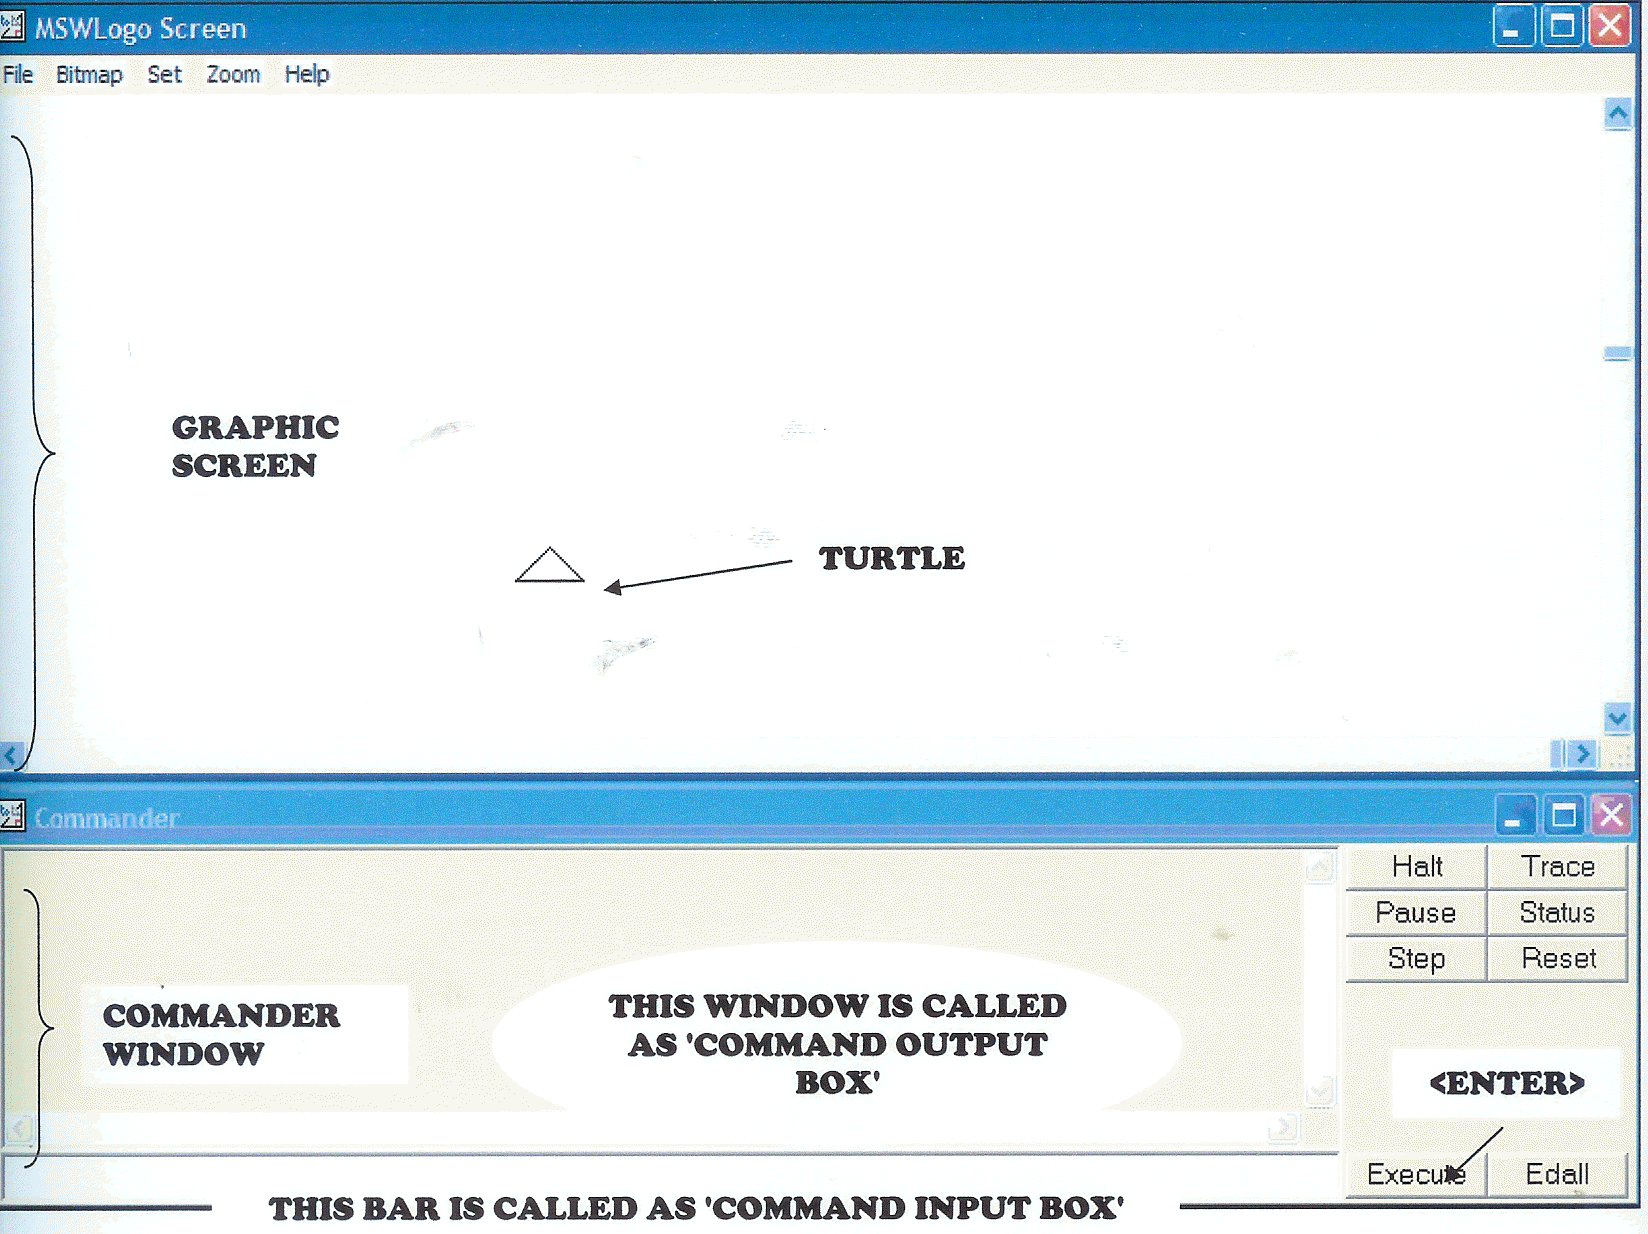
1.2.2.1. Main Screen
Main Screen is also known as the Graphic Screen. It is the place to draw pictures or figures. The triangle shape in the centre of the Graphic screen is called Turtle. Turtle moves on the screen according to the commands given by you. These commands are also known as primitives.
1.2.2.2. Commander Window
The Commander Window is the place to give commands to the turtle. The Commander Window has three important components:-
![]() Command Input Box
Command Input Box
- It is where you type commands in and execute them by clicking on the <Execute> button
or by pressing the <Enter> key on the keyboard.
- It is located in the bottom left portion of the Commander Window.
![]() Output or
Command-Recall List Box
Output or
Command-Recall List Box
- Displays and records all the commands that are executed and also any messages which are
output as a result of these commands.
- It is located above the Command Input Box.
![]() Execute
button
Execute
button
- Similar like the <Enter> button on the keyboard.
![]() How does the Commander Window work
out?
How does the Commander Window work
out?
Command Input Box is linked to the Output/Command-Recall List Box. If you click on a line in the Output/Command-Recall List Box, it is automatically appeared in the Command Input Box. It can be executed by clicking on the <Execute> button or by pressing the <Enter> key on the keyboard.
1. INTRODUCTION > Its two types
1.3.1. MSW Logo
Below is a symbol icon of MSW Logo Software.
|
FEATURES IN MSW LOGO |
|
|
1.3.2. PC Logo
Below is a symbol icon of PC Logo Software.
|
FEATURES IN PC LOGO |
|
|
1.3.3. The Similarities Between MSW Logo & PC Logo
![]() Some funtions in the window
are SIMILAR
Some funtions in the window
are SIMILAR
![]() Have pens called as TURTLE
Have pens called as TURTLE
![]() The process is the SAME
The process is the SAME
![]() SAME purpose i.e. used to draw pictures or graphics
SAME purpose i.e. used to draw pictures or graphics
2.0. WINDOWS > Knowledge of running LOGO
2.1.1. How to start LOGO?
STEP 1 : Click on <Start> button on the Windows Desktop. Start menu appears.
STEP 2 : Move the mouse pointer to <Programs>. Programs menu appears.
STEP 3 : Move the pointer to <Microsoft Windows Logo> or <PC Logo> (which ever LOGO type you wish to use) in the Programs menu. A submenu appears.
STEP 4 : Click on <MSW Logo> or <PC Logo> (which ever LOGO type you wish to use).
2.1.2. How to enter Commands?
To give a command to the turtle:
STEP 1 : Click on the Input box in the Commander Window.
STEP 2 : Type the command you wish to use.
STEP 3 : Press the <Enter> key from the keyboard or click on the <Execute> button in the Commander Window.
2.1.3 How to end LOGO Session?
After completing you work in LOGO, follow these steps to close the LOGO Window:
![]() Type <BYE> in
the Input box and press <Enter> key.
Type <BYE> in
the Input box and press <Enter> key.
OR
![]() Click on
<Close> button on the top right corner of the Main screen.
Click on
<Close> button on the top right corner of the Main screen.
The LOGO screen will be disappeared.
2.1.4 How to run LOGO?
Running the LOGO Language is very simple.
STEP 1 : Turn on the power supply to the computer and the monitor.
STEP 2 : Take a LOGO diskette and insert it into drive A or <A:>
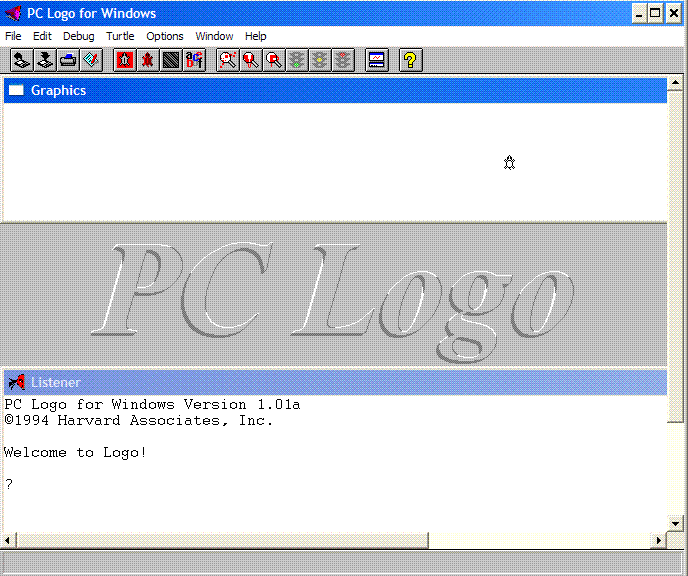
STEP 3 : Wait until the computer displays the turtle in the center of the screen with a question mark (?) at the bottom left corner of the screen. The question mark is a prompt, indicating that LOGO is ready to accept your instructions.
![]() REMEMBER: You must write
each instruction on a separate line. When you have completed writing all
the necessary instructions, you have written a LOGO program.
REMEMBER: You must write
each instruction on a separate line. When you have completed writing all
the necessary instructions, you have written a LOGO program.
OR
You can download directly from http://www.softronic.com for MSWLogo Version 6.4 for Microsoft Windows 3.x/9x/NT. and do not forget to save in your programs file. It is a freeware software and can be downloaded free of cost.
2.0. WINDOWS > Tips in LOGO
2.2.1. Tip 1
STEP 1 : Click on <Start> button on the Windows Desktop. Start menu appears.
STEP 2 : Move the mouse pointer to <Programs>. Programs menu appears.
STEP 3 : Move the pointer to <Microsoft Windows Logo> or <PC Logo> (which ever LOGO type you wish to use) in the Programs menu. A submenu appears.
STEP 4 : Right-Click on <MSW Logo> or <PC Logo> (which ever LOGO type you wish to use), then a pop-up window will appear. Click <Send To> and then click again <Desktop (Create Shortcut)>.
![]() So
that, in the future; you can directly open the LOGO Software on the
<Desktop Window> immediately.
So
that, in the future; you can directly open the LOGO Software on the
<Desktop Window> immediately.
2.2.2. Tip 2
To type a command:
If you use lowercase DO NOT EVER mix it up with uppercase letters or vice-versa!!
![]() Use
[uppercase letter] ALL-THE-WAY-LONG for the command in the line.
Use
[uppercase letter] ALL-THE-WAY-LONG for the command in the line.
OR
![]() use
[lowercase letter] ALL-THE-WAY-LONG for the command in the line.
use
[lowercase letter] ALL-THE-WAY-LONG for the command in the line.
3.0. COMMANDS > Basic LOGO Commands
3.1.1. Command 1
|
Command:
<FORWARD> or <FD> Function: The forward command is used to move the turtle forward while drawing a line. Syntax: FD <number of steps> Example: FD 45 <Enter> Result: Draws a 45 steps long line in the forward direction. |
 |
3.1.2. Command 2
|
Command:
<BACK> or <BK> Function: The back command is used to move the turtle backward while drawing a line. Syntax: BK <number of steps> Example: BK 40 <Enter> Result: Draws a 40 steps long line while moving backwards. |
 |
3.1.3. Command 3
|
Command:
<RIGHT> or <RT> Function: Turns the turtle to its right through the specified number of degrees. Syntax: RT <number of degrees> Example: RT 90 <Enter> Result: Turns the head of the turtle by 90° to its RIGHT. |
 |
3.1.4. Command 4
|
Command:
<LEFT> or <LT> Function: Turns the turtle to its left through the specified number of degrees. Syntax: LT <number of degrees> Example: LT 45 <Enter> Result: Turns the head of the turtle by 45° to its LEFT. |
 |
3.1.5. Command 5
|
Command: <PENUP>
or <PU> Function: The PU command lifts the turtle's pen so that, it does not draw a line while moving. Syntax: PU <Enter> |
 |
3.1.6. Command 6
|
Command: <PENDOWN>
or <PD> Function: The PD command puts the turtle's pen down so that it again starts drawing while moving. PD command is given only after PU command has already been used. Syntax: PD <Enter> |
 |
3.1.7. Command 7
|
Command: <HIDETURTLE>
or <HT> Function: HT command hides the display of the turtle. Syntax: HT <Enter>
|
 |
3.1.8. Command 8
|
Command:
<SHOWTURTLE> or <ST> Function: ST command is used to display the turtle on the screen. It can be used only after the HT command has been used. Syntax: ST <Enter>
|
 |
3.1.9. Command 9
|
Command: <CLEARSCREEN>
or <CS> Function: CS command erases all the drawings on the scren and clears the Main screen or the Graphics screen, and also brings the turtle to the centre of screen. Syntax: CS <Enter>
|
|
3.1.10. Command 10
|
Command:
<REPEAT> Function: REPEAT command allows to repeat a set of commands many times without writing them again and again. Syntax: REPEAT <n> [Set of commands] <Enter>, where n is the number of times a set of commands has to be repeated. Example: REPEAT 4 [FD 40 RT 90] Result: The REPEAT command will run the commands FD 40 & RT 90 four times to complete the SQUARE. |
 |
3.0. COMMANDS > More LOGO Commands
3.2.1. More Command 1
Command: <FENCE>
Function: At times, you might give a command for the turtle to move which will take it beyond the screen. The <FENCE> command creates a fence around the screen so that the turtle cannot go beyond the screen.
Syntax: FENCE <Enter>
Example:
FENCE <Enter>
RT 80 <Enter>
FD 600 <Enter>
Result: A message Turtle out of bounds appears and the figure is displayed, truncated at the right end of the screen.
3.2.2. More Command 2
Command: <WRAP>
Function: The <WRAP> command allows the turtle to reappear on the other end of the screen once the edge is reached.
Syntax: WRAP <Enter>
Example:
WRAP <Enter>
RT 80 <Enter>
FD 600 <Enter>
Result: When the screen is in Wrap Mode, as the edge of the screen is reached, turtle appears at the other end, drawing the balance part of picture.
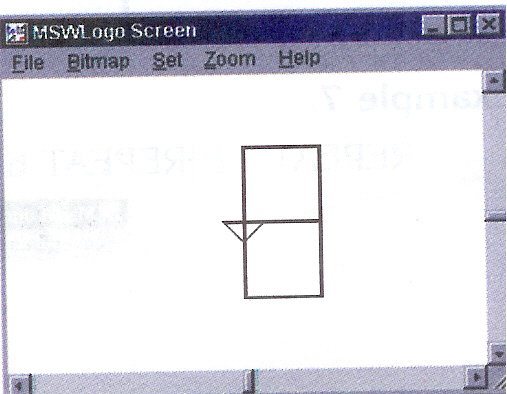
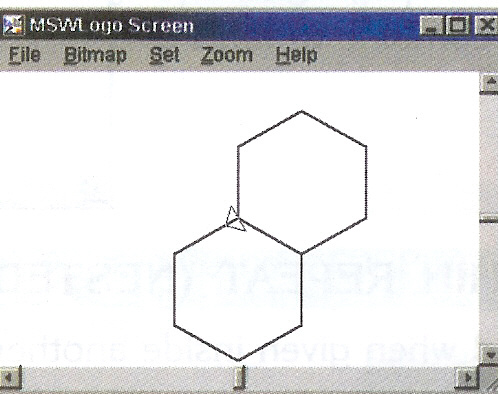
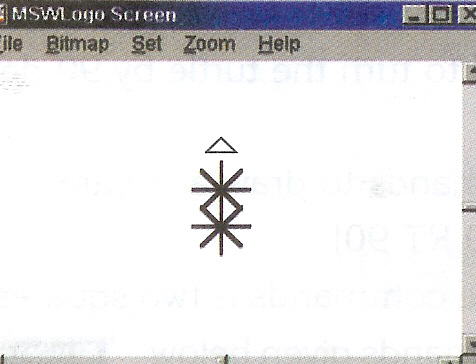
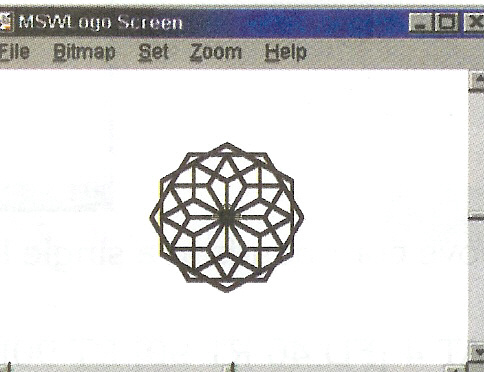
3.2.3. More Command 3
Command: Nested <REPEAT> (Repeat within Repeat)
Function: The REPEAT command when given inside another REPEAT command.
Example 1:
REPEAT 2 [REPEAT 4 [FD 40 RT 90] RT 90] <Enter>
Result: Two squares are shown in the figure below.
Example 2:
REPEAT 2 [REPEAT 6 [FD 80 RT 60] RT 120] <Enter>
Example 3:
REPEAT 2 [REPEAT 8 [FD 30 BK 30 RT 45] PU FD 40 PD] <Enter>
Example 4:
REPEAT 12 [REPEAT 6 [FD 40 LT 60] RT 30] <Enter>
4.0. PROCEDURES > Some Procedures in LOGO
4.1.1. What is A Logo Procedure?
In LOGO, the commands are executed as and when entered. These commands do not get stored in memory.
Till now we have been writing commands one by one to draw figures. If the same figure is to be drawn again, the same set of commands will have to be given again. Instead, if we want to save the set of commands and give it a name, we can do it with the help of LOGO Procedures.
A procedure is useful if we want to reuse a certain set of commands. We can give a name to a set of commands and can recall it whenever needed. A procedure once defined can be stored in memory and can be called any time when required.
A LOGO procedure is a set of LOGO commands given one after the other to perform a particular task and referred to by a name.
A LOGO Procedure is divided into 3 parts:
![]() Title of the Procedure
Title of the Procedure
![]() Set of Instructions
Set of Instructions
![]() End Line
End Line
The Title of the Procedure:
![]() Can
include letters, numbers or symbols
Can
include letters, numbers or symbols
![]() The first
character should always be a letter
The first
character should always be a letter
![]() Blank
spaces cannot be included
Blank
spaces cannot be included
![]() Arithmetic operators + , -, *, / cannot be included in the name
Arithmetic operators + , -, *, / cannot be included in the name
![]() LOGO
Command names cannot be included
LOGO
Command names cannot be included
The title of the procedure is the name given to the procedure. Preferably a procedure name should be such that it gives some information about the set of instructions.
| VALID PROCEDURES | INVALID PROCEDURES |
|
Square H20 PR3S S$2 |
SH 2 - A blank space is given 23 ABE - First character should be a letter FD - FD is a LOGO Command F/D - Includes an arithmetic operator |
4.1.2. Writing A Procedure
WRITING A PROCEDURE USING THE INPUT BOX:
STEP 1 : Click in the Command Input Box
STEP 2 : Type <TO> followed by a name for the procedure, for example: TO CIRCLE
STEP 3 : Now, press the <Enter> key
STEP 4 : After pressing the <Enter> key, the To Mode Input box appears
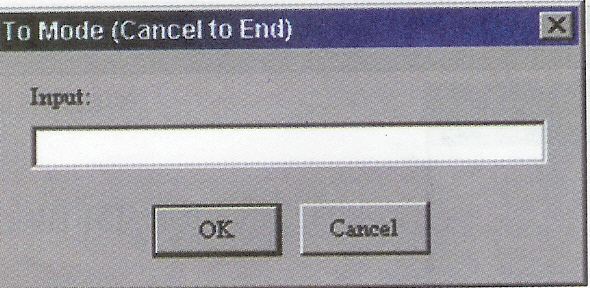
STEP 5 : Click inside the box
STEP 6 : Enter the commands one after the other, pressing the <Enter> key after each command
STEP 7 : Type <END> to mark the end of the procedure
WRITING OR EDITING A LOGO PROCEDURE USING THE EDITOR WINDOW:
The Editor Window allows you to make changes in an already existing procedure and also to write new procedures.
To write a new procedure using Editor Window follow the steps given below:
STEP 1 : Click in the Command Input box and type <Edit "Square"> and press the <Enter> key. Square is the name of a new procedure. The Editor Window appears as shown below.
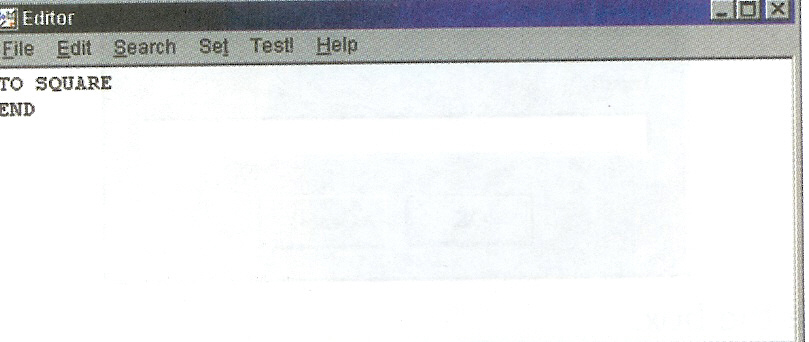
STEP 2 : Insert a blank line after the line containing TO SQUARE by pressing <Enter> key.
STEP 3 : Type the commands that you want to be included in the procedure for example,
CS
FD 40
RT 90
FD 40
RT 90
FD 40
RT 90
FD 40

The commands appear in the Editor Window between the Title Line and the End Line.
STEP 4 : Click on <File> in the Menu bar of the Editor window.
STEP 5 : Click on <Save and Exit> option in the Dropdown menu.
4.1.3. Running A Procedure
Running a procedure, means executing the set of commands typed and saved in the procedure. A defined procedure can be called any time by simply typing the name of the procedure in the Command Input box.
You can run a procedure by typing the name of the procedure, for example, SQUARE in the Command Input box and then pressing the <Enter> key.
![]()
4.1.4. Variables
![]() A
variable in LOGO is denoted by a: ,
followed by the name of the variable. For example,
A
variable in LOGO is denoted by a: ,
followed by the name of the variable. For example,
TO VARYSQ :SIDE
REPEAT 4 [FD :SIDE RT 90]
END
![]() Now, lets
do on your own with these examples:
Now, lets
do on your own with these examples:
| EXAMPLE 1 TO VARYRECT :W :L REPEAT 2 [FD :W RT 90 FD :L RT 90] END |
EXAMPLE 2 TO HEXAGON :SIDE REPEAT 6 [FD :SIDE RT 60] END |
| EXAMPLE 3 TO POLY :SIDE :ANGLE REPEAT 360/:ANGLE [FD :SIDE RT :ANGLE] END |
EXAMPLE 4 TO ROTATE :SIDE :ANGLE REPEAT 360/:ANGLE [POLY :SIDE :ANGLE LT 90] END |
4.1.5. Examples
Now, let us look at a few examples of procedures:
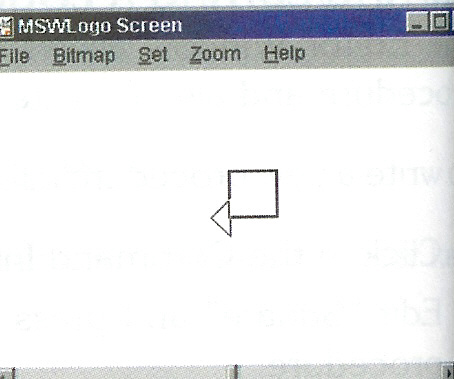
EXAMPLE 1
Procedure to draw a SQUARE:
TO SQUARE
REPEAT 4 [FD 40 RT 90]
END
SQUARE DEFINED
![]() To run the
procedure, type <SQUARE> and press the <Enter> key.
To run the
procedure, type <SQUARE> and press the <Enter> key.
A square gets drawn on the Graphic screen as shown.

EXAMPLE 2
Procedure to draw a CIRCLE:
TO CIRCLE
REPEAT 360 [FD 1 RT 1]
END
CIRCLE DEFINED
![]() To run the
procedure, type <CIRCLE> and press the <Enter> key.
To run the
procedure, type <CIRCLE> and press the <Enter> key.
A circle is drawn in the Graphic Screen.

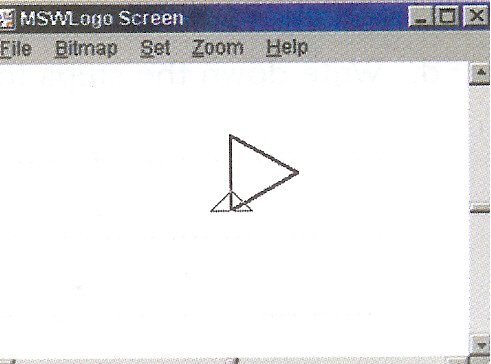
EXAMPLE 3
Procedure to draw a TRIANGLE:
TO TRIANGLE
REPEAT 3 [FD 60 RT 120]
END
TRIANGLE DEFINED
![]() To run the
procedure, type <TRIANGLE> and press the <Enter> key.
To run the
procedure, type <TRIANGLE> and press the <Enter> key.
Then a triangle is drawn in the Graphic Screen.
5.0. EXAMPLES > Some examples
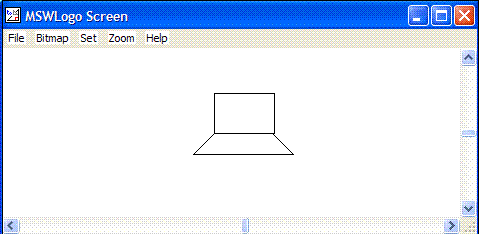
5.1.1. EXAMPLE 1
![]() PROBLEM:
To draw a Computer
PROBLEM:
To draw a Computer
![]() PLANNING: Draw a BOX chart
PLANNING: Draw a BOX chart
![]() CODING THE PROGRAM:
CODING THE PROGRAM:
| CODING 1 (MAIN PROCEDURE) | CODING 2 | CODING 3 | CODING 4 | CODING 5 |
| TO
COMPUTER SCREEN KEYBOARD BASE END |
TO RECT
:L :W REPEAT 2[FD :L RT 90 FD :W RT 90] END |
TO
SCREEN RECT 40 60 END |
TO
KEYBOARD LT 135 FD 30 LT 135 FD 100 LT 135 FD 30 END |
TO BASE PU BK 30 LT 135 RECT 10 100 END |
![]() SAMPLE
RUN: Type <COMPUTER>
SAMPLE
RUN: Type <COMPUTER>
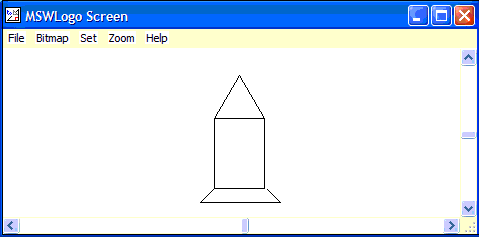
5.1.2. EXAMPLE 2
![]() PROBLEM:
To draw a Rocket
PROBLEM:
To draw a Rocket
![]() PLANNING: Draw a BOX chart
PLANNING: Draw a BOX chart
![]() CODING THE PROGRAM:
CODING THE PROGRAM:
| CODING 1 (MAIN PROCEDURE) | CODING 2 | CODING 3 | CODING 4 | CODING 5 | CODING 6 |
| TO
ROCKET HEAD BODY BASE END
|
TO
TRIANGLE REPEAT 3[FD 50 RT 120] END
|
TO
RECTANGLE REPEAT 2[FD 70 RT 90 FD 50 RT 90] END
|
TO HEAD RT 30 TRIANGLE END
|
TO BODY LT 30 PU BK 70 PD RECTANGLE END |
TO BASE LT 135 FD 20 LT 135 FD 80 LT 135 FD 20 END
|
![]() SAMPLE
RUN: Type <ROCKET>
SAMPLE
RUN: Type <ROCKET>
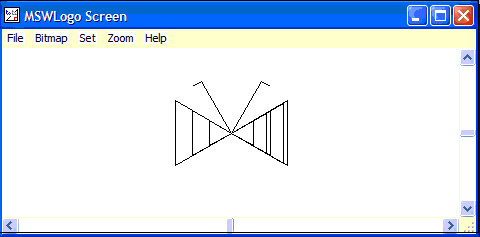
5.1.3. EXAMPLE 3
![]() PROBLEM:
To draw a Butterfly
PROBLEM:
To draw a Butterfly
![]() PLANNING: Draw a BOX chart
PLANNING: Draw a BOX chart
![]() CODING THE PROGRAM:
CODING THE PROGRAM:
| CODING 1 (MAIN PROCEDURE) | CODING 2 | CODING 3 | CODING 4 | CODING 5 | CODING 6 | CODING 7 | CODING 8 |
| TO BFLY LWING RWING ABDOMEN LEFTFEL RIGHTFEL END |
TO
TRISIZE :SIZE REPEAT 3[FD :SIZE LT 120] END
|
TO WING TRISIZE 25 TRISIZE 45 TRISIZE 65 END
|
TO LWING
LT 60 WING END
|
TO RWING RT 180 WING END
|
TO
ABDOMEN TRISIZE 60 TRISIZE 40 END
|
TO
LEFTFEL PU HOME LT 30 PD FD 60 LT 90 FD 10 END
|
TO
RIGHTFEL PU HOME RT 30 PD FD 60 RT 90 FD 10 END
|
![]() SAMPLE
RUN: Type <BFLY>
SAMPLE
RUN: Type <BFLY>
6.0. MESSAGES > Print command in LOGO
6.1.1. Why do you need to print messages in LOGO?
You have drawn shapes and figures by moving the turtle with the help of various LOGO commands. But you cannot use these commands to write any text or message on the screen. Neither can you use these commands to carry out calculations like addition and subtraction on numbers.
Sometimes you may want to write some messages or solve sums. LOGO provides you commands to do so. You will learn how to print text messages on the screen using the <PRINT> Command.
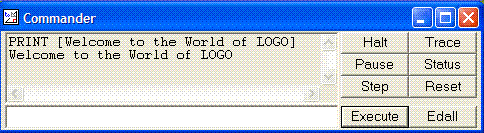
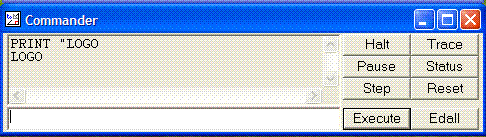
6.1.2. PRINT Command
The <PRINT> command in LOGO is used to print a text on the screen. The short form of PRINT is PR. Message to be printed can consist of one or more words or even a sentence.
The syntax of PRINT command is:
PRINT "word
or
PRINT [sentence]
PRINTING A WORD
If you want to print a single word, the primitive name should be followed by an opening quotation mark before the word to be printed.
Example: PRINT "LOGO
On executing this command the word LOGO gets printed in the Commander Window.
PRINTING A SENTENCE
For displaying a message in the form of a sentence, the message to be displayed should be included within a pair of square brackets.
Example: PRINT [Welcome to the World of LOGO]
This command displays the sentence written within the square brackets in the Output/Command-Recall List box.