 |
|
|
|
|
|
|
|
|
|
|
|
|
|
|
|
|
|
|
|
Install Pictures and Notes! |
|
|
|
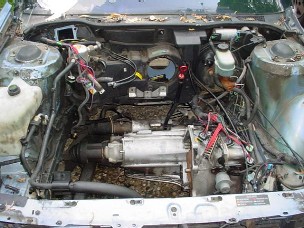
The first thing you need to do is get your engine. In my case I purchased a whole donor vehicle. I had to figure out what all was needed. I knew I needed the engine, wireing harness, PCM (computer) radiator hoses (upper hose used on Fiero during install) and brackets. I didnt have to pull everything at once since the car was sitting next to my garage which is a good thing. Makes it easier. Anyway, I pulled the engine being sure to leave as much attached as possible. I removed hte power steering lines and the AC compressor because I knew I wasnt going to use either one. I also didnt pull the transmisison with the engine because I was useing my 5 speed isuzu tranmission. I disconnected the wireing harness at the big junction block that is just inside the firewall and kept everything attached to the engine. After getting the engine out I put it on my engine stand and removed the PCM. The PCM is located on the passanger side of the dash behind the glove box. Be careful that you dont pull the BCM (Body Control Module) because it's located in front of the PCM. The PCM has 3 connectors on it and the BCM has 2. You DO NOT need the BCM. After getting the engine, wireing and PCM removed I had everything I needed. |
|
|
 |
|
|
 |
|
|
|
|
|
Like I said above I used my Isuzu 5 speed transmission on this swap. A couple of things have to happen in order for that to work. First you need to have a flywheel from a 88 Fiero or a neutraly ballanced flywheel. Then you have to send it out to a machine shop to have the holes filled and redrilled in the same bolt pattern where it bolts to the crankshaft as the Cadillac. You also need a washer installed in the middle so it fits the end of the crank snug. Second you will need to notch the bellhousing on your transmission to clear the massive Cadillac starter. You will also need to get your computer chip reprogrammed to get rid of the transmission inputs/outputs. Mine was programmed by Rockcrawl at www.fieroaddiction.com. He had it done and back to me in a week! Below is a picture of my flywheel after the machine work was completed. Looks pretty good! |
|
|
|
 |
|
|
|
Mounting the engine to my engine cradle was the next task. I did almost exactly the same mounting as www.fieroaddiction.com. I added the angle iron on the rear of my cradle so I could use the factory front engine mount. My friend Stan helped me make the engine mount bracket for the side mount which bolts in the same location as the factory Fiero mount. For mounts I used Polyurethane transmission mounts for a RWD GM vehilce. The mounts are made by Energy Suspension and can be purchased from www.Summitracing.com for $21 each. You will need 2. The part number for the mounts at Summit Racing is:ENS-3-1108R. I'm also going to install a Dogbone mount to the engine. I drove it about 500 miles without one and it does move some. A dogbone will help add some support. I'll have more info on this once I'm finished. I'll also add some pictures of my mounts and mount brackets as soon as I take them. |
|
|
|
BACK |
|
|
|
PAGE 2 |
|
|
|