|

How I make Lake applets
First we need a picture to work with.
get the picture that you want to use ...
I use in that case for now this picture
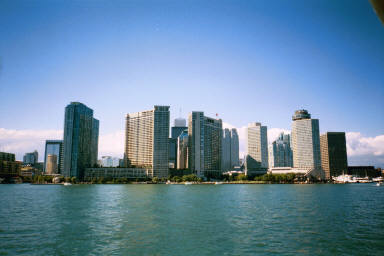
Original picture
This is toronto city
Now right click on the picture with the mouse ;
click on Properties to get the dimensions.
exsamble 384 x 256 remember that we need it later.
To make applets you need some kind of graphics program
that will handle JPG format.
I use Corel 8 photo shop.
to cut the picture that way the applet looks better on the picture
some picture dont need to be cut
if you wanna use a picture with water on ..
Now we cut the picture at the water line and copy it to the clipboard
Chose the principle tool and move down to where the water line starts in
the middle of the picture and cut there the picture ok .


Now click on the Edit menu and chose Copy.
This will copy the top half of
the picture to the clipboard.
Now you should have a picture like that way you like.
"Now we have the picture to make the applet but we still need the
"Lake.class" Java program that makes the whole thing work!
Where do I get that you ask?
Well other people will tell you that you have
to go and down it some where.
Or download the lake class from their site and link back to them..
if you want make a link back to my site is up to you
But I tell you that
you already have the "lake class"
it just don't know where it is at.
If you have looked at
one of my Applets it is in your computer now if you
haven't go look at one now an as soon as you close it
you have every thing
that makes work in your computer.
I am going to show you how to find it
but while you are looking at the
applet go to the top of your browser and click on the
view menu then click on source.
Notepad will open up with the source codes
that make it work. In notepad click on save as in
the box that says applet1 changed it to "applet1.html"
Make sure that you put the quotation marks
at the beginning and end this
tells Notepad to make it a web page. I will show you
how to make this one work too.
Now we are going to get the lake.class Java file we need.
Click on the start button in the lower left corner
of your screen move with
can find the directory you are working with.
Now click on the Start button with the left button
chose find file or folder.
In the file name type lake*.class
In the directory put C: and check sub directories.
And there it is in
C:\WINDOWS\Temporary Internet files "lake[1].class".
Click on it with the left button to highlight it then
click on it with the right button and drag it
to the folder you are working in and chose "COPY HERE".
Now click on it with the right mouse button
and rename to "Lake.class"
now you have the Java file we need to make the applet.
Now open note pad and make the applet by typing .
-------------------------------------------------------
<HTML>
<HEAD>
</HEAD>
<body bgcolor="#000000" text="#B3FFFF"
link="#00FFFF">
<center>
<APPLET code="lake.class" aline="baseline"
width="384" height="300"
id="lake">
<PARAM NAME="image" VALUE="torontocity.jpg">
</APPLET>
</body>
</HTML>
----------------------------------------------------------------------------------------
<HTML>
<HEAD>
</HEAD>
<body>
</body>
</HTML>
To make an applet we will be working between the body
tags.<body> this is the start tag. We will make changes to
it and put the applet in the body.
This is the Body ends tag </body>.Every thing we do goes
between these two tags.
The <center> tag tells the browser to center the applet.
The applet part that we are going to work with is.
<center>
<APPLET code="lake.class"
width="384"
height="300" id="lake">
<PARAM NAME="image" VALUE="torontocity.jpg">
</APPLET>
</center>
The first line.
<APPLET code="Lake.class"
width="384" height="300"
Tells that the applet starts code="lake.class" says
that we are using a JAVA class file called Lake.
width="384" is the Width in pixels of our picture.
height="300" is the height in pixels of the applet and
we need to adjust that. It is usually 2 x the height of the
picture - 10 to 15 pixels.
If there is a gray line at the bottom of the applet make this
number smaller until the gray line is gone.
The second line.
<PARAM NAME="image" VALUE="torontocity.jpg">
Is where we put the name of the picture we are working with. In
this case torontocity.jpg.
The third line.
</APPLET>
Is the end of the applet.
The </center>tag tells the browser to stop centering.
And that is all there is to this applet it should look like this.
the code suppost looks like this
<center>
<APPLET code="lake.class"
width="384"
height="300"
<PARAM NAME="image" VALUE="torontocity.jpg">
</APPLET>
</center>
if you want just copy an paste tis code inside the page that you want
the applet make sure you put the right name
the picture tha you use and the right size of the picture
and make sure the lake applet file is on the same
files where you want to make the page ok
good luck to you and if you need
more help let me know...
just one more lessons...
about to put a frame around the applet?
here the code
<CENTER>
<TABLE BORDER=5 CELLSPACING=0 CELLPADDING=0>
<TR>
<TD>
<APPLET code="lake.class"
width="384" height="300"
<PARAM NAME="image" VALUE="torontocity.jpg">
</APPLET>
</TABLE>
</TR>
</TD>
</CENTER>
and here now the applet with the border
now here the perfect
code to copy and paste to your web page .....
<CENTER>
<TABLE BORDER=5 CELLSPACING=0 CELLPADDING=0>
<TR>
<TD>
<CENTER>
<TABLE BORDER=5 CELLSPACING=0 CELLPADDING=0>
<TR>
<TD>
<APPLET code="lake.class"
width="384" height="300"
<PARAM NAME="image" VALUE="torontocity.jpg">
</APPLET>
</TABLE>
</TR>
</TD>
</CENTER>
</TABLE>
</TR>
</TD>
</CENTER>
� 1999 eros applet

|